Do you use Windows Media Player 11 or 12 as your default media player? Today, we’re going to show you how to add some handy new features and enhancements with the Windows Media Player Plus third party plug-in. Installation and Setup Download and install Media Player Plus! (link below). You’ll need to close out of Windows Media Player before you begin or you’ll receive the message below. 
The next time you open Media Player you’ll be presented with the Media Player Plus settings window. Some of the settings will be enabled by default, such as the Find as you typefeature. 
Using Media Player Plus! Find as you type allows you to start typing a search term from anywhere in Media Player without having to be in the Search box. The search term will automatically fill in the search box and display the results. 
You’ll also see Disable group headers in the Library Pane.  This setting will display library items in a continuous list similar to the functionality of Windows Media Player 10. 
Under User Interface you can enable displaying the currently playing artist and title in the title bar. 
This is enabled by default. 
The Context Menu page allows you to enable context menu enhancements. 
The File menu enhancement allows you to add the Windows Context menu to Media Player on the library pane, list pane, or both. Right click on a Title, select File, and you’ll see the Windows Context Menu. 
Right-click on a title and select Tag Editor Plus. 
Tag Editor Plus allows you to quickly edit media tags. 
The Advanced tab displays a number of tags that Media Player usually doesn’t show. Only the tags with the notepad and pencil icon are editable. 
The Restore Plug-ins page allows you to configure which plug-ins should be automatically restored after a Media Player crash. 
The Restore Media at Startup page allows you to configure Media Player to resume playing the last playlist, track, and even whether it was playing or paused at the time the application was closed. So, if you close out in the middle of a song, it will begin playing from that point the next time you open Media Player. You can also set Media Player to rewind a certain number of seconds from where you left off. This is especially useful if you are in the middle of watching a movie. 
There’s also the option to have your currently playing song sent to Windows Live Messenger.  ...
Read more »
...
Read more »
|
A new feature in Windows Media Player 12, which is included with Windows 7, is being able to stream media over the web to other Windows 7 computers. Today we will take a look at how to set it up and what you need to begin. Note: You will need to perform this process on each computer that you want to use. What You’ll Need - Two computers running Windows 7 Home Premium, Professional, or Ultimate. The host, or home computer that you will be streaming the media from, cannot be on a public network or part of domain.
- Windows Live ID
- UPnP or Port Forwarding enabled on your home router
- Media files added to your Windows Media Player library
Windows Live ID Sign up online for a Windows Live ID if you do not already have one. See the link below for a link to Windows Live.  Configuring the Windows 7 Computers Open Windows Media Player and go to the library section. Click on Stream and then "Allow Internet access to home media.”  The Internet Home Media Access pop up window will prompt you to link your Windows Live ID to a user account. Click "Link an online ID.” 
If you haven’t already installed the Windows Live ID Sign-In Assistant, you will be taken to Microsoft’s website and prompted to download it. 
Once you have completed the Windows Live download assistant install, you will see Windows Live ID online provider appear in the "Link Online IDs” window. Click on "Link Online ID.” 
Next, you’ll be prompted for a Windows Live ID and password. Enter your Windows Live ID and password and click "Sign In.” 
A pop up window will notify you that you have successfully allowed Internet access to home media. 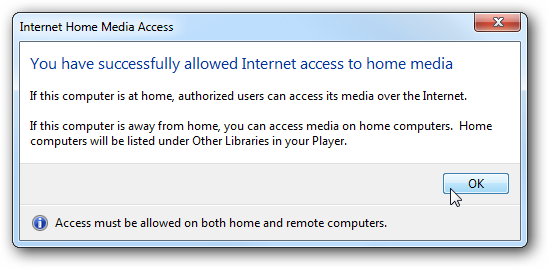
Now, you will have to repeat the exact same configuration on the 2nd Windows 7 computer. Once you have completed the same configuration on your 2nd computer, youmight also need to configure your home router for port forwarding. If your router supports UPnP, you may not need to manually forward any ports on your router. So, this would be a good time to test your connection. Go to a nearby hotspot, or perhaps a neighbor’s house, and test to see if you can stream your media. If not, you’ll need to manually forward the ports. You can always choose to forward the ports anyway, just in case. Note: We tested on a Linksys WRT54GL router, which supports UPnP, and found we still needed to manually forward the ports. Finding the ports to forward on the router Open Windows Media Player and make sure you are in Library view. Click on "Stream” on the top menu, and select "Allow Internet access to home media.”  On the "Internet Home Media Access” window, click on "Diagnose connections.” 
The "Internet Streaming Diagnostic Tool” will pop up. Click on "Port forwarding information” near the bottom. 
On the "Port Forwarding Information” window you will find both the Internal and External Port numbers you will need to forward on your router. The Internal port number should always be 10245. The external number will be different depending on your computer. Microsoft also recommends forwarding port 443.
...
Read more »
|
Are you a Zune owner who prefers the Zune player for media playback? Today we’ll show you how to integrate the Zune player with WMC using Media Center Studio. You’ll need to download Media Center Studio and the Zune Desktop player software. (See download links below) Also, make sure you have Media Center closed. Some of the actions in Media Center Studio cannot be performed while WMC is open. Open Media Center Studio and click on the Start Menu tab at the top of the application.  Click the Application button. 
Here we will create an Entry Point for the Zune player so that we can add it to Media Center. Type in a name for your entry point in the title text box. This is the name that will appear under the tile when added to the Media Center start menu. Next, type in the path to the Zune player. By default this should be C:\Program Files\Zune\Zune.exe. Note: Be sure to use the original path, not a link to the desktop icon.  The Active image is the image that will appear on the tile in Media Center. If you wish to change the default image, click the Browse button and select a different image. Select Stop the currently playing media from the When launched do the following: dropdown list. Otherwise, if you open Zune player from WMC while playing another form of media, that media will continue to play in the background.  Now we will choose a keystroke to use to exit the Zune player software and return to Media Center. Click on the the green plus (+) button. 
When prompted, press a key to use to the close the Zune player. Note: This may also work with your Media Center remote. You may want to set a keyboard keystroke as well as a button on your remote to close the program. You may not be able to set certain remote buttons to close the application. We found that the back arrow button worked well. 
You can also choose a keystroke to kill the program if desired. 
Be sure to save your work before exiting by clicking the Save button on the Home tab.  Next, select the Start Menu tab and click on the next to Entry points to reveal the available entry points. 
Find the Zune player tile in the Entry points area. We want to drag the tile out onto one of the menu strips on the start menu. We will drag ours onto the Extras Library strip. When you begin to drag the tile, green plus (+) signs will appear in between the tiles. 
When you’ve dragged the tile over any of the green plus signs, the red "Move” label will turn to a blue "Move to” label. Now you can drop the tile into position. 
Save your changes and then close Media Center Studio. 
When you open Media Center, you should see your Zune tile on the start menu. When you select the Zune tile in WMC, Media Center will be minimized and Zune player will be launched. 
Now you can enjoy your media through the Zune player. When you close Zune player with the previously assigned keystroke or by clicking the "X” at the top right, Windows Media Center will be re-opened.
...
Read more »
|
One of the new trends in computing is the use of desktop gadgets which are small applications that run on your desktop. If you like desktop gadgets for work or play today we will check out the ones available from Google and how to get them. The first thing you will need to do is download and install Google Desktop. You may think of this as a free product offered from Google that will index email, files, and web history on your computer for faster searching and access. While it does offer faster searching for computer items, when you install Google Desktop you’re not required to include the enhanced search features. We will cover the indexing and other enhanced features of Google Desktop in future posts. 

For the sake of this article we are only going to install the Sidebar with Gadgets. The desktop gadgets will work with a basic install and no additional features. 
After installation there will be a sidebar shown with some gadgets like an analog clock and notepad. The bar can be minimized or placed on different areas of the desktop. To find and install new gadgets for your interests Right-click and select "add gadgets”. 
This will pull up a menu of different gadgets available where you can browse through different categories or search for specific ones. In this instance it’s adding the Music Player gadget. 
After choosing the gadget there may be a description and note and just click OK. 
New gadgets will be placed in the sidebar and you can easily unlock them and move anywhere on your desktop.  

These can be a lot of fun and productive and for XP users it can really transform your desktop to a more modern look and feel. Google Desktop Gadgets are also available for Linux and Mac OS X users. 
Download Google Desktop Gadgets for Windows, Linux, or Mac
|
Are you tired of the same Windows Media Center look and feel? Today we’ll show you how change the background and apply themes to WMC. Changing the Basic Color Scheme in WMC There are a couple of very basic color scheme options built in to Windows 7 Media Center. From the WMC Start Menu, select Settings on the Tasks strip and then select General. On the General settings screen select Visual and Sound Effects.  Under Color scheme you’ll find options for Windows Media Center standard, High contrast white, and High contrast black. Simply select a color scheme and click Save before exiting.  If you have used Media Center before you are familiar with the standard blue default theme. 
There is also the high contrast white. 
And, the high contrast black. 
Changing the Background Image with Media Center Studio Themes and custom backgrounds need to be added with the third-party software, Media Center Studio. You can find the download link at the end of this article. You can use your own high resolution photo, or download one from the Internet. For best results, you’ll want to find an image that meets or exceeds the resolution of your monitor. Also, using a darker colored background image is ideal as it should contrast better with the lighter colored text of the start menu. Once you’ve downloaded and installed Media Center Studio (link below), open the application select the Home tab on the ribbon and make sure you are on the Themes tab below. Click New. 
Select Biography from the left pane and type in a name for your new theme.  Next, click on the triangle next to Images to expand the list below. You’ll want to browse to Images > Common > Background. You should see a list of PNG image files located below Background. We will want to swap out the COMMON.ANIMATED.BACKGROUND.PNG and the COMMON.BACKGROUND.PNG images. Select COMMON.ANIMATED.BACKGROUND.PNG and click on the Browse button on the right.  Browse for your photo and click Open. 
Your selected image will appear on the left pane. Now, do the same for the COMMON.BACKGROUND.PNG. When finished, select the Home tab on the ribbon at the top and click Save.  Now switch to the Themes tab on the ribbon and the Themes tab below. (There are two Themes tabs which can be a bit confusing). Select your theme on the right pane and click Apply. Note: You won’t see the image backgrounds displayed. 
Your theme will be applied to Media Center. 
Close out of Media Center Studio and open Windows Media Center to check out your new background.  You can load multiple backgrounds images and switch them periodically as your mood changes. You might like to find a nice background featuring your favorite movie or TV show.  ...
Read more »
...
Read more »
|

Not a day passes by without doing an online search. You may know of basic search operators like AND, OR, etc. but an increasing number of web applications support even more keywords that’ll help you fine tune your search to the core. Here are some you may have never heard of. This is a guest post by Shankar Ganesh 1. Google: Use AROUND(n) for proximity searchChances are you’ve never heard of Google’s AROUND(n) search operator. Using the AROUND(n) operator, you can specify the distance between two search terms. 
For example, searching for obama AROUND(5) osama will return only those web pages that contain both these terms at a distance of five words. Could come in handy when you’re searching for name aliases, among other things. If you’re interested, check out this list containing relatively lesser known Google search operators. 2. Gmail: Search super-starred emailsStarring emails is one indispensable feature in Gmail and you’ve probably enabled Superstars labs addon. This feature gives you additional star icons to mark your messages so that you can differentiate important emails. What many people don’t know is that you can search and find messages that have been marked by a specific star. For example, has:blue-info will restrict search results to those emails that are marked with a blue info star and not others. 
Here are other search operators that you can use to find super-starred emails in Gmail: has:yellow-star (or l:^ss_sy)
has:blue-star (or l:^ss_sb)
has:red-star (or l:^ss_sr)
has:orange-star (or l:^ss_so)
has:green-star (or l:^ss_sg)
has:purple-star (or l:^ss_sp)
has:red-bang (or l:^ss_cr)
has:yellow-bang (or l:^ss_cy)
has:blue-info (or l:^ss_cb)
has:orange-guillemet (or l:^ss_co)
has:green-check (or l:^ss_cg)
has:purple-question (or l:^ss_cp)
You really should thank the Google Operating System blog for bring these to light. 3. Gmail: Add Instant Search with CloudMagicGmail search simply leaves a lot to be desired. At least, in terms of speed. It’s pretty slow, especially if you have archived plenty of messages in your Gmail account. Enter CloudMagic– an addon for Firefox and Chrome that adds an instant search bar to Gmail. 
Give your Gmail account credentials (don’t worry, they’re stored locally) and then click Ctrl + / to put the focus on the CloudMagic search bar. Start typing. Matching emails show up instantly as you type. If you live and die by Gmail, you gotta have CloudMagic installed. No excuse! 4. Bing: Find a new wallpaper in secondsGoogle lets you use the imagesize operator to specify a resolution for image search results. You might have used this operator to search for wallpapers that satisfy your screen resolution. For example, searching for [nature imagesize:1366x768] will return pictures that are of that size. 
Bing fares better in this arena. Just visit bing.com/images, type in your search term and choose Size > Wallpapers from the left panel. Bing will now show pictures that match your screen resolution. You needn’t explicitly specify it. One caveat: it doesn’t work if you have dual monitors. Hat tip: Labnol. 5. Evernote: Search notes based on the source they came fromIf you’re an Evernote junkie, chances are you use it to dump stuff from a multitude of applications. What if you want to restrict searches to notes from a particular source? It’s easy, thanks to the built-in source operator.  ...
Read more »
...
Read more »
|
If you’re running iTunes on a Windows machine, you might be frustrated with how slow it loads and performs. Here are some tips for getting better performance and make it less annoying. There are certainly other factors that cause iTunes to run slow such as how many apps you have running at the time and how powerful the machine is. But we can make some adjustments to the settings in iTunes to help speed it up. Note: Here we look at tips for getting better performance out of iTunes. Each user is different, so you might not want to disable certain features if you’re happy with them. Install iTunes Faster You can actually make your installation of iTunes go more quickly by disabling a few things while going through the Setup Assistant. If you have a lot of songs in you’re my Music folder, iTunes will want to add them all. If you want to get down to business and not wait while it searches the folder to add songs uncheck both options. ![sshot-2010-07-26-[21-25-41]](http://www.howtogeek.com/wp-content/uploads/2010/07/sshot20100726212541.png "sshot-2010-07-26-[21-25-41]")
Another thing you can do to help improve performance and have more accurate data is to not let iTunes keep your media folder organized. This also gives you more control over your music collection, which will be appealing to the serious music enthusiast. 
Disable Unused Services Apple assumes you own an iPod, Apple TV, iPhone, and other Apple products. So there are services that are enabled by default to find them. If you don’t have the devices, let’s start by disabling them. Open iTunes and go to Edit \ Preferences. 
Then click the devices tab and uncheck Look for remote speakers connected with AirTunesand Look for iPod touch, iPhone, and iPad Remotes. 
If you don’t have an Apple TV or don’t want it to check for it during startup uncheck Look for Apple TVs. 
If you’re running iTunes on a stand alone machine another thing you might want to do is go to the Sharing tab and uncheck Look for shared libraries. 
Delete Smart Playlists If you’re really serious about making iTunes load and run faster, then disable Smart Playlists. Some users love this feature an can’t live without it. But if you want to make iTunes load almost instantly, delete them. You can still create your own playlists and it doesn’t slow down performance as much as the Smart Playlists. 
When deleting a playlist, you’ll get a message asking if you’re sure. Check Do not ask me again and continue deleting the default playlists. 
Disable Genius If you haven’t turned Genius on, then don’t. If you have it enabled then turn it off. While it’s enabled you’ll notice that it’s doing a lot of things in the background, taking up resources. 

Turn off Cover Flow While the Cover Flow feature offers some cool "eye candy”, it can run slow, especially on older systems. The other problem with it is you have to flip through album by album and that can be inconvenient.  ...
Read more »
...
Read more »
|

Photoshop is not always the most user friendly of programs. Sometimes it has frustrating issues, and the solution is not always clear. Here’s a list of 10 annoying problems you might have with Photoshop, and simple solutions to fix them. They’ll range from simple to complex, some dealing with why the program won’t let you use your cursor tools, or why your cursor has changed shape. Read on to see the list, and what you can learn to make your graphics editing experience more pleasant and productive.
Your Cursor Disappears or Changes Shape
The Problem: After working with some type or some other tool, only to return to the brush to find that your cursor has changed shape, and is difficult to see. What the heck has happened?  
The Solution: If your cursor looks like the ones directly above, you’ve probably switched to "precise cursors.” A simple press of the Caps Lock key will return them to normal. You can also change them under your preferences, shortcut key Ctrl + K.
Your Panels Keep Disappearing
The Problem: Uncertain what you’ve done, all your panels have vanished from your screen. The menu is still available, but what has caused them all to go away? 
The Solution: Normally, all panels are hidden by a quick press of the Tab key, often by accident. A single press hides all active panels, and a second one brings them back as they were, no need to reactivate them under the Window menu.
Your Brush Tool (Or Others) Have Stopped Working
The Problem: You’re trying to paint, erase, clone stamp, heal brush, etc, and Photoshop simply won’t make a mark on your canvas or let you use your tools like normal.   
The Solution: This can be one of several problems. Go to Select > Deselect if you have an area selected with the marquee tool that you might have forgotten or can’t see. From there, Navigate to your channels panel, and check that you’re not working in a quick mask channel, or any other extraneous channel. If you are, click the combined RGB channel (pictured above, center) or the combined CMYK channel, if you happen to be working in CMYK. You should also be able to see if you are in a mask channel, another potential pitfall. If you are working in Quickmask mode (pictured above right) you can press shortcut key Qto return to normal, or simply click the icon in your toolbox.
Clipboard Export Error When Switching Programs
The Problem: Photoshop hangs up every time you try to switch programs, and often gives you a strange error about the clipboard. 
The Solution: Press shortcut key Ctrl + K to bring up your preferences and under
...
Read more »
|
If you have the Starter Edition of Windows 7 installed on your netbook you may be sick of looking at the default wallpaper. With Starter Background Changer you can access other customization options with ease. Before There is not a lot that you can say about the singular default wallpaper included with the Starter Edition…it just kind of sits there all boring like. 
Installing Starter Background Changer Since the installer part of the program is in French we have the entire set of install windows shown here with the appropriate buttons highlighted to get you through the whole process without any problems. 


Using Starter Background Changer Once the installation process has finished you will simply see a quiet screen with no desktop icons or Start Menu entries visible. Now if you are wondering at this point "Did the program finish installing or did it install at all?” the answer is yes. Right click on your desktop and you will notice a new entry on the Context Menu…the same one that is included in the other editions but not Starter. Time to have some fun… 
The Personalization Window will open maximized but we have reduced it here for our screenshots. You have four regular categories to choose from in the lower part of the window: Wallpaper, Colors, Sounds, & Screensavers. 
The first category that we chose for our example was Wallpaper. As you can see here the main display area (My Collection) has no wallpapers showing at the moment. You can use the drop-down menu to access your My Pictures Folder or browse for a different location. Notice that you can choose how the image fills the screen and set up a timed wallpaper slideshow at the bottom. 
Any picture (or pictures) selected will be added to the My Collection display for easy access the next time you open the window. Once you choose a picture click on Validate the modification to set the wallpaper for your desktop and return to the main window. 
When you return to the main window you will see a preview for your selection. At this point you can simply close the window or make further adjustments in the other categories. 
Starter Background Changer provides easy one-stop access to other customization areas. We started off with Colors… 
Followed by Sounds… 
And finally Screensavers. 
Before you do close the main window you can take a quick look at the Options if desire
...
Read more »
|
The Commodore 64 was one of the bestselling home computers ever, and many geeks got their first computing experience on one of these early personal computers. Here’s an easy way to revisit the early years of personal computing with a theme for Windows 7. With only 64Kb of ram and an 8 bit processor, the Commodore 64 is light-years behind today’s computers. But with a Windows 7 themepack, you can turn back the years and give your computer a quick overhaul to look more like its ancient predecessor. Age Windows 7 with a click Download the Commodore 64 theme from PC World (link below), and unzip the files. 
Now, double-click on the Themepack file to apply the theme. 
This will open your Personalization panel and will automatically change your system fonts, window style, background, and more. 
Your desktop will go from your Windows 7 look… 
to a modified Windows 7 look that is reminiscent of the Commodore 64. 
Open an application to see all the changes … notice the old-style font in the Window boarder and menus. 
This theme also changes your Computer, Recycle Bin, and User folder icons to Commodore 64-inspired icons. 
And, if you want to go back to the standard Windows 7 look and feel, it’s only a click away in the Personalization dialog. Right-click on your desktop, select Personalize, and then choose the theme you want.  Conclusion Although this doesn’t give you the real look and feel of the Commodore 64, it is still a fun way to experience a bit of computer nostalgia. There are tons of excellent themes available for Windows 7, so check back for more exciting ways to customize your desktop! Link Download the Commodore 64 theme for Windows 7
|
Windows Phone 7 offers a unique and exciting UI that displays lots of information efficiently on the screen. And with a simple Rainmeter theme, you can have the same UI and content directly on your Windows 7 desktop. Turn your Desktop into a Windows Phone 7 lookalike To give your Windows 7 desktop a Windows Phone 7 makeover, first you need to have the free Rainmeter application installed. If you do not have it installed, download it from the link below and run the setup. Accept the license agreement, and install it with the default settings. 
By default Rainmeter will automatically run when you start your computer. If you do not want this, you can uncheck the box during the setup. 
Now, download the Omnimo UI theme for Rainmeter (link below). You will need to unzip the folder first. 
This theme uses the Segoe UI and the Segoe UI Light font, so Windows Vista users need to install the segoeuil.ttf font first, and XP users need to install both the segoeui.ttf and the segoeuil.ttf font first. Copy the appropriate fonts to C:\Windows\Fonts, or in Vista double-click on the font and select Install. 
Now, run the Rainmeter theme setup. Double-click on the Rainstaller.exe in the Omnimo folder. 
Click Express install to add the theme and skin to Rainmeter. 
Click Finish, and by default Rainmeter will open with your new theme. 
When the new theme opens the first time, you will be asked to read the readme, or simply go to the gallery. 
When you open the gallery, you can choose from a wide variety of tiles and gadgets to place on your desktop. You can also choose a different color scheme for your tiles. 
Once you’re done, click the X in the top right hand corner to close the Gallery. Welcome to your Windows Phone 7 desktop! Many of the gadgets are dynamic, and you can change the settings for most of them. The only thing missing is the transition animations that Windows Phone 7 shows when you launch an application. 
To make it look even more like Windows Phone 7, you can change your background to black. This makes the desktop theme really dramatic. 
And, if you want to add gadgets or change the color scheme, simply click on the + logo on the top. 
Windows Phone 7 Desktop Wallpapers If you’d prefer to simply change your background, My Microsoft Life has several very nice Windows Phone 7 wallpapers available for free. Click the link below to download these and other Microsoft-centric wallpapers. 


If you can’t wait to get the new Windows phone 7, this is a great way to start experiencing the beauty of the
...
Read more »
|
Are you looking for a way to easily change your desktop background periodically throughout the day? Today we look at using the desktop slideshow feature in Windows 7 that will automatically change the wallpaper at different time intervals. Using Desktop Slideshow To create your slideshow right-click on the desktop and click Properties. 
Click on Desktop Background located at the bottom of the window. 
Now hold down the Ctrl button on your keyboard and select each picture you would like to show on the desktop. Then choose the amount of time to to change the pictures, you can select from 10 seconds all the way up to a full day. Click the box next to Shuffle to vary them up even more. 
After you’ve enabled this setting you’ll notice it says Slide Show under Desktop Background. 
If you’d rather not muck around in the properties panel to add new wallpaper, you can simply head into the folder with all of your pictures, wallpapers, or photos, select the ones you want and use "Set as desktop background” from the right-click menu. 
Once you’ve enabled the desktop slideshow, if you want to skip over to the next wallpaper you can simply right-click on the desktop and then use "Next desktop background” from the menu. 
This is a great way to add variety to your desktop, show off some pictures you’ve taken, or just mess around with while you’re bored at work.
|
Want to change out the icons on your desktop and more? Personalizing your icons is a great way to make your PC uniquely yours, and today we show you how to customize your Windows icons. Change the icon for Computer, Recycle Bin, Network, and your User folder Right-click on the desktop, and select Personalize. 
Now, click the "Change desktop icons” link on the left sidebar in the Personalization window. 
The window looks slightly different in Windows Vista, but the link is the same. 
Select the icon you wish to change, and click the Change Icon button. In Windows 7, you will also notice a box to choose whether or not to allow themes to change icons, and you can uncheck it if you don’t want themes to change your icon settings. 
You can select one of the other included icons, or click browse to find the icon you want. Click Ok when you are finished. 
Change Folder icons You can easily change the icon on most folders in Windows Vista and 7. Simply right-click on the folder and select properties. 
Click the Customize tab, and then click the Change Icon button. This will open the standard dialog to change your icon, so proceed as normal. 
This basically just creates a hidden desktop.ini file in the folder containing the following or similar data: [.ShellClassInfo]
IconFile=%SystemRoot%\system32\SHELL32.dll
IconIndex=20
You could manually create or edit the file if you choose, instead of using the dialogs. Simply create a new text file named desktop.ini with this same information, or edit the existing one. Change the IconFile line to the location of your icon. If you are pointing to a .ico file you should change the IconIndex line to 0 instead. Note that this isn’t available for all folders, for instance you can’t use this to change the icon for the Windows folder. In Windows 7, please note that you cannot change the icon of folder inside a library. So if you are browsing your Documents library and would like to change an icon in that folder, right-click on it and select Open folder location. Now you can change the icon as above. 
And if you would like to change a Library’s icon itself, then check out this tutorial: Change the icon of any file type Want to make you files easier to tell apart? Check out our tutorial on how to simply do this: Change the icon of any Application Shortcut To change the icon of a shortcut on your desktop, start menu, or in Explorer, simply right-click on the icon and select Properties. 
In the Shortcut tab, click the Change Icon button. 
...
Read more »
|
Do you like to customize the Windows interface, and tired of the standard log on screen in Windows 7? Today we take a look at Windows 7 Logon Background Changer which is a free and Open Source app that lets you easily customize the logon screen. Windows 7 Logon Background Changer This cool app is free, Open Source, and lets you change the wallpaper on the Windows 7 Logon screen. It doesn’t require installation, and won’t change any of the system files. The download is a small zip file that contains an executable you can run from a flash drive, and also an installer in the Setup folder if you choose to install it. 
After launching Background changer, you can browse through the standard Windows backgrounds to get an idea of how it will look. 
If you don’t want to use the standard Windows backgrounds, you can add your own folder of images. 
After you’ve selected the background you want, click on the Apply button in the upper right hand corner. 
Click Yes on the authorization screen. 
Click Yes to User Account Control if it comes up. 
The wait a bit while the background is applied. 
Now you can log off to see how the new background will look when you or another user signs in. 
There are some different settings you can select like resetting back to the default pictures folder, preventing other users from changing the background, and adjust shadows. 
Conclusion There are several apps out there that will tweak the logon background, but this one from Julien Manici is one of the better ones that I’ve found. It’s easy to use and has a nice amount of features for tweaking the background. If you like to tweak and customize your Windows 7 interface, you’ll definitely want to take a look at this app. Download Windows 7 Logon Background Changer Windows 7 Logon Background Changer Homepage
|
For some users, changing Windows desktop wallpaper to a personal photo is one of their first tasks after a new install. Today, instead of using a photo, we’ll look at how to create a personal video with Windows Live Movie Maker and then set it as a Windows DreamScene. Windows DreamScene is a utility only available in Vista Ultimate that allows users to set a video as desktop wallpaper. Recently we’ve looked at ways to set a video as your desktop Wallpaper using VLC Media Player and how to enable Windows DreamScene in any version of Windows 7 or Vista. Now we’ll give DreamScene a personal touch with Windows Live Movie Maker. Installation Download and install Windows Live Movies Maker. The software itself comes bundled as part of Windows Live Essentials. However, you don’t have to install any of the programs you may not want. You’ll find the download link below.  On the You’re almost done screen, make sure to uncheck boxes for any unwanted options before hitting Continue. 
Open Windows Live Movie Maker and add your video clip by selecting the Add videos and photos button on the Home tab, or by dragging and dropping the clip onto the storyboard. 
First thing we will do is edit our video by clipping out unwanted sections. You can navigate through the video by dragging the slider on the storyboard, the slider under the Preview window, or one frame at a time with the Next frame / Previous frame buttons. 
You can remove unwanted portions two ways. Split the video and delete sections, or Trim the video and keep the area within the trim. To Split the video into sections, move the preview slider to the location in the video clip where you’d like to split it, and select Split. 
Select that unwanted section and click Delete. 
If you want to "Trim” the video and keep the area within the trim, select the Trim button on the ribbon. 
Drag the sliders below the preview windows to select the are you wish to keep. The area outside the sliders is removed from the movie. The area inside is the section that is kept in the movie. Since our DreamScene will be looping repeatedly, try to trim the beginning and end of the video in a way to make playback as seamless as possible. 
Audio If you’d like to remove or reduce the background audio, select the Edit tab, then the Video volume button. Move the slider all the way to the left to mute all sounds. 
You can add music to the clip if you’d like. Click the Add music button on the Home tab and select Add music. Note: If you want to add music and don’t want to audio from the video itself, mute the audio before adding the music. 
You’ll see the music track added to your project on the storyboard. You can fade the music in and out by selecting the options on the ribbon. 
When you are finished, you’re ready to output you video. Select the icon at the top left, then select Save movie and click one of the options. Since we are using our video for desktop wallpaper, selecting Standard, widescreen, or one of the HD options (if your recorded in high definition) is best. All video are exported as WMV files and thus will work as DreamScenes.  Enable DreamScene
...
Read more »
|

Your desktop doesn’t have to be a boring graveyard for lost and forgotten files anymore! Transform it with BumpTop into 3D desktop that help you keep organized. Like a real desk. Create the desktop that suits your needs and style. There’s nothing about the installation, you just keep on pressing "Forward” and you are done. When you launch BumpTop for the first time, you’ll be taken in tutorial to show you how to use BumpTop efficiently, it doesn’t last more than a minute so make sure you watch it. 
Features:Right after the tutorial you’ll see you shiny new 3D desktop. Let’s start using the new desktop by learning some basics. 
Right-Click Options:You right-click menu is now replaced by BumTop’s menu, but you can still access your normal menu by choosing more. 
Piles:You can make piles of files, photos and folders just like how you do in real life. You can do this by selecting them and drag across the pile icon that appears without letting go of the mouse as described below: 
Walls:You can pin stuff to the walls, like photo frames or TO-DO notes and when you want to have better view of the wall, simply double-click it. 
Setting Window:BumpTop comes with plenty of setting you can choose from including the infinite desktop mode that allows you to have no boundaries or fixed size for your desktop. 
Themes:The best thing in BumpTop is you can customize it with themes. It makes you feel like you are in a different room or went to somewhere else! You can download themes or you can create your own room. 
Download BumpTop [via Brothersoft.com] BumpTop themes [via Customize.org]
|
Do you love how Stacks look in Mac OS X and want to add that kind of functionality to your Windows system? Here we look at 7Stacks which gives you a similar experience. Note: Stacks attach to the Taskbar in Windows 7 and to the Quick Launch Toolbar in Vista and XP. Setting Up Your New Stacks Installation of 7Stacks is simple and straightforward. As soon as you start the app you can immediately begin creating stacks using this window. Notice that you will need to choose between two browsing options to "add” the appropriate folder for your new stack. The "SF Button” is for "special folders” and the "… Button” is for adding any regular folder that you desire. We decided to begin with a regular folder first. Note: The default "Stack Type” is "Vertical Stack”. 
We browsed until we found the Internet Browsers folder from our start menu, selected it, and clicked "OK”. 
As you can see more details are filled in now such as "Target Path” and the "Caption/Name” for this particular stack. Once you have things sorted click on "Create Shortcut on Desktop”. Note: You may want to deselect the "Show Explore Item” option if you do not want to access the "stack’s originating folder” using Windows Explorer and wish to cut down on "clutter” in your stacks. 
Here is our new "Stack Shortcut” on the Desktop… 
In Windows 7 right click on the shortcut and select "Pin to Taskbar”. For those using Windows Vista and XP drag the shortcut to your "Quick Launch Toolbar”. 
There is our first stack full of browser shortcut goodness. 
If you want access to the shortcuts in one of the folders in the stack click on it and it will open ("shift into focus”) as shown here. 
Whenever you are ready to create a new stack right click on any existing "stack icons” and select "Create a new stack”. 
This time we decided to create a stack for a "special folder” and use "Grid” as the "Stack Type”. 
When you click on the "SF Button” you will see a "classic start menu styled” menu. You can choose one of the preset choices in the main area or browse through the "Start Menu, Common Folders, & Other” sub-areas. Here we chose "My Pictures”… 
Once again click on "Create Shortcut on Desktop” to finish your new stack and add it to your "Taskbar or Quick Launch Bar”. 
Here is our "Pictures Stack” using the "Grid Setting”. Looking good… 
For our final addition we created a stack for "My Documents” using the "Menu Stack Type”. 
Not bad at all. Notice how the folders are set up for easy content browsing. 
...
Read more »
|
Windows DreamScene was a utility available for Vista Ultimate that allowed users to set video as desktop wallpaper. It was dropped in Windows 7, but we’ll take a look at how to play DreamScenes in all versions of Windows 7 or Vista. Downloading DreamScenes First, you’ll need to find some DreamScenes to download. We’ve found some nice ones at both DreamScene.org and DeviantArt. You can find those download links at the end of the article. They’ll come as compressed files, so you’ll need to extract them after downloading. 
Windows 7 DreamScene Activator If you are running Windows 7 you can use Windows 7 DreamScene Activator. This free portable utility enables DreamScene in both 32 & 64 bit versions of Windows 7. Users can then set either MPG or WMV files as desktop wallpaper. Download and extract the Windows 7 DreamScene Activator (link below). Once extracted, you’ll need to run the application as administrator. Right-click on the .exe and select Run as administrator. 
Click on Enable DreamScene. This will also restart Windows Explorer if it is open. 
To play your DreamScene, browse for the file in Windows Explorer, right-click the file and select Set as Desktop Background. 
Enjoy your new Windows 7 DreamScene.  Although it says it is for Windows 7 only, we were able to get it to work with no problems on Vista Home Premium x32 as well. 
You can Pause the DreamScene at anytime by right-clicking on the desktop and selecting Pause DreamScene. 
When you are ready for a change, click Disable DreamScene and switch back to your previous wallpaper. 
Using VLC Media Player Users of all versions of Windows 7 & Vista can enable a DreamScene using VLC. Recently, we showed you how to set a video as your desktop wallpaper in VLC. Since DreamScenes are in MPEG or WMV format, we will use the same tactic to display them as desktop wallpaper. We’ll just need to make a few additional tweaks to the VLC settings. You’ll need to download and install VLC media player if you don’t already have it. You can find the download link below. Next, select Tools > Preferences from the Menu. 
Select the Video button on the left and then choose DirectX video output from the Output dropdown list. 
Next, select All under Show Settings at the lower left, then select the Video button on the left pane. Uncheck Show media title on video. This will prevent VLC from constantly showing the title of the video on the screen each time the video loops. Click Save and the restart VLC.  Now we will add the video to our playlist and set it to continuously loop. Select View > Playlist from the Menu. 
Select the Add file button from the bottom of the Playlist window and select Add file.  ...
Read more »
...
Read more »
|
VLC media player is terrific for playing all kinds of media files on your system but you may not care for the native look. We have a great collection of skins to help get you started on removing the "blah factor” and make VLC a lot more fun to look at. Default Skins & Adding New OnesWhen you install VLC Media Player it has a basic, native look to it. If you are just interested in functionality then it is not a problem, but if you like something with a bit more attitude then a few minutes work will terminate the problem. 
The first step is to navigate to VLC’s Program Files folder and access the skins subfolder. You will see the .vlt file for the default skin included with your VLC installation. Note: Unless you changed the folder name for VLC when installed (as shown here), look for a folder named VideoLAN. 
Simply drag and drop the skins that you have downloaded into this folder. Now for the next step. 
Go to the Tools Menu and access Preferences. 
When the Preferences Window opens go to the Interface Settings section (it should display by default). Select the Use custom skin setting and click Save. You will need to restart VLC for the changes to take effect. 
As you can see the default skin has a nice, clean look to it but now you get to start having fun. 
Right click on the top bar, go to Interface, then Select skin, and choose the skin you would like to use. That is all there is to it. Note: You will not need to manually restart VLC for the change to take effect. 
Recommended SkinsNote: Most of the download links open the VLC Skins Homepage but others are off-site. Alienware Darkstar 
Download TRANSFORMERS vlc skin Note: The skin will need to be extracted from a .rar file. 
Download SilentVLC Note: The skin will need to be extracted from a .zip file. 
Download VLC Darkness  ...
Read more »
...
Read more »
|
Do you want a quicker way to access Chrome’s special pages (instead of using the menus or typing in the special URLs)? Now you can access them easily using a single button with the Chrome Page extension. Installation You will see a confirmation message window during the installation process…simply click "Install” to finish adding Chrome Page to your browser. 
Once installation is complete you will see your new "Toolbar Button” and a quick message about managing your extensions. 
As you can see there are no options that you have to bother with for the extension… Nothing but click-and-go goodness. 
Chrome Page in Action To get started viewing any of Chrome’s special pages simply click on the "Toolbar Button” and select the desired page from the list. 
A close-up view of the drop-down menu. 
Here are some samples of the special pages that you can access with the drop-down menu. With the "Chrome Version Page” you can check to see which version of "Chrome, Webkit, & V8” that you are using and see the User Agent. 
View all of the installed plug-ins on the "Plugin Page”… 
You can easily access/view the contents of the cache with the "Cache Page”. 
Curious about memory usage at any particular moment? View memory stats quickly in the "Memory Page”. 
View histograms easily in the "Histograms Page”… 
And just for fun you can even simulate a crash! 
Conclusion If you have been wanting a quick and easy way to access Chrome’s special pages without using the menus or memorizing the special URLs for them, then you are definitely going to want this extension added to your browser. Links Download the Chrome Page extension (Google Chrome Extensions)
| |

