Welcome, Guest! Sign Up RSS

Covering Hollyhood Microsoft Google Apple

Saturday, 2025-01-04
Main » Vista and 7 Tips and Tricks!
« 1 2 ... 21 22 23 24 25 ... 29 30 »

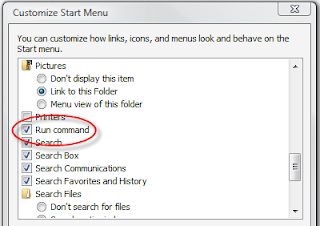
Don’t see the run command in Vista’s start menu like in Xp? Don’t worry.You can add the run command to vista’s start menu very easily.Here is what you have to do.

  1. Choose properties by right clicking on the start menu.
  2. Select the customize button under start tab.
  3. Scroll down and tick the run command option.
  4. Select apply and then press OK.
  5. If you have any doubt check the screen shot below.

start menu Get/Add the RUN command in Windows Vista Start Menu

Select the start button now and you will see the run command.

Category: Vista and 7 Tips and Tricks! | Views: 959 | Added by: Adamsummer | Date: 2012-03-24 | Comments (2)

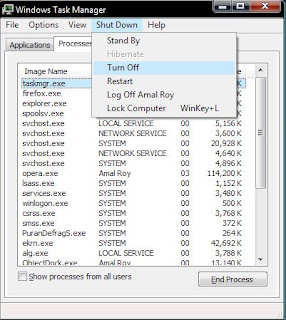
Here is trick to shutdown windows like never you have done before.This trick can be used to do an emergency shut down.You will be surprised to see windows getting shut down under 2 seconds!!!. At first make sure that you don’t have any unsaved works. So here is how you do it.

  1. Call up the task manager by pressing Ctrl + Alt + Delete or by pressing Ctrl + Shift + Esc(for vista users.Xp users too can do this.)
  2. Pressing Ctrl + Shift + Esc will directly call the task manager in vista.
  3. Now from the menu bar select the shutdown option.
  4. Hold Ctrl and press Turn off.

taskkkkkkk Super Fast Shut down in windows under 2 seconds!!

You will see windows shutting down under the blink of an eye.

We don’t recommend shutting down windows this way. Use it only in case of an emergency.

Category: Vista and 7 Tips and Tricks! | Views: 875 | Added by: Adamsummer | Date: 2012-03-24 | Comments (0)

This trick can be used to hide the disk drives in your Computer.

  1. Go to start menu>select run the type regedit.

  2. Now Got to HKEY_CURRENT_USERSoftwareMicrosoftWindowsCurrentVersionPoliciesExplorer.

  3. Right click on the right pane and create a new Dword value.

  4. Give the name as NoDrives Give the name as it is given here.

  5. Modify it’s value and make it to 3FFFFFF(Hexadecimal).

  6. Now restart your PC.

  7. Open my computer you will not see any disk  ... Read more »

Category: Vista and 7 Tips and Tricks! | Views: 706 | Added by: Adamsummer | Date: 2012-03-24 | Comments (0)

Here is a trick to add ” Open in New Window ” option to explorer right click menu or context menu.
This trick is applicable for Windows XP, Windows Vista and Windows 7 users.

  1. Copy the following registry entry in notepad and save as CU.reg then just run the file and add the registry entry in windows.
  2. Windows Registry Editor Version 5.00
    
     [HKEY_CLASSES_ROOTDirectoryshellopennewwindow] @="Open inside New Window"
    
     [HKEY_CLASSES_ROOTDirectoryshellopennewwindowcommand] @="explorer %1"
    
     [HKEY_CLASSES_ROOTDriveshellopennewwindow] @="Open inside New Window"
    
     [HKEY_CLASSES_ROOTDriveshellopennewwindowcommand] @="explorer %1"

Now you will get the option to open a folder or drive inside a new window in explorer context menu.

Category: Vista and 7 Tips and Tricks! | Views: 4310 | Added by: Adamsummer | Date: 2012-03-24 | Comments (1)

By default Vista does not make use of the full potential of the new SATA hard disk’s. We do not get the actual power of the Hard disk that we use. In order to get it we just need to make a small change.

  1. Call up the Start menu and type Device Manager in the search box.
  2. Expand the Disk Drives section by clicking on the plus sign near it.
  3. Now Look for the internal SerialATA (SATA) drives under it.
  4. Right Click the disk and select properties.
  5. Go to the "Strategies” TAB.
  6. Now check the option "Enable Advanced Performance ".
  7. Select OK and Close the Device manager.
  8. Restart your  ... Read more »
Category: Vista and 7 Tips and Tricks! | Views: 756 | Added by: Adamsummer | Date: 2012-03-24 | Comments (0)

There may be hardly few Firefox users who don’t know about the Adblock plus extension. Adblock Plus is used as the online ad filter by many users. But using a large number of self defined filters in Firefox can make it really sluggish. Long self defined filter lists makes Firefox sluggish because every page that is loaded is checked against the filters each and every time. However we can solve this problem to a great extend by optimizing the filter lists.

  1. To start with first you have to save your filter list.
  2. Then go to ‘Tools‘>’Adblock Plus‘.
  3. From settings dialogue box open ‘Filters‘> ‘Export Filters‘.
  4. Open Windows Explorer and open the text file with an editor like Notepad.
  5. Now select the entire content of the file by pressing [Ctrl] + [A] and copy tit to clipboard by pressing [Ctrl] + [A].
  6. Now go to the website http://adblock.free.fr/optimize/index.php?lang=en and paste the list there by pressing [Ctrl] + [V].
  7. Now check the options that are set. Please check that the ‘Optimize URLs‘ and ‘Remove Filters matched by others‘ options are active.
  8. If you are already using an optimized list the ‘Optimize including pre-existing RegExes‘ option must be activated. This will insert new filter list to the already optimized ones.
  9. Now click ‘Optimize‘.
  10. A dialog box showing the compressed list will show up.
  11. Select the optimized list and copy it to a new blank text file and save it.
  12. Now in Adblock settings dialog box, Open ‘Filters‘> ‘Import Filters‘ and now navigate to the new text file and click on ‘Open‘.
  13. ... Read more »
Category: Vista and 7 Tips and Tricks! | Views: 3304 | Added by: Adamsummer | Date: 2012-03-24 | Comments (5)

In Windows Xp we get six different Folder views Thumbnails, Tiles, Icons, List, Details, Filmstrip. Each time when we open different type of Folder for example we opened a folder containing pictures we see the view set to Filmstrip or so. If you want to set it in tile view you have to select form the view option. Doing this for each and every folder is really time consuming.

Setting a particular Folders view setting to all the Folders will be the easy way.To do this just go to My Documents Folder and select the type of view you want too have in all the Folders from the view options after doing that. From the menubar select tools> Folder Options and select the ‘View’ tab from it. Now click on ” Apply to All Folders ” Options and select apply and then OK.Thats it from now on you can get a common view setting in all the Folders.
Category: Vista and 7 Tips and Tricks! | Views: 961 | Added by: Adamsummer | Date: 2012-03-24 | Comments (3)

Windows7logo2 Most Useful Windows 7 Registry Tweaks for Speeding Up Windows 7

Every windows user will be using a lot of tweaks these days for speeding up their system. I am sure all will be waiting for theRegistry tweaks for the newly born Windows 7 operating system. Here are some registry tweaks that can be safely applied after its installation or later. I am sure these tweaks can speed up Windows 7.
First of all i will tell what all changes will be made after applying the tweaks.

  • Hanged programs will be terminated quickly.ie. Automatically it will end tasks of programs that are taking longer to respond.
  • Menus will be shown very faster. When you pause on the main menus the sub menus will be shown up very fast than normal.
  • You will get an option ” Take Ownership” when you right click on files or folders. This will become handy when you want to replace system files while doing customization.
  • Make windows not to search for a program that no longer exist when you click on the shortcut there by saving your valuable time.
  • Adds "Copy To” and "Move To” options in the right click context  ... Read more »
Category: Vista and 7 Tips and Tricks! | Views: 938 | Added by: Adamsummer | Date: 2012-03-24 | Comments (0)

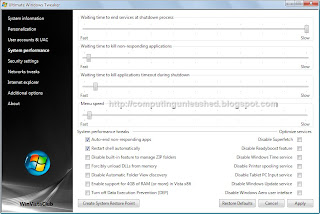
WinVistaClub has finally released one of the best and powerful tweaking utility for Windows (created by Microsoft MVP Ramesh). It can tweak and optimize almost every thing in Windows Vista (32-bit and 64-bit) and certain (most) tweaks work for Windows XP too!. This small and free utility will make your Windows more faster, secure and stable in a few mouse clicks.It will tweak Windows Vista to its Best. This program is made user friendly and is portable. Lets see what all it does.

Ultimate+Windows+Tweaker Make Windows Super Fast!!! with Ultimate Windows TweakerIt has a lot of features.This program has an ability to detect whether you haveinstalled IE7 or IE8 and give the relevant tweaks according to the version installed on you system. Different tweaks have been organized into various sections, they are :
1) Personalization,
2) User Accounts & UAC,
3) System & Performance,
4) Security,
5) Internet Explorer (IE7 / IE8)
6) Network Optimization
7) Additional Options

... Read more »

Category: Vista and 7 Tips and Tricks! | Views: 871 | Added by: Adamsummer | Date: 2012-03-24 | Comments (0)

The Send To options in the right click menu in Windows enables to work in windows Faster. After a long time the send to menu gets cluttered and it will take more time than usual for the items under send to options to appear. So here is a way to speed up or create a send to options which is clutter free…..

The steps are simple.
Just go to RUN from start button or press [WIN] + [R].
Now type sendto and press [Enter].
A window showing the list of items which under the send to menu in Windows will open up.
You can add any new link or delete the unwanted items from the send to menu.
Category: Vista and 7 Tips and Tricks! | Views: 1033 | Added by: Adamsummer | Date: 2012-03-24 | Comments (2)

You might have noticed the Windows context menu studded with certain options which you have never used or will never use.remove context menu entries or items Remove Entries from CONTEXT MENU in Windows These unused options are attached to the context menu when you install an application so that it can be accessed quickly.You can remove some unwanted menu options by a simple registry tweak if it is not required……..

You can remove a context menu option with the help of the following methods:Click "Start” and type "regedit” in the "search” box.

As the context  ... Read more »

Category: Vista and 7 Tips and Tricks! | Views: 741 | Added by: Adamsummer | Date: 2012-03-24 | Comments (0)

The Hibernate function in Windows will enable to save the current desktop as it is when we shutdown the system. When you Turn On windows again windows will restore the previous desktop you were working with earlier. So this way if you open a lot of programs in Windows you need not start or open the programs again when windows starts up. The hibernate option is a very useful and time saver function for Daily Windows Users. You can access the ‘Standby’ or ‘Hibernate’ function by pressing [Shift] key in the Windows shutdown menu. You will be really embarrassed since you need to press the Shift key each and every timeyou need to hibernate windows. Microsoft gives this function enhancement only through a telephone call and that too for valid support customers. So how about showing a separate button for the hibernate function in the shutdown  ... Read more »

Category: Vista and 7 Tips and Tricks! | Views: 1752 | Added by: Adamsummer | Date: 2012-03-24 | Comments (3)

video streaming Speed Up Video Buffering Sure Way To Stream Videos FasterDo you experience slow video buffering speeds? Thinking of how to buffer the videos faster? The videos get buffered slow at times. For users with slow internet access speed and for dialup users this is a head ache. They’ll lose the pleasure of watching videos hitch free. Usually in such cases, we pause the video and leave it for some time to get the video buffered 100%. But also wastes the time. But there is a way to speed up buffering of videos.Speed Bit Video Accelerator has come up with a solution to buffer videos faster in youtube, metacafe, Dailymotion, Bebo, CNET and other 150+ popular video sharing sites. This tool will stream the videos using multiple connection to the server of the video sharing site. The  ... Read more »

Category: Vista and 7 Tips and Tricks! | Views: 771 | Added by: Adamsummer | Date: 2012-03-24 | Comments (0)

These days most of the computer system’s come up with loads of ram installed. 2GB is the minimum memory which people are currently asking for. make windows 7 use more ram and speed up system How To Make Windows 7 Faster and Responsive by 2XWindows 7 is a much faster and stable operating system that the previous ones. But windows will use only a definite amount of memory even if we have much more than that. Whats the remaining memory is kept as such? Keeping the programs in the memory will make the sytem much more faster and responsive as there wont be a need to search the data in the slow hard drive. Windows 7 doesn’t allow to set an custom size for the file system cache. One of our readers suggested a great tip to make windows 7 use more ram and thereby making your system much more faster and responsive than before. This tweak will also work for Windows Vista. So here’s how we apply the tweak to in windows 7.

Click Start and type in "cmd” and you will see the command prompt icon.

Right Click the cmd icon and choose "Run as Administrator".

Now in the command prompt windows type in the following command.

fsutil behavior set memoryusage 2

Now restart windows 7.

... Read more »

Category: Vista and 7 Tips and Tricks! | Views: 1178 | Added by: Adamsummer | Date: 2012-03-24 | Comments (3)

After installing many softwares in your computer, you could notice that the startup of Windows 7 is taking too long. 378220d1252534426windows7ultimat How to Remove Startup Programs in Windows 7This is because when you install certain programs, they are set to automatically start running at the startup of Windows 7. As the number of programs set to start during startup increases, Windows 7 takes more to startup your computer.

Some programs like Antivirus softwares also start running with the startup of Windows. But it is a necessary one. There might be many other programs which you don’t want to start along with theWindows 7 startup. So you could remove those programs. Just do the following to remove those programs from Windows 7 startup.

1. Click on the start button.

2. Type msconfig in the search box and open it.

3. Select the Startup tab.

4. Uncheck the programs you don’t want to start during startup.

5. Click on OK and then Apply.

6. To finish off the procedure, restart your system and you are done.

Now the programs you selected will be removed and will not run at Windows 7 startup anymore unless you enable them again using msconfig.
Category: Vista and 7 Tips and Tricks! | Views: 857 | Added by: Adamsummer | Date: 2012-03-24 | Comments (0)

The USB Flash drive Autorun function is a great bless for many users. But still there are people who find this feature annoying or useless as it might not be comfortable for them. So if you want to disable the Autorun in pen drive, then here are the instructions to do it easily in Windows.

Disable Autorun in Pen Drive in Windows XP, Vista or 7

1. Type in ” gpedit.msc ” in Run to open Group Policy Editor.

2. Navigate to Computer Configuration > Administrative Templates > System.

Disable Pen Drive Autoplay How to Disable Autorun in Pen Drive

3. In the right side, double click on ” Turn off Autoplay ".

4. Check the enabled option and change the ” Turn off Autoplay on ” option to ” All drives ".

5. Apply the changes to disable autorun of pen drive.

That’s it! The Autorun feature will be now disabled.

Category: Vista and 7 Tips and Tricks! | Views: 865 | Added by: Adamsummer | Date: 2012-03-24 | Comments (0)

froyo on the droid incredible How to install Froyo on Droid Incredible Manually

To install Froyo manually on your Droid Incredible all you have to do is follow these steps:

>Check if you are on a stock ROM as this update will work only if you are.

>Download the Official Android 2.2 Firmware.

>Make a copy of the downloaded file to the root directory which is your microSD and name it as "update”.zip.

>Switch Off your phone. Now reboot it with Volume down button pressed.

>Now in the bootloader screen select recovery using volume keys to navigate and power button to select.

>Upon seeing the "/!” symbol press volume up and power to show recovery options. As earlier use volume keys to navigate and power button to select "apply sdcard:update.zip”.

>When the installation completes you will see "Install for sdcard complete”, now just select "reboot system now”  to finish.

Category: Vista and 7 Tips and Tricks! | Views: 810 | Added by: Adamsummer | Date: 2012-03-24 | Comments (0)

The new Internet Explorer comes packed with features but if you are not happy with it then we have a tool for you which may change your mind. IE9 Tweaker v1.0 is a great tool which helps you make many modifications to your Internet Explorer 9.

With this, you will be able to make changes such as making the menu bar always visible (to make menu bar visible the first time,you may have to press Alt key) (if switch this off menu bar will be always invisible), adding menu bar on top, setting InPrivate Filtering to Always ON, Adding 3D Border between the Web page and toolbar, Making Internet Explorer Start Up in to Internet Explorer in Full screen mode, Changing Size of Toolbar icons, Changing the maximum number of Simultaneous Downloads and Rows in the Favourites Home Page.

IE9 Tweaker v1.0 thumb Tweak Internet Explorer 9 for Better Performance

Like other Browsers Internet Explorer 9 also will keep track of your history and make a favourites page from that data. But using IE9 Tweaker v1.0 helps you create the Favourites page by yourself. To do so, Firstly click "Create Custom Favourites Homepage" which will open a new Window as seen below.

Custom Favorites Page thumb Tweak Internet Explorer 9 for Better Performance

Just edit the Home Page by adding the Web Addresses and you are done. Just make sure you select "Set homepage to custom page”. This comes in handy if you find new sites or if you like to keep The Favourites Page organized.

Category: Vista and 7 Tips and Tricks! | Views: 933 | Added by: Adamsummer | Date: 2012-03-24 | Comments (1)

Having a good Internet connection your phone is great, but it is definitely a let down if you can’t use the same phone as a modem for your computer. It is also cheaper to just use the same connection for both devices. Here is a really simple and quick way to use your Android Phone as a Modem for your PC. It does not even require a rooted device. All you require are : An Android Phone with Internet connection, a computer , a little software called PDAnet and your Android phone’s USB Cable.

use android phone as modem How to Use Android Phone As Modem

PDAnet is a great software to tether your Android Phone. But the full version costs around $15. It does allow a trial period and even after the trial period you can browse the Internet but the only problem is not being able to use secure connections. So you won’t be able to use Gmail etc. But if you are tethering just for emergency situations for browsing sites then should just use trial as you can always check your email from your phone. But buying the app for $15 is much better than paying around the same thing but on a monthly basis to your cellphone company.

Category: Vista and 7 Tips and Tricks! | Views: 871 | Added by: Adamsummer | Date: 2012-03-24 | Comments (1)

Portable devices have become a part of our daily life. Most of us today own a Laptop for obvious reasons. Most of us love it because it is portable and very useful. But some thing that most of the Laptop owners feels distressful is about the battery life of Laptops. So, the battery life of the Laptops play a crucial role. We strive to preserve the battery power for getting enough time to save our work. So it is essential to know how much charge is left on the battery to finish up our work without any worries.

Windows have an inbuilt Laptop Battery Meter which shows off the percentage of charge left on the Laptop’s battery and the time left for using the Laptop without direct main power supply. But this information provided by the Laptop Battery Meter in windows is not accurate and the information we get from it is very limited.

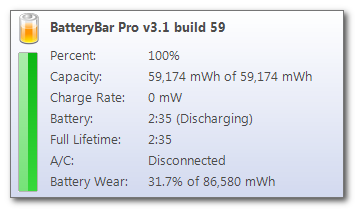
BatteryBar is a simple and powerful tool that is a good replacement to the outdated windows inbuilt

Laptop Battery Meter. BatteryBar shows the status of your Laptop’s battery in the windows taskbar. Unlike Windows inbuilt Laptop battery meter BatteryBar shows the most accurate time remaining on your battery.

Screen Shots of BatteryBar

StatusPopup The Best Laptop Battery Meter for Windows BatteryBar

BatteryBar2 Discharge The Best Laptop Battery Meter for Windows BatteryBar

BatteryBar2 Charge The Best Laptop Battery Meter for Windows BatteryBar

... Read more »

Category: Vista and 7 Tips and Tricks! | Views: 1578 | Added by: Adamsummer | Date: 2012-03-24 | Comments (5)

Blogger Widgets