To anyone keeping up with the smartphone market, the Chinese
manufacturer ZTE won't be entirely unknown. Specialising in affordable
handsets, the company has now turned its hand to budget tablets and the
result, the ZTE Light Tab 2, isn't a bad offering.
It's solidly
constructed and surprisingly zippy. The only problem is the operating
system is well out of date and, more importantly, there's no sign of
Google Play.
Although this is one of the more pricey budget
Android tablets, you get a fair amount for your cash. There's a 1,024 x
600 capacitive touchscreen, while power is provided by a Qualcomm 1.4GHz
Snapdragon processor and 512MB of RAM.
Unfortunately though, the
ZTE Light Tab 2 is saddled with Google's Android 2.3 Gingerbread
operating system, rather than the tablet-focused Honeycomb or Ice Cream
Sandwich iterations. Gingerbread was released in 2010 and ported to
tablets from smartphones, and there's no getting away from the fact it
seems dated.
Interestingly, the ZTE Light Tab will allow you to
insert a SIM card for 3G and, if you're so inclined, phone calls.
Holding it to your ear is a little bit impractical though, given the 202
x 122 x 13mm dimensions.
At 395g the ZTE Light Tab isn't heavy,
but the BlackBerry Playbook and Tablo are lighter and therefore easier
to use long-term. Some may argue that a little extra weight adds a sense
of quality to a gadget, and the ZTE certainly feels strong and well
constructed.
There's a fairly thick bezel wrapped around the
screen, with touch-sensitive Android buttons for Home, Menu and Back.
The rear of the tablet features a matte plastic covering that comes away
to reveal the 3,400mAh Li-Ion battery and slots for a SIM and MicroSD
card.
With only 4GB of on-board storage, half of which is taken
up with the OS and pre-installed apps, you'll want to accessorise the
ZTE Light Tab 2 with a MicroSD card if you want to store your media
collection.
The ZTE Light Tab 2 handles media well. The smaller
size might not be to everyone's taste, but it's perfectly serviceable
for small bursts of entertainment. The built-in browser supports Flash
playback, so you can visit sites like YouTube and iPlayer and watch
embedded video right on the page.
All work, no Play
While
that sounds like a good thing, it is in fact masking the biggest
drawback of the ZTE Light Tab 2 - the lack of a pre-installed Google
Play app store. Of course, if you're a dedicated tech head there are
ways around this, but for the vast majority of us, Google Play is a
must-have addition. The fact that the ZTE doesn't come with it is a
black mark on its record.
It comes with lots of pre-installed
apps, including some good ones like Documents to Go (an Office app), FM
radio, email and several games, but with no option of adding more, this
tablet has a limited lifespan.
If you're less keen on apps and
are instead looking for a device for watching media and browsing on the
move, the ZTE Light Tab is a good choice. The 3G capability and
excellent screen are clear standout points, but the lack of Google Play
and the outdated OS make it somewhat hard to recommend.
Battery life has been an ongoing issue for some iOS 5 users, particularly those with iPhone 4 and iPhone 4S. The recent iOS 5.1 update
aimed to fix that with "improved battery life” mentioned in the release
notes, but just how improved is it? With casual use since the update
was released, the consensus at OSXDaily suggests the improvement is substantial, and thus if you haven’t updated your iPhone, iPad, or iPod touch to iOS 5.1 yet, it is highly recommended to do so now.
Every user is going to notice different gains depending on their
device usage and general battery health, but overall the improvements
seem to be most noticeable on cellular iOS devices, particularly iPhone
4S, iPhone 4, and iPad 2 3G models. The assumption is that some of the
potential location services issues has been resolved, though its
certainly worth mentioning that users of the standard Wi-Fi models and
iPod touch also report a nice boost, even if it doesn’t seem to be quite
as dramatic (likewise, the original drain problem usually wasn’t as bad
either).
Monitoring Your iOS Device Battery Life
To get a good feel for the improvement and to monitor battery drain,
it’s best to have made note of the prior usage history and then compare
it to the iOS 5.1 battery usage, but those who have already updated
won’t be able to do this obviously. Nonetheless, it also helps to turn
on the "Battery Percentage” indicator and make a mental note of usage
data too. Here’s how to do both of these in iOS:
Tap on "Settings” and tap "General”
Tap "Usage” and then swipe down to "Time since last full charge” to
find the usage time (actively using the device) and standby time (device
is on, but not in use)
In the same "Usage” screen, swipe "Battery Percentage” to "ON” to follow precise drain
The percentage indicator displays alongside the battery icon in the upper right corner of the screen:
Update iOS, Calibrate the Battery, and More
Update to iOS 5.1 and hopefully any lingering battery drain problems
will be resolved once and for all. Don’t forget to calibrate an iOS
devices battery about once a month by letting it charge to 100% and then
running it down to 0% before recharging again, that helps keep the
battery in good health. It’s also a good idea to disable battery
draining services you don’t use often, be it Bluetooth or Push
Notifications, and you can check out some general iOS 5 battery life tips we have discussed before for more on that.
iOS 5.1 was released a few days ago but some people are still having
problems when trying to update. The download can time out, not start at
all, or sometimes throw an error message saying "Unable to Check for
Update. An error occurred while checking for a software update.” or "The
network connection could not be established.”
If you’re having trouble downloading iOS 5.1 from Apple’s servers, try these fixes:
Reset Network Settings on iOS Device: Tap Settings > General > Reset > Reset Network Settings
Clear Hosts File: Look at your hosts file for
anything blocking Apple’s servers and comment them out, this is mostly
relevant to jailbreakers and if you see "Error 3194"
Change DNS Servers: Adjusting DNS on either the
computer you are downloading from or iOS device if using OTA can resolve
the issue, instructions on how to do so are below
Changing DNS seems to be the most reliable method, here is how to do so in iOS and OS X.
Changing DNS in iOS
Tap on Settings, tap on "Wi-Fi”, and tap on the blue arrow next to the router name
Under "DHCP” tab tap on "DNS” and replace with: "8.8.8.8″ for Google DNS, or "208.67.222.222″ for OpenDNS
Tap the Back button and attempt to use OTA again
Change DNS in OS X
Open System Preferences from the Apple menu
Click on "Network” and then click on ‘Advanced’ in the lower right corner
Click the "DNS” tab and then add a new DNS server by clicking the
"+” icon, adding either "8.8.8.8″ for Google DNS or "208.67.222.222″ for
OpenDNS
Drag the newly added DNS server to the top of the list, click "OK” then close out of System Preferences
On a Mac you may need to follow this up with flushing DNS cache, so open the Terminal and type the following:
You may have noticed that iOS 5.1 changed the behavior of the lock screen camera compared to it’s predecessor, this has caused some confusion
as to how it works compared to iOS 5. You’ll notice that if you tap on
the camera icon now it just causes the screen to bounce. No, the
bouncing screen doesn’t mean the camera isn’t working anymore, it’s aim
is to indicate how it works.
You now swipe up to activate the lock screen camera in iOS 5.1. Likewise, you can swipe down to deactivate the camera and return back to the lock screen.
Get used to the new gesture, it’s actually faster than the double-tap home button method before in iOS 5,
and you’ll be able to take pictures quicker than ever after you get
accustomed to it. There also doesn’t seem to be a way to return to the
old behavior anyway, so old habits will have to be broken here.
iOS 5.1 has been released, alongside the new iPad 3 and new Apple TV.
The update brings a variety of new features and bug fixes to iOS
including the ability to delete images from Photo Stream, camera
shortcut visible by default on lock screen, improved camera face
detection, Japanese language support for Siri, genius mixes for iTunes
Match, updated AT&T network indicator, improved battery life, and
more.
You can get the iOS 5.1 software update directly on your iPhone, iPad, or iPod touch by using OTA Update, otherwise you can update through iTunes or by downloading the IPSW and performing a manual upgrade.
We have included links to the firmware files below, they are hosted by Apple.
Turning on the iPhone camera grid makes it easier to take better pictures, here’s how to enable it:
Launch the Camera app from home screen or lock screen
Tap on "Options” at the top
Swipe Grid to "ON”
Tap "Done” to hide the Options again and return back to Camera
The grid will not appear on finalized images in the photo stream.
What’s the point? If you’re new to photography or don’t know why the
grid is potentially useful, the grid makes composing images using the
"rule of thirds” easier. Essentially that means by dividing a picture
into horizontal and vertical thirds and placing compositional elements
along those lines and intersections, you’ll end up with better pictures.
It’s an old artistic technique that has been around for hundreds of
years.
If you’re suffering from email overload, sometimes the easiest thing
to do
... Read more »
The new iPad, the iPad 3, the new iPad 3… call it what you want, but
it's a device that from the outside looks remarkably like the iPad 2 but with an overhaul on the innards.
The question most people ask us when it comes to the new iPad is: what's different from the old one?
Well,
in this case it's pretty easy: there's a Retina Display that makes
everything looks superbly crisp, an updated A5X processor bringing
quad-core graphics and a 5MP camera on the rear with a VGA sensor on the
front.
Oh, and the iPad 3 is also the device that brings iOS 5.1 to the masses (well, it's also on the likes of the iPhone 4S and iPad 2 as well, but hey, we're not reviewing those today, and you don't really care unless it's a new iPad.)
The
design of the new iPad 3 isn't really anything different from the
original duo from Apple's tablet range. Actually, while we're thinking
about it, it looks almost identical to the iPad 2 – to the point you'd
struggle to tell them apart when turned off.
However, in
the hand, there's a little bit of a difference, especially when it
comes to the weight. The new iPad is nearly 60g heavier than the
previous iteration, and while it's not terrible, it does add a little
arm strain during a marathon movie session.
Retina Display
Before
we get onto all the normal insight over the frame of the new iPad, it's
worth talking about the main feature: the Retina Display.
Apple
has packed a huge amount more pixels into the 9.7-inch screen - 1536 x
2048 to be exact. However, despite the fact that the Cupertino brand
makes a big thing about the 330 PPI density of the iPhone 4, we're
looking at a screen that's technically a lot less sharp than its
smartphone brethren - around 264PPI.
Apple
has got around this fact by stating that the screen is meant to be held
at 15 inches from the face, rather than the 10 inches the iPhone is
supposed to from your eyes, and as such the sharpness is the same.
Given
the fact the term 'Retina Display' really isn't a legally binding term,
we don't care. What matters is the effect - and it's one of the most
impressive we've seen on a tablet to date. If someone took an iPad,
printed out a really hi-res image of an iOS system and stuck it on the
front, we'd struggle to tell the difference - it's superb, and even
squinting up close you'll be hard pushed to notice any pixelation.
The
colour reproduction will also appeal to many, as it's pretty close to
reality - it lacks the punch of the Super AMOLED HD screens seen on the
likes of the Samsung Galaxy Note for instance, but it will depend on
personal preference as to whether that's a good thing.
We like the vivid colours of Samsung's screens, but we know plenty of people that loathe them too.
The
main thing is things like internet browsing; photo viewing and movie
sessions are all much, much improved over the iPad 2, and is one of the
main reasons to pick up the new iPad.
Design
The
new iPad, as we said, is only marginally thicker and a little heavier
than the iPad 2, and if you pick it up with no knowledge of the former,
you'll likely be mighty impressed.
The rest of the design is
premium too - given you can be paying nearly £700 for a top end model,
it needs to seem like a worthwhile investment, and it does.
The
curved edges, the oleophobic scratch-proof glass and the aluminium
chassis are all the kind of thing that some Android tablets have tried
to ape and failed. Of course, many will prefer the feather-light frames
of some of the Samsung models but, like the screen, it really comes down
to personal preference.
The buttonry on the new iPad is pretty sparse though - we're talking four buttons and that's your lot.
The iconic home button is back once again, despite rumours of its demise, and is easy to reach and hit within the thick bezel.
The
rest of the buttons are all clustered tightly together in the top
left-hand corner of the new iPad, with the rocker/volume key, the
mute/orientation switch and power/lock key all within an inch of one
another.
As you can see, Apple has been pretty efficient with the
button placement, with all of them performing more than one function.
And they say the iPad can't multi-task... tsk.
The new iPad 3 picks up the iOS story where the iPad 2 left off - with an incremental upgrade to iOS 5.1 the main talking point.
However,
before we go through what's new, we'll take a quick tour across the
operating system to show just how simple it is to operate a new iPad.
The
home screen is laid out in a very similar way to the iPhone, except
we're seeing some much larger icons for the apps you've downloaded.
You
can fill as many home screens as you like with apps as you download
more from the App Store, and swiping from screen to screen on the iPad 3
is silky smooth even with loads of programs downloaded.
There's
also the dock at the bottom of the display which can hold up to six
regularly-used apps that are present on all home screens, which is more
than the four on offer with the iPhone thanks to the extra screen real
estate.
Neat
freaks need not despair either: it's easy to create folders of the apps
you want to lump together simply by dragging an icon and plopping it on
top of another – the iPad will create a name for the group based on the
content, but it's easy to rename these.
iOS 5.1 doesn't offer too
much in the way of new features for the users interface, but a trick
that Apple has learned from Google's Android is the notifications bar,
which can be accessed simply by swiping down from the top of the screen.
This
contains information on everything from unread mail messages to
notifications of new moves in games you're playing with friends. It's a
simple system and one that's prevalent throughout the system, even in
most apps, meaning you can easily jump in and out of applications where
necessary.
Speaking of which, it's worth taking a look at the
multi-tasking gestures on offer, as they're pretty sensational. Using a
full set of fingers on the screen allows three functions: pinching in
will take you to the home screen, flicking up will enable the
multi-tasking window and swiping left will let you bounce between open
apps.
It really works on the new iPad, and we urge you to check it
out as it really makes moving through the system easy and cool at the
same time.
There's a great debate over what really constitutes
multi-tasking – but in our view, the iPad does enough to warrant the
title. The likes of the BlackBerry Playbook
are more capable when it comes to fully running programs in the
background, but most users will struggle to really notice the difference
when the iPad and its Android competition are asked to jump between
apps.
As mentioned, you can easy multi-finger swipe up or double
tap the home button to call up a list of recently opened apps, which can
be deleted from the tray by a single long press and tapping of the 'x'
that appears.
Swiping
right in the multi-tasking tray will also call up the music player,
which allows you to see what songs are about to play, or change the
volume or brightness. Not new, but the closest thing to a widget we'll
get here.
The lock screen allows you to do some pretty funky
stuff; double tapping the home button will call up the music player so
you can switch tracks or pause without needing to open the iPad. Also,
there's an option to have a slide show of y
... Read more »
Samsung has plenty of experience in crafting slim, powerful laptops, but unlike its premium Samsung Series 9 ultraportable, the Samsung Series 5 Ultra appears to be more of an "everyman" device.
It won't out-power Ultrabook rivals such as the Dell XPS 13, Acer Aspire S3 or Asus Zenbook UX31,
and it doesn't look A jaw-droppingly attractive. But importantly, and
some would say crucially, it won't cost you the Earth, either.
The
Samsung Series 5 Ultra is available in two models - a 13.3-inch model,
the NP530U3BI, priced at £799.99 in the UK or $879.99 in the US, and a
14-inch model, the NP530U4BI, costing £849.99 or $899.99.
Considering
most Ultrabooks retail for £899-£1,100, this makes the Samsung Series 5
an attractive proposition for anyone on a budget.
Both
models pack in mid-level Intel Core i5-2467M processors, but the
14-inch model comes with an optical drive and an HDD capable of being
upgraded to an impressive 1TB of storage space.
Our review unit
was the smaller 13.3-inch model, but at 20mm in thickness, the Samsung
Series 5 Ultra 530U3B is still one of the bulkier Ultrabooks we've seen.
It's comparable to the HP Envy 14 Spectre but unlike that machine, the chassis doesn't feel chunky.
It has the sloping, blade-like appearance of other Ultrabooks and weighs a miniscule 1.5kg.
The
outward design is attractive without being breathtaking. The plain
silver design is equally well placed at home or the office, and the
brushed metal finish won't attract smudges the same way a reflective
surface would.
Look
below the surface, though, and you'll soon notice the Samsung Series 5
Ultra 530U3B has a few tricks up its sleeve. Most notable is the option
of including a 500GB HDD alongside a fast-booting 16GB SSD, giving you
both space and speed.
The usability of the machine hasn't been
ignored either, and the keyboard and touchpad are indicative of
Samsung's usual excellence.
Standing out from the crowd of
Ultrabooks isn't getting any easier, and whether this - Samsung's first
attempt - is strong enough remains to be seen.
It might get noticed thanks to the friendly price, but can the rest of the machine live up to the Ultrabook moniker?
Samsung
has taken the middle ground on equipping the Series 5 Ultra 530U3B,
opting for an Intel Core i5-2467M (1.6GHz) CPU, 4GB RAM and a 1366 x 768
screen resolution.
The processor is part of the Sandy Bridge
family (a prerequisite for Ultrabook-class), so the graphics memory is
built into the CPU core.
Don't expect any hard gaming on the Series 5 - if that's what you're looking for, Samsung has crafted the Series 7 Gamer especially for you.
Gaming aside, the integrated Intel HD Graphics 3000 chip doesn't do a bad job. You'll find streaming movies over Netflix or using editing programs such as Adobe Photoshop and Dreamweaver is within the grasp of this machine.
If
you do crave a slightly bigger graphical grunt, the 14-inch Series 5
packs in a dedicated AMD Radeon HD7550M GPU. And, while both machines
come with 4GB RAM as standard, there's the option to upgrade to 8GB for a
bit of extra future-proofing.
One of the main features of the
Samsung Series 5 Ultrabook is the decision to include a 500GB hard disk
drive, as well as a 16GB SSD (an SSD-only option is available).
In
order to keep to Samsung's stated 20-second boot-up time, the Series 5
Ultra 530U3B also includes a 16GB iSSD and a technology called
ExpressCache. Start it up and ExpressCache loads the operating system
and most-used programs straight from the iSSD, while the HDD is left to
boot in the background.
It
appears to work very well, and the Series 5's boot-up time stands up
against the other Ultrabooks we've tested. The extra storage space is
undoubtedly a bonus.
Even though external hard drives don't cost a
fortune any more, buying one to go with your Ultrabook still means
extra bulk to carry around. If you've got a large media library or a
wealth of documents and programs, you'll thank Samsung for giving you
the extra space.
Samsung takes a certain amount of pride in its
bright screens, and the 300nit screen on the Samsung Series 5 Ultra
530U3B is no exception. The lack of a Super-TFT coating means bright
lights and reflections don't interfere with usability.
This
should prove popular with anyone looking to use the Series 5 as a mobile
workstation, although media enthusiasts might miss the richer colours
and deeper contrast supplied by a reflective coating.
The 1366 x
768 pixel resolution is perfectly serviceable for watching films in 720p
high definition, and the silver bezel doesn't intrude on the experienc
Cinebench 10: 5,809
3D Mark '06: 3242 Battery Eater '05: 191mins
So,
after tearing through the specifications, the real question is how does
the Samsung Series 5 Ultra 530U3B perform day-to-day? This i
... Read more »
Can LG make an impression on the laptop market with these Ultrabooks?
Not renowned for their PCs, Korean behemoth LG has released two Intel Ultrabooks here at CES 2012. And these aren't just Ultrabooks, the press release refers to them as Super Ultrabooks.
We're
not quite sure why this is, but we'll go along with it. After all,
we're in Las Vegas, where everything is supposed to be Super.
You can check out TechRadar's video of LG's Ultrabooks below:
There are
two models, the Z330 and the Z430 and as you can see the chassis of this
model looks very nice indeed – what's more, they're among the slimmest
and lightest Ultrabooks on show.
The
13-inch Z330 is the model shown here. LG has gone for the top of the
pile with these models (and therefore they will be highly priced) and
features the top-line Core i7 processor.
As
with many other Ultrabooks, LG says it has managed to get the 13-inch
display into a compact 12-inch chassis. Rather than being tapered at one
end, the Z330 is 14.7mm thick across the whole chassis – gven that many
Ultrabooks are 17-18mm thick, the Z330 really appeals. It's also among
the lightest Ultrabooks around 1t 1.21kg.
We also really liked the keyboard on the model we saw, although the trackpad was a bit slippy for our liking.
As
you can see, the 13-inch model pictured here has HDMI out and three USB
ports - you only get two and a mini HDMI with a lot of the tapered
Ultrabooks. There's a drop down bit for the Ethernet port and one USB
3.0 port.
According to LG, the Z330 requires less than 10 seconds to complete booting and has a latest-class SATA3 SSD, too.
The
14-inch Z430 weighs 1.5kg and is equipped with SSD and HDD, meaning
storage capacities of up to 500GB. This is similar to the Series 5
from LG's great rival Samsung. But unlike that model, it's not clear if
the Z430 can be bought with just SSD, or whether it comes with the two
drives as a default.
Last night, this morning Microsoft announced Windows 8 Consumer
Preview in Barcelona, Spain. According to Microsoft this new build has
over 100,000 code changes since the last September’s Developer Preview Release.
Windows 8 System Requirements
Windows 8 Consumer Preview works great on the same hardware that powers Windows 7:
Processor: 1 gigahertz (GHz) or faster
RAM: 1 gigabyte (GB) (32-bit) or 2 GB (64-bit)
Hard disk space: 16 GB (32-bit) or 20 GB (64-bit)
Graphics card: Microsoft DirectX 9 graphics device or higher
To use touch, you need a tablet or monitor that supports multitouch
To access Windows Store and to download and run apps, you need an
active Internet connection and a screen resolution of at least 1024 x
768
To snap apps, you need a screen resolution of at least 1366 x 768
Samsung
published endless press releases about its ever growing global sales
figures, which can only mean one thing. A sequel is guaranteed for 2012.
Samsung is yet to make any official announcement regarding the
Galaxy S3, mind, but the pieces are falling in to place. Samsung's
processor developments are clear to see, with the company announcing
several new Exynos cores during 2011 that could power the new Galaxy S3.
The Galaxy S 3 (which we've also seen referred to as the Galaxy
SIII) is bound to be at least powered by a dual-core processor, but
there's even been rumour of a quad-core chipset in Samsung's pipeline,
which may power the S3. Here's what else we've gathered so far.
The
mobile phone industry is extremely predictable. The high-spec models
for the year are invariably announced and shown off at February's Mobile
World Congress event, with the finished hardware starting to appear on
sale at the end of March and into April.
Samsung managed to
release the S2 right at the beginning of April in 2011, so it's bound to
want to repeat the winning formula and release the S3 at the same time
in 2012. If you're due an upgrade next April, the S3 ought to be ready
and waiting for you.
Samsung has even gone as far as cancelling its whole MWC conference altogether, so we're looking forward to seeing how it diverts all those funds into making the Galaxy S3 launch superb.
Update: A couple of South African carriers
have said that they expect the Samsung Galaxy S3 to hit shelves as
early as July - which tees us up nicely for a March unveiling.
Update: A leaked image claiming to be the Samsung Galaxy S3
has appeared online suggesting it will be unveiled on March 22 -
however Samsung has already denied the date and the image has several
flaws.
Update: The Samsung Galaxy S3 could be in-line for a surprise launch on March 30,
depending on the conclusions you draw from a cryptic paint-job adorning
London's flagship Phones 4U store - although this now looks unlikely as
Samsung has confirmed it is the launch of a Samsung vendor within the
Phones 4U shop.
Samsung Galaxy S3 US release date
The
Galaxy S2 took many months to appear in the US, as Samsung rearranged
the design and changed features to please the US networks and their
customers.
Given that the S2 is therefore still quite "new" to
America, we'd expect the S3's American launch to be several months after
the UK arrival once again. Mobile hardware launches are one of the few
areas where the UK leads the world.
It's
been suggested the reason Samsung has delayed the Galaxy S3 until after
MWC 2012 is so it can be launched simultaneously in the US and rest of
the world.
The Galaxy S2 suffered a US release delay, which saw it
arrive several months after the rest of the world and Samsung is keen
to avoid the same situation this year.
Samsung Galaxy S3 price
Obviously we don't have pricing details for an unannounced phone, so all we can do is speculate. Given the recent launch of the ... Read more »
If you are one of those very early adaptors out there you’ve
probably heard or have tried Windows 8 Developer Preview released in
last September. Today Microsoft has just announced their public beta,
aka Consumer Preview, of the upcoming Windows 8. Together, there are
tons of changes and improvements over the initial Developer Preview
release.
Here are some highlights of the Windows 8 Consumer Preview
Broad range of product changes and improvements
Windows Store with an "App Preview” of new apps
Connecting to the cloud across Windows PCs and Windows Phones
Internet Explorer 10 Platform Preview 5
So if you have a Windows 8 Developer Preview, here is how you can upgrade your system to the latest Consumer Preview.
I installed my first Windows 8 Developer Preview first day when it
came out on the virtual box. Since then, there are many different
methods you can try out Windows 8 but the upgrade process from Windows 8
Developer Preview to Consumer Preview are pretty much the same.
Insert the ISO image or CD
Let the Windows 8 Developer Preview start up.
Now go back to Windows 8 Developer Preview Desktop and start the ISO image.
Important note: if you are running Windows 8 Developer Preview
64-bit, make sure the Consumer Preview is matching to what your original
version. So if you have 32-bit installed, download the corresponding
32-bit Consumer Preview image as well.
Now just follow the on screen step and ready to roll!
One thing need to point out is that, Windows 8 Consumer Preview setup you need to have this product key: DNJXJ-7XBW8-2378T-X22TX-BKG7J in order to continue to finish the installation process.
Lastly just wait till this finishes.
When everything are all over you will see this "beta” fish (Betta) has changed over since the last time you saw it.
The CPU,
however, increases from the 1GHz ARM Cortex-A8 to the 1.4GHz MSM8255
Snapdragon/Scorpion which certainly helps add snap to the Windows Phone Mango operating system.
The
Nokia Lumia 800 (£400 SIM-free), although being the more expensive of
the two Nokia Windows Phone offerings (the other being the £299
SIM-free/£199 PAYG Nokia Lumia 710) shares the Nokia N9's 16-bit AMOLED
ClearBlack display whereas the Nokia Lumia 710 sports a 24-bit
ClearBlack TFT.
This
being said, even though the colour depth is theoretically deeper than
in the Nokia Lumia 710, AMOLED screens are seen as better than the older
TFT technology due to the more vivid colours and better contrast
ratios.
Moving away from Nokia comparisons, the Lumia 800 also has to compete with the likes of the HTC Titan and HTC Radar Windows Mango phones. When we compare screen size we find the Nokia Lumia 800 feeling a little small with the HTC Radar and HTC Titan
entering the fray with 3.8-inch and 4.7-inch screens respectively
although all competitors are limited to the same 800 x 480 pixel
resolution.
Obviously the iPhone has managed to be a success with a
smaller screen at 3.5 inches, but the trend towards bigger displays is
increasing all the time, and we have to say we're fans of those over
four inches thanks to the improved internet and media experience.
This
means that the pixel density on the Lumia 800 is a little sharper, but
in our side by side comparisons we noted very little difference between
them.
When it comes to internal storage the Nokia Lumia 800 and HTC Titan are equal with 16GB of fixed internal storage, with the Nokia Lumia 710 and HTC Radar weighing in with 8GB a piece.
Based
on the two manufacturer's product specs it soon becomes apparent that
the Nokia Lumia 800 is intended to compete against the HTC Titan and the Nokia Lumia 710 with the HTC Radar.
When compared dimensionally with the HTC Titan
(131.5mm x 70.7mm x 9.9mm and 160g) we note that the Nokia Lumia 800
(116.5mm x 61.2mm x 12.1mm and 142g) cuts a very slim profile, with a
lighter yet reassuring weight.
The physical appearance of the
Nokia Lumia 800 is a dream to observe and handle, with its smooth curves
fitting snugly to the hand both with and without the protective case
provided in the purchase packaging.
That said, if you're used to
handling the current crop of super slim handsets doing the rounds in
today's phone shops, you can't help but feel the Lumia 800 is a little
on the chunky side, even compared to the iPhone 4S thanks to it being around 10 per cent thicker.
However,
that's not to say it isn't an attractive device, with its large
3.7-inch AMOLED screen pushed to the sides of the chassis and a cool
curved polycarbonate shell gives the phone a very premium feel indeed.
Nokia
has worked very hard on the unibody design here, using top-mounted
flaps to cover the charging port and SIM slot, but sadly leaving the
battery inaccessible. Intriguingly, we're seeing a microSIM here, which
seems to be the fashion for the next wave of smartphones.
The
battery is something we can get on board with as this isn't the first
Nokia device to have an enclosed power pack and makes sense if it allows
a greater design freedom.
There was no easy option for battery removal on the Nokia N8 or Nokia E7,
for example. The problem is that with a charge lasting no more than a
day, the option to switch out the battery, as with the Nokia Lumia 710,
would have been nice.
The microSIM is somewhat more of an
annoyance, since we couldn't even carry an old Nokia as a back-up
because the SIM card is a different size.
SIM card adaptors are
available, but use them at your own risk since they have a tendency to
wedge in some phones. Add to this the frustration when you find that
some operators charge for providing a microSIM when on a standard SIM
contract.
The
SIM to microSIM switch comes down to the simple issue of space. In the
phone, the microSIM sits within the metal assembly bottom right.
The
Nokia Lumia 800 is quite reasonably priced, costing nothing on as
little as a £26 Orange or Vodafone contract with Carphone Warehouse
compared with HTC Titan starting at £31 pm with Vodafone and £36 pm with Orange.
The
major difference between Nokia Lumia series and other Nokia phones is
the fact that it uses the Microsoft Windows Phone operating system. The
system itself is nothing new, of course, releasing its latest
incarnation (WP 7.5) on the HTC Titan and HTC Radar in 2011 and due for an update to Windows Phone Tango later this year.
A major point for and against WP7 for some is that it looks completely different to iPhone, Android, Symbian and Meego as the concept of application grids is nowhere to be seen.
Instead
of the more standard home screen, or "Start Screen" in the case of
Windows phone 7.5, the Nokia Lumia 800 uses "Live Tiles", fitting a 2x4
grid (although Calendar and Pictures tiles are full screen width) of
tiles on the screen, vertically scrolling to display as many tiles as
you wish to add.
Adding tiles to the Start screen is as easy as
left swiping to the apps list, long pressing an app and selecting "pin
to start", with removing a tile requiring a long press on the tile on
the Start page and then tapping the drawing pin with a line through it.
Moving tiles around is just as easy, requiring a long press and then dragging them to the desired location.
At
first we were unsure about the large tile based layout, finding it a
little cumbersome and poor screen re
... Read more »
On Wednesday, Microsoft officially released the Windows
8 Consumer Preview (which is essentially a fancy term for ‘public
beta’). If you’re eager to dabble around with the build in a virtual
machine – perhaps due to the lack of a non-production machine, a spare
partition, the fear of using it in a production environment, or, well,
if you just want to install it in a virtual machine – then you’re in
luck.
Here’s a quick tutorial
that will show you how to install Windows 8 in a VirtualBox virtual
machine, so you can enjoy the Consumer Preview from the comfort of a
safe and sound OS. So, what do you need? A copy of VirtualBox (free), and a copy of the Windows 8 Consumer Preview, which you can grab from here. Let’s get started.
Step 1: Launch VirtualBox and click on the "New"
button to create a new virtual machine. In the wizard that pops up,
select the Microsoft Windows Operating System and the Windows 8 version (remember to select the 64-bit version if your ISO is an x64 copy).
Step 2: Select the amount of memory that you wish to
allocate to the virtual machine. VirtualBox recommends the staggeringly
specific amount of 1536, so I just went with that. Raise or lower the
memory amount as you please, but bear in mind that decreasing it too far
beyond the minimum recommended amount will lead to diminished
performance.
Step 3: Now, you’re going to have to create a new
virtual hard disk. VirtualBox recommends that its size be 20GB; this is
the minimum amount that Windows 8 needs for its x64 version (x86 is
16GB). If you do wish adjust this amount, the only way you can go is up.
Step 4: Select the virtual disk file type that you wish to use. I went with a VirtualBox disk image
as I won’t be using this virtual machine with other VM software, but
you do have the option to select a more generic file type if needed.
Step 5: You will be able to choose between a fixed
virtual hard drive size and a dynamically allocated size. Basically, the
latter will allow your virtual machine hard disk size to increase in
size as it fills up. If you choose to create a fixed virtual hard drive
size, set your HDD size here.
Step 6: We’re getting there. Verify that the settings are the ones that you desire, and create the virtual machine.
Step 7: Now, start the virtual machine that you just created; a wizard will appear.
Step 8: Browse to and select the Windows 8 Consumer Preview ISO that you downloaded.
Step 9: Install Windows 8. Assuming that the previous steps were performed correctly, you should now be viewing Windows Setup.
Step 10: Wrap up the Windows 8 installation process, and voilà.
Offering Verizon Wireless subscribers yet another glossy-looking 4G
LTE smartphone to choose from, the LG Spectrum is a variant of the LG Optimus LTE, also seen in a different form on AT&T as the LG Nitro HD.
The
LG Spectrum packs in a dual-core 1.5GHz Snapdragon processor and 1GB of
RAM, which results in generally snappy performance around the menus and
while using apps. However, the phone still runs Gingerbread (Android
2.3.5), with an Ice Cream Sandwich (4.0) upgrade expected at an
undisclosed date.
What
immediately grabs your attention is the crisp 4.5-inch display, which
shines at 1280x720 resolution at 329 ppi, making it one of the sharpest
screens on the market. It's protected by Gorilla Glass, which keeps the
screen impressively free of scratches.
You'll have to look very
closely to spot individual pixels, though in regular day-to-day use, the
display impresses consistently whether viewing videos or browsing the
web. It's a bit prone to fingerprints, but that's a small price to pay
for a fantastic screen.
The
LG Spectrum sports a slim and sleek build, at just 0.41-inches deep,
with a front facing camera up top and three touch buttons at the bottom.
The center Home button resembles a physical one due its silver sheen,
but like the Menu and Back buttons around it, the phone must be powered
on to use it.
On the back, you'll find a black-and-silver
checkerboard pattern atop a very slick, shiny cover. Without any sort of
tactile grip, it's sure to slide around in some users' hands,
especially as the weather heats up, but it's an attractive and sturdy
backing that can be pretty easily removed from a notch on the bottom of
the phone.
Also
on the back is the 8-megapixel camera lens, which is accompanied by a
small light – the whole of which only slightly juts out from the rest of
the cover. In addition to photos, the lens can also shoot HD video up
to 1080p resolution.
The
top of the phone includes the physical power button, a 3.5mm headphone
jack, and a mini-USB input, which is covered by an attached flap. The
left side of the phone includes a lightly raised volume rocker, while
the right side is completely free of buttons and inputs.
Included
on the LG Spectrum is 4GB of internal storage, but unlike some phones,
we weren't able to access this space by connecting the phone to a
computer. Luckily, the phone also comes with a 16GB microSD card, and it
can accommodate 32GB cards as well. The card is found behind the back
cover above the 1830 mAh battery and adjacent to the SIM card.
The
LG Spectrum is available on Verizon Wireless for $199.99 with a
two-year contract, with the full retail price for the phone listed at
$589.99.
The LG Spectrum launched more than a month after the Samsung Galaxy Nexus
introduced Ice Cream Sandwich (Android 4.0) into the marketplace, yet
is still stuck running Android 2.3.5. Despite the dated OS build, the
Spectrum moves pretty fluidly across the LG-skinned menus and in and out
of apps, putting its dual-core 1.5GHz processor to work.
Seven
home screens are available on the LG Spectrum, with the center one
initially dominated by a large and attractive digital clock widget that
also includes the current weather for your location, along with a visual
representation of the conditions.
Another page is set by default
to contain a scrolling list of large icons that grant access to photos,
videos, and music sorted by albums, artists, and playlists, which makes
it easy to jump into media without digging through menus.
Left
and right swipes get you around the menu screens, with a tap of the
home button bringing you back to the center one. Pinching any home
screen brings up an overview of all seven, which lets you drag and drop
them to rearrange the order.
Rearranging app icons is curiously a
hassle, though, as it's not possible to move them around an
already-filled screen. Attempting to drag an icon into the gap next to
or between others doesn't automatically create a space for it; instead,
you'll have to move an app to another page to create a space to work
with, or delete an icon to do the same.
Various
widgets – including social networking, news, finance, and calendar
options – can be added to any of the home screens, along with shortcuts
and folders for storing multiple apps. LG's Friends+ widget lets you
handpick pals from Facebook, Twitter, and MySpace, and quickly view
their latest status message or photo update. It's a handy tool, but no
replacement for each full-service social networking app.
The
Apps listing is a bit of a headache to deal with, as it offers access
to apps in only one of two layouts: sorted by category, or listed in a
very long and unnecessarily chunky list. We would have loved to just see
a few pages of alphabetically sorted icons, but neither option here is
particularly ideal.
Gingerbread's pull-down notifications tab is a
little busy in this skinned iteration, but offers easy access to a few
helpful settings, like orientation lock, Airplane mode, Bluetooth and
Wi-Fi on/off access, and the ability to control your music.
The
touch buttons located below the screen make it easy to return to the
main home screen, flip back a screen or option in any app, and access
settings and options applicable to the current app or screen,
respectively.
The LG Spectrum offers a pretty familiar take on Gingerbread's
contacts system, letting you search for and join together contacts,
which can be imported en masse from Google, Facebook, and Twitter.
Pairing
together multiple accounts from your friends is as simple as finding
one in your contacts, selecting "Edit Contact" from the Menu touch
button after viewing it, and then pressing the Menu button again to find
"Join." From there, it will suggest other listed accounts that might
match it, or you can view the whole list.
Of course, if you prefer
not to import in contacts, or simply want to add in someone not
affiliated with your social networks of choice, you can easily add them
locally and search for contacts from the box atop the Contacts page.
Calling
On
the calling side, the LG Spectrum includes a clean-looking dialer, with
rectangular touch buttons that collectively fill half the screen and an
auto-complete box that'll suggest numbers from your Contacts as you
dial. Each number press triggers a light haptic response from the phone,
which is an appreciated touch.
At AddictiveTips, we are always looking for newer and better software that can make the life of our readers simpler. Screenshots
are used in several situations; from creating a manual to getting help
on a forum, screenshots act as a visual aid to the topic or problem
under discussion. We have covered a lot of screenshot-taking tools in
the recent, as well as not-so-recent past. Today, we thought of picking
out some of the best screenshot tools and comparing them against each
other for our readers. The following articles contains a roundup of five
of the best screenshot taking tools featured on AddictiveTips.
Being a full-featured screenshot taking tool, Shotty is used as the
primary screenshot taking utility by a lot of people (including a lot of
us at AddictiveTips). Its ability to capture the Aero-Glass effect in
Windows Vista and Windows 7 allows it to take HQ screenshots with
semitransparent borders, along with the shadow of the selected window.
Some other useful features include cropping the captured image,
captioning the image, marking a specific area and inserting text. It can
not only capture the selected windows, but also the windows running in
the background without having to bring them to front. Shotty also lets
you directly upload images to image hosting websites.
Cons:
Even though the high quality image looks pleasing to the eye, the
compression of PNG images is not that good. Resultantly, the size of the
captured image is quite high, and further compression with an external
image editor is required specially if you want to upload it to a
website.
Key Success Factor:
The ability to capture Aero-Glass and shadow effect and take
screenshots of windows running in the background makes this software a
perfect choice for taking high quality screenshots of complete windows.
GreenShot is an open source screenshot capturing software, allowing
you to take screenshots of the complete screen, active window or an area
of the screen. It has been under my own use ever since I started
blogging, specifically for its area capture mode. Taking over the Print
Screen button, it allows you to quickly take area specific screenshots
and edit them. The GreenShot Image Editor allows you to move or remove
the mouse cursor even after taking the screenshot. Other options include
drawing different shapes, adding text to image, obfuscating elements,
filling color etc.
Cons:
The complete window capture of GreenShot is not that good, and
sometimes, either cuts the edges of windows off, or adds a little bit of
background around the edges.
Key Success Factor:
Allowing you to take screenshots by simply hitting the Print Screen
button on your keyboard and selecting the required area makes GreenShot a
very useful and time-saving screenshot capturing tool.
Screenshot Captor is one of the most extensive and comprehensive
screenshot taking tools out there. It has an array of options allowing
you to take screenshots, edit them, add special effects, add colors,
objects and share the screenshots. You can specify pre-capture and
post-capture settings, and edit the image using the built-in editor. You
can create mailing lists to share captured images with multiple people
or print them directly from within the application. Other options allow
you to crop image to selection, resize the image, adjust image, enhance
selection, blur the image, adjust its colors, add captions, change its
transparency etc. There is also support for multi-monitor setup allowing
you to take flawless screenshots across all connected monitors.
Cons:
Compared to GreenShot or Shotty, setting up and learning to use
Screenshot Captor can be a bit difficult. Users will have to put some
time and effort in getting to know the software to use it at its full
potential.
Key Success Factor:
To be honest, I cannot name any one factor which makes this tool
stand out from the crowd. The massive number of options let you perform
almost every thinkable function for capturing and editing the
screenshot.
Live Capture can easily be a direct contender to Screenshot Captor in
terms of the number of available options. It boasts a whopping total of
not 4 or 5, but 12 screenshot capturing modes. Each mode can be
equipped with its own hotkey. That’s not all, there is also a Magnifier,
Color Picker, Color Palette, Ruler, Editor, Crosshair, Protractor and
GIF animator packed within the application. The "Capture Bar” stays on
top of every window – with adjustable transparency – allowing you to
quickly grab the screen you want. Other than the usual file capturing
modes, Live Capture has Window Control Capture, Timing Capture, Repeat
Last Capture, Web Capture and Program Menu Capture.
Cons:
The application doesn’t have its own image editor. You will have to
use MS Paint (selected by default) or any other external image editor of
your choice.
Key Success Factor:
The 12 different capturing modes, supplemented with several other
tools, such as Color Picker and GIF animator, makes it a feature-rich
tool for capturing any kind of screenshots.
Recently, a screenshot taking application named Snappy caught our
eye, mainly because of its Event Capture feature. The Event Capture
feature allows you to set a timer for capture and initiate screenshot
capture on specified mouse and keyboard events, such as every mouse
click, release or double click or every keyboard key pressed or
released. It stores each screenshot in to its own memory and allows you
to Export all the selected images in a single PDF file. The image editor
lets you tag additional data to the image, adjust its RGB values,
Brightness, Contrast and Color, as well as add lines with adjustable
width. There is also an option to directly email the images for sharing
with someone, from directly within the application.
Cons:
It took me a lot of time to find out something missing in this tool,
but finally I noticed that there is no Aero-Glass effect or shadow
capturing option available in Snappy.
Key Success Factor:
The Event Capture option is definitely a useful tool for effortlessly
capturing screenshots specially while making guides and adding visual
aid.
Nokia might be pushing at the high end of the smartphone world with its Lumia 800 and Lumia 710, but the company also has a budget series, Asha. The Nokia Asha 201 is designed for the chatterbox.
And
costing around £65 SIM-free it sounds like a steal, with its QWERTY
keyboard just crying out to be typed on. Our sample came from Vodafone,
which sells it for the even cheaper UK price of £45 on pay as you go.
At
that price you clearly have to expect some less than stunning
specifications. Probably the lack of 3G and Wi-Fi will put many people
off immediately. And then there's the small screen (320 x 240 pixels),
and the rather old hat Symbian S40 operating system that holds
everything together.
But
that low price beckons, and there's a quoted seven hours of 2G talk
time from the battery to lure you too. You've got various colours to
choose between depending on where you buy from, with eye-watering shades
of green, blue, pink and orange all in the mix as well as more
standard, and less frightening black and white.
The
Nokia Asha 201 is a smallish handset considering it totes a mini QWERTY
hard keyboard, and light too, thanks to its plastic shell. At 105g and
measuring 115.4 x 61.1 x 14mm, it's a good size and weight for small
hands and pockets. We bet that youngsters are high on its target list.
The
build is reasonable, but not outstanding. The plastic feels solid
enough, but on our white sample we could see the join between the
pearlescent white backplate and the edges of the phone, which we found
irritating.
There's
a microSD card slot on the right edge, under a hinged cover. You'll
need to use this to boost the 10MB of built-in storage. Other than that,
all the ports and connectors are on the top, with the bottom and left
edges clear.
So,
the top edge has headphones connector, USB port and a connector for the
tiny round pin Nokia mains charger. No, you can't charge over USB.
There's
no volume rocker or shortcut button for the 2MP camera. Meanwhile, the
front of the Nokia Asha 201 houses a physical mini QWERTY keyboard and a
nice arrangement of buttons.
The
central D-pad has a ring where the top and bottom edges move you
through the main screen (it's not a touchscreen), while a press on the
right edge takes you to the calendar, on the left edge to messaging.
Two
soft menu buttons offer various changing functions, and there are two
shortcuts, one to the web (via Opera Mini), and one marked up for
messages but which you can customise. There are also Call and End
buttons. It's nothing special, but it is all quite neat.
The
Nokia Asha 201 runs on Symbian S40, albeit a tweaked version. This is
an old, old, old operating system that's been beefed up to look and feel
modern.
And it does have its good points, but don't for a moment
be fooled into thinking it is a bells and whistles smartphone operating
system. This is what we call 'feature phone plus' territory.
The single home screen looks quite attractive with its favourite contacts, social media and app shortcuts all lined up.
And
you can configure how it looks, too, deciding what you'd like to have
displayed on the home screen. But doing so is a bit of a faff. We had to
walk through five screens to get to the one where we could personalise
the home screen view.
This
being a Series 40 handset, the Asha 201 has a rather old fashioned
Nokia look and feel once you get beyond the home screen. Hit the Menu
button and you are into an icon driven-area with a very Nokia-esque
look.
Elsewhere
there are other shades of old fashioned Series 40. On the main screen,
for example, hit the left softmenu button (marked 'Go to'), and you can
then scroll through a number of shortcuts for quick access to them.
Well, we say quick, it's a bit tedious tapping away at the D-pad, but
if' youre ont used to a touchscreen then you won't find this too much of
a hassle.
Contacts are a bit of a bugbear with the Nokia Asha 201. They aren't
drawn from your Facebook or Twitter accounts when you sign in, so
everyone you know will either need to be on your SIM, entered manually
or copied using Bluetooth-based Sync and Backup if you're transferring
from another Nokia handset.
Manual contact entry is made easier
thanks to the keyboard, but it's still a bit of a pain. You enter a
number and name and then save the contact, then have to come out and go
back in to add other contact info such as email address, postal address,
nickname, birthday and notes.
You can assign contacts as
favourites, and these will appear on the home screen with little
thumbnail photos if you have assigned them. If you've no photos,
hovering the cursor over the generic contact icon will show their name,
and you can then choose the one you want to contact.
It's quite annoying that contacts are listed by last name then first name. It's a lot more formal than we like.
Making
a call is easy enough, but there's no smart dialling support. You can't
start tapping out a name or number on the keyboard and then see a list
of contacts diminishing as you get close to the one you want.
If
you do start tapping something out, the handset only recognises
numbers, ignoring any letters you press, and even then it doesn't search
the contacts themselves to narrow down your selection.
What this
means is that when you want to contact someone specific you either have
to know their number, have them saved as a favourite for quick access,
or trundle through the whole contacts list.
If you’ve been using VirtulBox
as your primary virtualization tool, you must have heard about the
latest iteration – Version 4.0 which hosts many new features in a
revamped UI. Sadly, you wont find portable VirtualBox 4 version over at vbox.me.
Today, we have a simple trick that requires you to download Portable
Virtualbox v3.2.12, which you can use to make VirtualBox v4.0 portable.
Before starting out, it is recommended to backup previous VirtualBox data. In Portable-VirtualBox folder, you need to rename app32 folder to app32.old.
Now on launching Portable VirtualBox, you will get to see the initial
configuration (Extract And Compress) window, requiring user to either
download VirtualBox or specify its path. Here, you need to specify the
path for VirtaulBox 4.0 installation package, – VirtualBox-4.0.0-69151-Win.exe. Choose your system type 32 or 64 and hit OK to make your VirtualBox 4.0 portable.
The HTC Sensation XE built well on the success of the original Sensation, but since the launch of Ice Cream Sandwich toting handsets at MWC 2012 it is in need of an update to keep up with the pack.
HTC
has done just that providing the Sensation XE with Android 4.0.3 Ice
Cream Sandwich, coupled with its own Sense 3.6 overlay update. A new
Sensation XE should now run Ice Cream Sandwich out of the box.
If
you own a HTC Sensation XE currently running Android Gingerbread, the
Ice Cream Sandwich update will be available in the near future.
If
you do need to update over the air we suggest hooking yourself up to
Wi-Fi to ensure a speedy download. All you need to do is to go to
Settings > About Phone > Software Update and follow the on-screen
instructions. In total it took us less than 30 minutes to download and
install Ice Cream Sandwich on our Sensation XE.
Now the Sensation XE sports Ice Cream Sandwich it jumps in between the quad-core One X and the mid-range One S in HTC's line up.
The Sensation XE goes up against devices such as the iPhone 4S, Samsung Galaxy S2 and Motorola Razr and can now be picked up for free on a £25 per month contract or £400 sim-free.
The
Sensation XE is a good looking device with its black case and red and
silver detailing. The premium feel is certainly present with the metal
and rubber unibody case allowing the Sensation XE to sit comfortably in
the hand and providing a sturdy build.
Due
to the quality materials used by HTC on the Sensation XE's body, it
weighs in at 151g – heavier than rivals such as the Galaxy S2 (116g) and
iPhone 4S (139g), but it's not overbearing and reinforces the premium
feel of the phone.
HTC
has gone down the minimalist route with the Sensation XE with just two
well placed and easy to hit physical buttons on the handset, a volume
rocker on the left and a power/lock key on top, accompanied by a 3.5mm
headphone jack.
There
is a third button on the base of the HTC Sensation XE which allows you
to slide off the solid unibody case – providing you access to the SIM
and microSD slots as well as the 1730mAh battery.
You'll
still find the punchy 1.5GHz dual-core processor under the hood, vivid
4.3-inch HD (540 x 960) display on the front and the Dr Dre-inspired
Beats Audio technology to blast tunes down your ear canals.
Rather
disappointingly for a high end phone the Sensation XE only provides 1GB
of internal storage, but an 8GB microSD card is supplied in the box and
it can support a card up to 32GB in size.
It will come as no surprise that the interface on the HTC Sensation XE is where the bulk of the changes have occurred post-Ice Cream Sandwich update.
Not
only does the Sensation XE bring the latest version of Android to your
fingertips, it also delivers HTC's new Sense 3.6 overlay. Now, you may
well be asking where Sense 4.0 is, but this version is only available on 2012 handsets such as the HTC One range - as it's not compatible with older devices.
Ice
Cream Sandwich brings in a raft on new features and improvements to the
Android operating system, but don't panic if you're a loyal HTC user as
the Sense 3.6 overly ties it all together nicely in a familiar skin.
What
we notice straight away is the Sensation XE feels more fluid. It seems
faster than pre-Ice Cream Sandwich - not to say it was slow while
running Gingerbread - but it looks like the addition of Android 4.0.3
has managed to streamline the user experience.
So you downloaded Windows 8 and now want to try it out on VirtualBox
but are constantly getting errors? You are not alone. Installing
Windows 8 on VirtualBox is tricky but not that hard once you get to know
the basics. In this guide, we will explain the step by step procedure
to installing Windows 8 on VirtualBox 4.1.2 (which is the latest
version). Advanced users might want to skip the first few steps and
directly go to settings.
Important Note: Before we begin, make sure your
processor supports Virtualization Technology and is enabled. Windows 8
will not work if your processor does not support Virtualization
Technology. Most processors support Virtualization Technology but the
option is not enabled by default. You can enable Virtualization
Technology option from the BIOS. Now let’s begin!
First grab VirtualBox (link given at the bottom of the post) and
install it. You will get few Oracle permission pop-ups where you have to
click Allow. Once installed, launch VirtualBox and click New. The New
Virtual Machine wizard will open up, click Next.
Type the name of the Virtual Machine, we named it Windows 8, select
Microsoft Windows as Operating system, and select Windows 7 as version. Important Note:
Even if you are running VirtualBox on Windows 7 x64, you still have to
select Windows 7 from version. Do not continue if Windows 7 (64-bit) is
selected, otherwise VirtualBox will crash. When done, click Next.
We will recommend allocating at least 1GB memory if you are
installing Windows 8 32-bit, and at least 3GB memory if you are
installing Windows 8 64-bit. I have allocated almost 4GB of RAM as you
can see in the screenshot below. When done, click Next.
VirtualBox provides options to either create a new hard disk or use
an existing hard disk as a Start-up Disk. By default, it is set to
Create new hard disk. Leave it as it is and click next.
In this step, make sure VDI is selected. VDI stands for VirtualBox Disk Image. Click Next.
In this step, select Fixed size or Dynamically allocated based on
your needs, so that it does not eat up more virtual disk as allocated by
the user. We selected Fixed size but most users prefer Dynamically
allocated.
By default, VirtualBox allocates 20GB hard disk space for new
machine. You can increase or decrease this amount. We would strongly
recommend not to allocated less than 20GB. When done, click Next.
In the last step, you will be given a quick summary of the settings
you have selected. Click Create to begin creating virtual disk file.
It will take anywhere from 5 minutes to 30 minutes to create a
virtual disk space, i.e, a fixed medium storage unit. Please note that
it can take more than 30 minutes if you have allocated more than 20GB
hard disk space for new machine.
Once the process is complete, in the final step, click Create and you
will be taken to the main interface where the Virtual machine will be
ready.
Now go to Settings, click System from left sidebar, and make sure that Enable IO APIC is checked in Motherboard tab. You can uncheck Enable absolute pointing device since it is not used by most users.
When done, move to Processor tab and make sure that Enable PAE/NX is checked.
Finally move to Acceleration tab and make sure both Enable VT-x/AMD-V and Enable Nested Paging are checked.
Checking all these settings are important, otherwise Windows 8 will not install on VirtualBox.
Now go to Storage from the left sidebar and click Empty under IDE Controller. Click the CD icon next to CD/DVD Drive selection box and click Choose a virtual CD/DVD disk file. Now navigate to the Windows 8
... Read more »
So you've read TechRadar's in-depth Google Nexus S review,
you've reconciled the (now much lower) price and you've ordered the
latest smartphone - now it's time to turn into a power user.
Here's
a round up of the secrets and tips you'll need to know to get the most
out of your latest gadget, so read on to go from Android amateur to
Nexus know-it-all.
1. Reclaim the comma
One
of the first irritations you'll encounter with the Google Nexus S is
the lack of a comma - the keyboard has a voice search icon where the
oft-used symbol should be.
But
there's a way to reclaim it - head into Settings, and choose Language
and Keyboard. Tap Android Keyboard and in there you'll see a dropdown
menu labelled Voice input.
From here you can select whether the
voice search icon is on the front screen, the symbol menu or delete it
altogether - and more importantly, the comma is back where it belongs.
2. Inbuilt battery graph
A
massive problem for smartphones is the battery maintenance - so many
devices have offered such poor battery life that some have been rendered
virtually unusable.
The Nexus S isn't that bad in terms of
holding its charge, but if you want to see what's happening with your
battery, the phone comes with a battery graph built in.
Simply
go into Settings, then tap About Phone. Open Battery Use and hit the
smaller battery graph at the top - this then opens up into a
fully-fledged graph complete with information on how fast your power
depleted and what the phone was doing at the time.
3. Get rid of unwanted apps quickly
You probably know already how to uninstall applications on the phone in the menu system.
But this can take a while, and ultimately frustrate you into leaving some apps that you didn't reach.
But if you open up the Android Market, you'll see a Downloads tab that shows you everything you've nabbed from Google's portal.
Choose
any of these and the option to Uninstall is present in the bottom
right-hand corner - the list is easier to access and quicker to use, and
you can give feedback to the developer on why you uninstalled it too.
4. Boost your media experience
The
media experience on the Android 2.3 platform is unfortunately not that
good natively - incompatibility with many file types and basic operation
mar the experience.
For music, we recommend MixZing - it has all
the features of the Android experience but also has Genius-like
abilities to mix a playlist based on a single song choice, as well as a
decent inbuilt EQ make it a real step up.
For
movies, mVideo Player is the one we reach for instantly whenever we
pick up an Android phone. The powerful player has a high level of file
compatibility, multiple bookmark options and even a slider for
brightness management.
You can even see the clock when viewing a video if you so wish - an oft-overlooked feature.
5. Unlock the power of voice
We mentioned we didn't like the voice input icon on the keyboard, but that doesn't mean we aren't fans of voice search.
From
calling and navigation to text entry and Google searching, your voice
can be activated by simply holding down the search key.
If
you're already in an application (say text message editor) you can hit
the icon to simply say your text - although you'd have to ask whether a
phone call makes more sense at this point.
6. Stop the constant sipping
We've mentioned battery management earlier - and there's a way you can stop it plummeting downhill instantly.
If you head into the Settings menu and choose Accounts and Sync, there's a large checkbox for background data.
If
you only periodically check things like social networks or email, then
this is a great way to save some power, as you can get the same
functionality by just manually updating when you open the app.
It
does mean things like push notifications won't work, but if you're after
a decent battery saving and don't care about instant updates, give this
a go.
7. Go 3D with Google Maps
Google
Maps 3D is here - well, for Cardiff and Birmingham in the UK. The new
Google Maps 5.0 for Android is by far the most powerful offering so far,
with the 3D vector view allowing you to zoom in and twist around
certain cities from your mobile.
Other
additional functions include compass orientation, for easier foot
navigation, and offline caching, where the phone cleverly works out the
places you frequent the most and downloads the date when you're on Wi-Fi
and plugged in (ie on the nightly charge).
8. Unlock your file system
Although
some phones (like the Samsung Galaxy S) include an inbuilt file
management system, the Google Nexus S has no such functionality.
This
means when you've copied media across to the phone but can't see it in
the gallery you're pretty much stuffed - unless you download a file
manager.
We're
fans of Astro - not only is it ridiculously easy to fly through the
folder branches, it can also unzip folders and search for file names -
and it's free too.
9. Take a picture of yourself
One
of the new features of Android 2.3 is a support for video calling, and
to that end the Google Nexus S has a front-facing camera to facilitate
it.
The problem is there's no mainstream application to let you
call using the front VGA camera - but you can still use it to take
pictures.
Simply
fire up the camera and hit the camera switch icon in the bottom
right-hand corner - you can take slightly gawpy pictures of your mug as
quick as a flash.
10. Easier copy and paste
Android 2.3 comes with enhanced copy and paste, making it easy to just hold down a word and see it copied to the keyboard.
In
text editing, you can cut or copy the word, and on the internet you
simply need to long press on a phrase and drag the tabs to choose the
selection you're after, with a quick tap auto-copying the text.
The
tabs are now much larger and easier to manipulate as well, making it a
much more simple experience when trying to move text from one place to
another.
11. Check out the downloads
This might sound like a simple update, but there's now a dedicated application for items you've downloaded from the internet.
It
saves you having to delve into the internet browser to get pictures or
applications you've snaffled from the web, and delete them easily too.
12. Bars to stop you scrolling
When
you're running through a list and get to the bottom, sometimes you're
not sure whether you've reached the end or if the phone is still loading
more options.
Google has added in some orange flashes when you
hit the top or bottom of a list as a visual cue - it's not the most
piviotal upgrade, but it's certainly adds to the sheen of your phone.
13.Magic tricks with photos
OK, not technically magic, but it certainly feels as cool as a card trick.
When
in the gallery view, you already will know that the stacks of pictures
mean there's more than one item in that category - but here comes the
awesome part.
Put two fingers on the top of the stack, pull them
apart and watch as the pics fly between your two
... Read more »
The PlayStation phone is the device equivalent of El Dorado, in that
it's spent a long time as a golden fable to trot out when conversation
slows. Now the fusion of gamepad and Android phone has emerged into the
modern world in the form of the Sony Ericsson Xperia Play.
It's a time when iPhones have permeated the globe, able to deliver tactile gaming on the go, and Nintendo's 3DS is making waves by bringing portable 3D fun to the masses.
Even within the Sony stable, the Xperia Play has rivals to overcome. There's the NGP, successor to the PSP, on the horizon, which will arrive boasting enough processing power to run the LHC (well, a quad-core CPU and graphics processor, at least).
What's more, it must establish itself over a selection of fast and competent Android handsets, such as Sony Ericsson's Xperia Arc, which will also have the chops for 3D gaming of the non-stereoscopic kind.
As a
gaming-oriented mobile, the headline feature here is, of course, the
slide-out controller section. This comes bearing a D-pad, the familiar
PlayStation face buttons, a pair of touchpad 'thumbsticks', two shoulder
buttons and some menu keys. There's also an accelerometer on board, and
the four-inch 480 x 854 multi-touch screen for getting all handsy with
your software.
Powering
this is a 1GHz Snapdragon processor with embedded Adreno 205 GPU
graphics, 512MB of RAM and Android 2.3, or Gingerbread. While that's
competitive in terms of modern smartphones, we have to admit we were
expecting more pixel-pushing oomph.
Rounding
out the offering are a smattering of features, including Wi-Fi and 3G
connectivity, 5MP camera, Bluetooth and a bundled 8GB microSD card.
Okay,
now you know what's on offer, let's talk price. SIM-free, the Xperia
Play will require a £480-520 extraction from your wallet, and to get the
phone free on a contract will typically require paying £35-40 per
month.
To put that in perspective, you could get the much-lauded Orange San Franciscoand a 3DS
for the same cost as a SIM-free Xperia Play, with change enough for a
small library of games. For this kind of money, you'd be right to expect
legendary performance.
The Xperia Play hardware itself isn't
unattractive, but it is bulky, coming in a finger-width shorter than a
closed 3DS and a few millimetres less thick at 62 x 119 x 16.5mm.
It's
heavy as well, and feels too plasticky in the hand, mainly thanks to
the creaky, glossy backplate. Oh, and the whole device retains
fingerprints better than a crime lab database.
Holding
the phone upright as you would to make a call, along the left-hand side
of the slide-out section is a 3.5mm headphone socket and the micro-USB
port. We're not huge fans of how the jack is placed, given its location
makes the provided headphones rub against the base of our thumb while
playing games and gets in the way for movies.
On the top edge of
the phone is another less than ideally placed button – the power/lock
switch. Because it's recessed, it requires a fair flex of the index
finger to operate, which can be faffy at key moments.
The
right-hand side has the shoulder buttons (more on them in a bit) and a
volume rocker, which is in a great place for adjusting volume on the fly
during calls, but awkwardly right behind the middle of the screen
during gaming.
There's a minimal selection of non-backlit buttons
along the bottom of the screen too to handle navigating duties. These
are: Back, Home, Menu and Search respectively. They're pleasant enough
to use, but we think you'll find it hard to make them out in the dark.
One
neat touch is that when you flip the phone over and take off the
backplate, you can access the sim slots and microSD card without
removing the battery.
Not quite the killer start we'd hoped for, but we've yet to venture onto the Xperia Play's home turf: gaming.
The interface on the Xperia Play looks pretty similar to its cousin, the Xperia Arc.
By default, there are five Home screens to populate as you wish, with a
persistent dock-like bar along the bottom with space enough for four
customisable icons and a static menu launcher.
The Contacts and
Phone apps take up the right two slots, with the left two given over to
the Media folder and Messaging. We fast swapped out the Media file for
the Browser, given that one of the five Home screens is already filled
with widgets for the Gallery and Music apps, but you can hone this bar
as you wish.
Tapping the centre icon on the dock brings up a list
of apps to add to your Home screens, and all you need do is press and
hold one to drag it into a free slot. Handily, the background lines
behind it will turn green when you've found a valid place, so organising
is fast and intuitive.
One
minor quibble we do have is that you'll have to bypass this system and
go via the external menu key to place widgets, folders and shortcuts,
which seems a little inconsistent and caused us some early confusion.
By
default, the centre screen is almost entirely given over to the
Timescape widget, which acts like a stream of postcards, each presenting
Facebook and Twitter updates as well as text messages. Much like the
Friend Stream system we've seen on recent HTC models, each of these acts
as a slick starting point for finding the content you want.
Other
screens tend to be more open, but notably there's one screen dedicated
to gaming, with a half-screen widget for the PlayStation Pocket app and a
link to the Android Market to buy more games.
All you need do to
navigate between screens is swipe left and right, but there's also an
exploded view of all your widgets that you can access by pinching. Tap
on a widget and you'll be taken to its resident Home screen.
We're
not huge fans of this system, since it neglects to show you apps as
well, making it selectively useful, but if you're a widget-fiend then
it's perfect.
Scrolling left and right between Home screens is
generally quick and fluid, though. However, we've found it can be jerky
just after waking the device from its slumber in the mornings. On the
flip side, we were impressed by the speed of the scrolling Rolodex-style
widgets (as well as the PS Pocket, there's one for the Gallery, too),
making them eminently usable.
Taken as a whole, the system doesn't quite gel together as we'd like, but its not hard to learn to work around its quirks.
Contacts are accessed through the icon found by default in the dock
and the menu. You can also access the phone dialler, call log and
favourites from the menu at the bottom.
Importing our contacts to
the phone proved as simple as providing our Google log-in details, and
there's a wizard in place to help you get contacts onto the phone in
various other ways too.
The PS Vita is the most powerful, dazzling and impressive handheld games console ever built.
It
packs not one but two quad-core processors, a sparkling 5-inch
touchscreen OLED display, dual analogue stick controls and games that go
way beyond what any other portable device is currently capable of.
That includes the Nintendo 3DS,
which may wield 3D optics as its trump card, but nonetheless simply
cannot compete with the Vita in terms of graphical fidelity. What the
PlayStation Vita offers is more akin to a home console experience on the
move, and that puts it in an elite class of one.
Of course,
whether or not there is a big market for such a device is an interesting
question, and we're in the process of getting some early answers. A
sluggish start in Japan has been followed by some less-than-stellar
sales figures in the first weeks of its UK and US launch. It doesn't
come as much of a surprise.
After all, it's a luxury item
launching post-Christmas into a Western world ravaged by financial
floundering, and further hindered by Sony's desperate need to make money
at a time when the strength of the Yen makes exported Japanese products
very expensive.
Take a look at PS Vita gameplay footage, the new interface and touch controls in our video:
But we'll
get to that a little later, and as far as this PlayStation Vita review
goes, we're looking at the product as a stand alone piece of hardware,
how it stacks up against the competition and whether or not it offers
value for money.
The basics
In many ways,
despite the new name, the PlayStation Vita is another revision of the
Sony PSP legacy with plenty of much needed evolution on top.
The
same basic form factor returns and it doesn't look too different from
its predecessors. But this is a wolf in sheep's clothing. A beast among
men. A veritable fire-breathing monster compared to those long-dead PSPs
in the sky.
The
curvy oval shape returns, and measures 7.2-inches from end to end. So
it's the biggest Sony handheld ever, with a height of 3.3-inches and a
thickness of 0.73.
Sony's reasoning has clearly been: if we're
going to make the world's most powerful handheld console, we might as
well make it the best it can possibly be. That involves packing
industry-leading visuals, hence the 5-inch OLED screen which on its own
is as big as the entire PSP Go console was.
We think the enlarged
size is a worthwhile compromise, and this Wi-Fi only model weighs in at
just 260g which is 20g lighter than the original, smaller PSP 1000. So
when you pick it up you'll react to its apparent lightness.
On the table
The front of the console is a smorgasbord of hardware delights.
To the left of the screen you'll find the classic Sony D-Pad, a left analogue stick, a left speaker and the PS Home button.
To
the right you'll find your classic PlayStation triangle, circle, square
and X buttons, as well as a right analogue stick, right speaker, a
0.3MP front-facing camera and the Start and Select buttons you're most
likely very familiar with already.
On the top side of the Vita are left and right shoulder buttons - there are no trigger buttons like you'd find on a PS3
Dualshock controller. Between the shoulders you'll find the on/off
button, volume controls, the PS Vita Card slot (which we'll discuss in a
moment) and a terminal to plug in any number of as-yet non-existent
peripherals.
The
base of the console houses the proprietary USB connector for charging
and connecting to PS3 etc, as well as the headphone/microphone adapter
and the Memory Card slot.
And finally, the rear of the PS Vita is home to the brand-new rear Touch Pad, a rear 0.3MP camera and a microphone.
Price
At
launch the PS Vita will set back UK gamers around £209.99 (RRP
£229.99), while the 3G version will launch a little later for £259.99
(£279.99). At the time of writing, the cheapest deal for the PS Vita is
£197 at ASDA, while Amazon have matched that price.
There are bundle deals if you shop around, and these include different combinations of PC Sivta with memory cards and games.
Which is the best Android phone for you? We've got the answers
Our verdict on the best Android phones - constantly updated
There's one key way in which Android
is massively different from its Apple-branded smartphone competition -
the number of phones out there running Google's hot mobile OS.
Samsung
makes loads of them. Sony Ericsson makes a few. Then you've got
Android-powered phones from Acer, LG, Huawei and many others, while HTC
releases more in a month than all the rest added together manage in a
year.
The many
variations in screen size, processor power, software features and design
makes finding the best Android phone for you extremely tough.
Do
you physically and emotionally need a QWERTY keyboard? Are you the sort
of oddball who prefers the rough pressing needed to make resistive
touchscreens work? Are you struggling to work out which are the best Android Widgets? Or even stuck wondering: 'Actually, what IS Android?'
To
help find the best Android phone for you, we've rounded up the ten best
Android handsets out there today, rating the phones on hardware
performance, OS upgrade potential and, of course, how shiny and nice
they are to have and boast about to work colleagues.
So here they are - the ten best Android phones money can buy today. For many, many different reasons.
10. Sony Ericsson Xperia Mini
It
is indeed very mini, but Sony Ericsson has performed a tech miracle in
squeezing a capable 1GHz processor into its tiny chassis. The Xperia
Mini runs Android 2.3, enhanced significantly by the company's user
interface, which adds lots of style and extra functionality to Google's
on-fire mobile OS.
The email app with its resizing preview pane is
as sexy as an email app is ever likely to get, the jiggling app drawer
edit screen (with the ability to delete apps right from the listing) is
very nice, plus you get themes, a cool power off animation and much,
much more.
The
screen's responsive, text appears sharp, the camera capable of producing
good stills and passable 720p video footage. It does it all in an
impressively condensed package.
Quick verdict:
Small,
and very nearly, perfectly formed. If you can live with seeing the
world through a small-ish 3" screen, it's a great, highly usable
smartphone.
Samsung
took screen size to a ridiculous new level with the Galaxy Note,
offering us a huge 5.3" display that's by far the largest of any
smartphone out there today.
You also get a stylus, which is
pressure sensitive and comes with great handwriting recognition tools,
plus dual cameras (8MP and 2MP) along with an LED flash around the back
and rather decent image results.
As with all of Samsung's newest
Android models the Note is a solid performer, running Android 2.3
impeccably, with the same TouchWiz interface we've seen on the likes of
the Galaxy S II.
With
the show running at a super-high 1280x800 resolution, it's a
sharp-looking, smooth-running phone for those who don't want their style
cramping.
Quick verdict:
A great mobile, as long as you're not easily embarrassed by whipping out something so comically huge in public.
Orange stuck its logo on another ZTE-made phone in 2011, hoping to recreate the successes of the super-budget Orange San Francisco. And there are some reasons to upgrade to the £150 Monte Carlo, the most obvious being the larger screen.
ZTE's
stuck a large 4.3" display in here, which runs at a decent 800x480
resolution. It's not as dazzling as the displays on similarly sized
phones like the Xperia Arc, but it's still a big, solid screen considering the budget price.
Unfortunately
the Android 2.3 OS has been modified by Orange, which has made it
all... orange. But at least the network has added a nice gesture-based
control system that works well, while the Monte Carlo also generally
runs smoothly, powering web pages and apps well. Shame about the VGA
video recording spec, though.
Quick verdict:
It doesn't have quite the same transformational appeal as the San Fran, but it delivers a lot of phone and punch for the money.
Motorola's
newest flagship is by far its best Android offering so far, fusing a
unique hardware design with a less obtrusive user interface skin.
In
fact, Motorola's UI is actually quite fun to play with nowadays, coming
with resizable widgets and its extremely clever Smart Actions
automation system, which lets you set all sorts of time and
location-aware rules up and running.
The phone is solidly made,
and although impressively skinny, the odd, bulbous camera unit and
extra-wide bezel make it feel chunkier in the handy than the likes of
the Xperia Arc S and the older Galaxy S II. Still, if you like them a bit different, the Razr certainly stands out from the pack.
Quick verdict:
Impressively
built, fast hardware with a great display, plus a well refined Motorola
interface. Best current Moto mobile by miles.
Nearly two years ago the HTC Desire was the cutting-edge "superphone" of choice, now its enhanced sequel is an affordable mid-range option.
That's
how fast things move in the Android world. But don't dismiss the Desire
S because of its workmanlike approach. What you get here is a solid
phone with a great 3.7" screen, powered by Android 2.3 and HTC's updated
Sense 2.1 user interface. The result is a very slick and smooth
experience.
The camera is sadly a weak point, though, offering the
same blotchy 5 MP output as the original Desire. But apart from that,
everything here's a little better than in last year's Desire. Which
makes this a fantastic smartphone and a great entry to Android.
Quick verdict
A
superb update of the HTC Desire. Slightly smaller and a little faster,
it's a perfect gradual evolution of 2010's smash. Available on some very
cheap contracts, too.
An image of the Samsung Galaxy S3 has apparently leaked online,
prompting speculation that the phone could be unveiled to an expectant
tech world before the month is out.
Sourced by Phone Arena, the snap shows a handset with the same super
slim form factor and opinion-dividing plastic exterior as the
blockbuster blower that is the Galaxy S2.
However, in keeping with more recent smartphone challengers (CF:
Nokia’s Lumia 800), this time around it seems Sammy has dispensed with
front-facing physical buttons in favour of on-screen pressers.
Also noteworthy is that the screen appears extended too, perhaps
tallying with rumours that the S3 will feature a super-sized display in
the region of 4.8-inches, almost pushing it into tablet territory.
Less convincing than the image, though, is text on the screen that
suggests that the device will make its debut on March 22nd. We're very
much inclined to doubt that. Not least because, as Phone Arena’s scribes
point out, the font looks wrong and smacks of a Photoshop mock-up.
Also causing us to doubt its veracity is that Sammy previously warned
tech fans to expect the phone in the first half of the year. That
suggests to us that it’s more likely to be a second-quarter release than
any time in the next few weeks
Battery fix is being pumped out to all corners by April 18
Nokia has released the long-awaited update that promises to fix the Nokia Lumia 800's less-than-perfect battery life.
The
first Nokia phone to run Microsoft's Windows Phone operating system,
the Lumia 800 has been beset by bugs since its release, most notably a
very short battery life.
The new software (version
1600.2487.8107.12070) is rolling out across the globe from today until
April 18. Lumia 800 owners can check on the Nokia site to find out if the update is already available for their country and network.
25-30 hours battery life after update
Dinesh,
the Nokia employee who announced the update, reports that he has been
getting 25-30 hours of battery life with fairly active use (though five
of those hours are in flight mode – which is cheating, isn't it?).
Other
changes include beefing up the Lumia 800's weak bass to improve sound
quality in calls and music, as well as tweaking the illumination
settings of the soft keys.
However, Wi-Fi tethering is still missing, and we're told simply that it's "on its way".
What should you do when you forgot the password to login to Windows
system? Ask an administrator to reset the log on password for you. If
you yourself are administrator, and you can’t remember the administrator
password, the problem get a little tricky, and probably hard to recover
the ‘forgotten password’ again. Before you search for recovery CD or
Windows DVD to format and reinstall Windows onto the computer, here a
few ways you can try to unlock the Windows to gain access to the system
again, at least by resetting the password.
Method 1: Take a rest, and try hard to remember the forgotten password
Sometimes, human being is a little weird. You won’t get the thing
that you urgently need. So have a coffee, take a snap or even come back
after a few days, you may found that you suddenly ‘remember’ your
Windows password.
Method 2: Try No Password Administrator Login Backdoor
In Windows XP (not Windows Vista as Administrator account is not
enabled by default), there is built-in Administrator user account, that
has administrative credentials, enabled by default, and without any
password to protect the account from been access. If you didn’t change
this Administrator’s password, then try to sign in to Windows XP without password.
Method 3: Reset password from another user account with administrator credentials
If you cannot log on to Windows by using a particular user account,
but you can log on to another account that has administrative
credentials, follow these steps on how to do the trick:
Log on to Windows by using an administrator account that has a
password that you remember. You may need to start WinXP in safe mode.
Click Start, and then click Run.
In the Open box, type "control userpasswords2″, and then click OK.
Click the user account that you forgot the password for, and then click Reset Password.
Type a new password in both the New password and the Confirm new password boxes, and then click OK.
Method 4: LOGON.SCR password reset trick
LOGON.SCR changing administrator or domain admin password hack works
on Windows NT 4.0 and some versions of Windows 2000. The simple trick
uses Cmd.exe as screen saver that triggered by system when idle,
allowing users to access to command prompt to change password.
Method 5: Do-It-Yourself (DIY) third party recovery tool
There are a lot of tools and utilities that can be downloaded and
used to recover, reset, retrieve or reveal existing password. These
password reset or retrieval utilities, free or paid, are usually a Linux
boot disk or CD that able to comes with NT file system (NTFS) drivers
and software that will read the registry and rewrite the password
hashes, or can brute force crack the password for any user account
including the Administrators. The advantage is that there is no fear of
leaking your password to outsiders, while the process requires physical
access to the console and a floppy or CD drive, depending on which tool
you choose. And it’s not easy, although it always work!
Offline NT Password & Registry Editor
– Available as bootdisk or bootable CD, Offline NT Password and
Registry Editor works to change or reset password of any users on
Windows NT 3.51, NT 4, Windows 2000, Windows XP, Windows Server 2003,
Vindows Vista 32 and 64 bit. It can also detect and offer to unlock
locked or disabled user accounts.
Download Links:
cd080802.zip (~3MB) – Bootable CD image and can be used to make bootable USB drive. bd080526.zip (~1.1MB) – Bootdisk image for floppy disk drivers1-080526.zip (~310K) – Disk drivers (mostly PATA/SATA). drivers2-080526.zip – Disk drivers (mostly SCSI).
John the Ripper password cracker
– John the Ripper is a fast password cracker based on dictionary attack
with a wordlist currently available for many flavors of Unix (11 are
officially supported, not counting different architectures), Windows,
DOS, BeOS, and OpenVMS. Its primary purpose is to detect weak Unix
passwords. Besides several crypt(3) password hash types most commonly
found on various Unix flavors, supported out of the box are Kerberos AFS
and Windows NT/2000/XP/2003 LM hashes, plus several more with
contributed patches.
EBCD – Emergency Boot CD
– EBCD is a bootable CD, intended for system recovery in the case of
software or hardware faults. It is able to create backup copies of
normally working system and restore system to saved state. It contains
the best system software ever created, properly compiled and configured
for the maximum efficient use. Features are such as copy files from
unbootable volume, recover master boot record of HDD, recover deleted
file, recover data from accidently formatted disk and floppy disk. EBCD
also includes function to change password of any user, including
administator of Windows NT/2000/XP OS without the need to know the old
password.
Both contains necessary NT password recovery feature.
Ophcrack
– Windows password cracker using time-memory trade-off on LM and NTLM
hashes based on rainbow tables and supports Windows Vista, XP, 2003 and
NT. This tool allows you to retrieve existing password.
RainbowCrack
– Crack Windows password using time-memory trade-off cryptanalysis
based on rainbow tables. Unless you already has dumped the hash for your
Windows password, else this utility is for hacker as it provides no way
to retrieve the password hashes when you unable to access to your
computer.
L0phtCrack (LC5) – L0phtCrack (now known as LC5) is a
password auditing and recovery application by using dictionary,
brute-force, and hybrid attacks. originally produced by Mudge from L0pht
Heavy Industries, and was produced by @stake after the L0pht merged
with @stake in 2000. Support and sales has been discontinued by Symantec
from end of 2006, after it acquered @stake in 2004. So you probably
need a crack that lists below. If you unable to sign on to your
computer, you probably can’t use this.
Cain & Abel
– Cain & Abel is a password recovery tool for Microsoft Operating
Systems. It allows easy recovery of various kind of passwords by
sniffing the network, cracking encrypted passwords using Dictionary,
Brute-Force and Cryptanalysis attacks, recording VoIP conversations,
decoding scrambled passwords, recovering wireless network keys,
revealing password boxes, uncovering cached passwords and analyzing
routing protocols. The program does not exploit any software
vulnerabilities or bugs that could not be fixed with little effort. It
covers some security aspects/weakness present in protocol’s standards,
authentication methods and caching mechanisms; its main purpose is the
simplified recovery of passwords and credentials from various sources,
however it also ships some "non standard” utilities for Microsoft
Windows users.
This tool needs to be installed, so you must have another working
computer to recover your password remotely. Thus it’s likely to be
useful for system administrator only. Supports Windows Vista.
The latest Unity, available in Ubuntu
12.04 Precise Pangolin alpha 2 feels very smooth and is actually quite
stable for an alpha. Besides many bug fixes, there were also many tweaks
and changes designed to make Ubuntu 12.04 "pixel perfect" and while
we'll obviously not cover all of them, you can read about the most
important changes below.
The Ubuntu button ("BFB") now has quicklists let you quickly access any available lenses:
The Dash / Launcher color can now be changed:
In Ubuntu 12.04 Precise Pangolin alpha 2, when launching an application, the menu is initially displayed on the top bar and is only hidden after an amount of time which can be modified (along with the fade duration) through CCSM.
Until now, the menu would always
be hidden and only show up on mouse over, but this behavior made the
menu hard to discover for new users, so with this change, the Unity
developers hope to make the menu easier to find. And in case you were
wondering: no, you can't set this to a huge value to basically disable
autohiding the menu - the maximum value is 10:
In the screenshot above, you can also see the new "Show desktop"
button (yeah, Unity didn't have this until now) which can be enabled
from the CompizConfig Settings Manager. In the same screenshot you'll
also notice thatCCSM no longer uses sliders - they were removed
because users could accidentally change various settings by just trying
to scroll through the CCSM interface. This is just a first attempt to
improve CompizConfig Settings Manager, more changes should follow to
make sure users can't break Unity by just changing some settings.
With Ubuntu 12.04 Precise Pangolin alpha 2, work has started to integrate Unity settings with the System Settings
(GNOME Control Center), under "User Interface". For now, the available
options include: setting the launcher icon size, enable/disable launcher
autohide and autohide reveal spot:
The new Unity settings integrated into System Settings work with both Unity 3D and Unity 2D,
however, since not all settings work with both Unity versions (for
instance, you can't change the launcher icon size for Unity 2D), only those supported will be displayed for each Unity version.
As for Unity 2D, besides the new Unity settings integration mentioned above, there only one change worth mentioning: the top panel has finally got buttons to close maximize/restore Dash:
Other changes
LightDM received an update too and in Ubuntu 12.04 Precise Pangolin alpha 2, the login screen uses the background you set for the desktop. This works for multiple users too - in this case, the LightDM login screen background changes depending on which user is selected, using a nice effect - you can see it in action at the end of the video in the beginning of this post.
By default, Ubuntu Software Center adds newly installed applications to the launcher. This can, be disabled by unckecking "New Applications in Launcher" from the Ubuntu Software Center View menu:
Also, Ubuntu Software Center now
automatically installs language support packages so there's no need to
open "Language Support" after installing new applications.
There are some more Unity features already available in the Unity PPA and the Unity Staging PPA which have not landed in Ubuntu 12.04 Precise Pangolin yet:
New shortcuts hints overlay - a list of Unity keyboard shortcuts which is displayed when pressing and holding the SUPER key
Launcher switcher which you can use to switch between applications via the Unity Launcher using SUPER + TAB
A new "home" lens for Dash which displays recently used applications, files and so on, replacing the old shortcuts
Rovio clears up the confusion and will launch Angry Birds Space for WIndows Phone
Rovio has confirmed that Angry Birds Space will indeed come to Windows Phone handsets, contrary to an earlier statement from the developer.
The
Finnish company had initially said remaking the game for Microsoft's
momentum-gaining operating system would be too much work and thus it had
no plans for offer the new title.
Peter Vesterbacka, head of marketing told Bloomberg
that: "We're the No. 1 app in the Windows Phone app store, but it's a
big undertaking to support it, and you have to completely rewrite the
application."
The announcement will have raised alarm bells with
Microsoft and its preferred partner Nokia as the pair seek to establish
themselves as a serious alternative on the same level as iOS and
Android.
Relief for all concerned
Thankfully for the
pair, and Windows Phone adopters, it appears that something may have
been lost in translation as a second statement, just hours later on
Friday, cleared up the matter.
Rovio Chief Executive Mikael Hed told Reuters: "We are working towards getting Angry Birds Space to WP7," although he didn't offer a release date for the title.
A
studio like Rovio dumping Windows Phone at this stage of its
development could have had disastrous consequences for Microsoft in its
battle to win hearts and minds.
While the company has produced an
intelligent and original operating system, it could barely afford a "no"
in reply to the question: "Can I play Angry Birds on it?"
Has the world gone crazy? What is it with these lemmings, standing on
long lines spending so much money - for what? An new iPad 3? What do I
need a new iPad 3 for?
And yet, you're tempted. After all, this is the 21st century, and Apple's tablet is a uniquely 21st century device.
And you're even more tempted by the five reasons I gave yesterday for buying a new iPad 3 (hereafter abbreviated iP3).
To
help you resist the cultural and technological pull, here are five
justifications for responsibly resisting your tablet temptations.
1. iP3 is inappropriate for kids.
For
one thing, sharper small text is meaningless for largely large
type-size, image-based kid activities, eliminating iP3's key upgrade
benefit. Plus, junior's finger smudges would mar any of iP3 higher
resolution advantages. Kids also aren't likely to need the sophisticated
gaming or productivity apps that require the kind of super-charging
iP3's improved A5X chip provides.
But most of all, do you trust your young'un with such an expensive toy? And speaking of expensive...
2. It's too expensive.
In
a world with a more pocket-friendly $200 Kindle Fire and other
lower-priced/lower resolution Android tablets, there's no need to spend
so much money on a new tablet simply to casually surf the Web, answer
occasional email or read an e-book.
Plus, if you'll use your
tablet mostly at home or where you know there'll be Wi-Fi connectivity,
you can opt for a cheaper Wi-Fi-only tablet.
3. An iPad 2 is good enough.
There is nothing wrong with an iPad 2 - it's not as if it's a 1978 Ford Pinto with 200,000 miles on it. In fact, iPad 2 was state-of-art just a couple of weeks ago.
If
you have resisted buying a Blu-ray player because you believe your DVDs
look just fine, than either your current iPad 2 or buying a newly $100
discounted or even a refurbished iPad 2 to save $150 will certainly satisfy.
4. I hate Apple's ecosystem.
Yes,
once you buy into the Apple ecosystem there really is no escape. Any
music, movies or books you buy in iTunes will play only on Apple
hardware, which means you'd lose all your media content if you, at some
future date and for whatever reason, decide to switch operating system
sides.
Living in the Android or even the Microsoft Windows
Phone/Windows 8 world is far more forgiving. You get more media purchase
options and device flexibility – all your purchased media bought from
any source will play on any Android or Windows Phone device from any
manufacturer – and keeps you from being co-opted by the cult of Apple.
Even
I sometimes feel a little Apple claustrophobic, but I consider the
company a velvet dictator. Or maybe I'm just rationalizing my purchased
content trap.
5. Why do I need it?
If you
equate "need" with breathing, eating and wearing clothes (at least in
public), you don't need an iP3. Even if you equate "need" with watching
TV, social networking, reading or a clock radio - although any tablet
combines all these activities into a single portable gadget - you don't.
Like
anything else, you definitely should decide on a specific need before
plopping down $499-$829 for a device whose precise personal utility
you're still fuzzy about.
Although, once you buy one you won't know how you lived without it.
Almost four months ago, OS X Lion
escaped from the Mac App Store and took up residence in Macs around the
globe. And for the most part users are quite happy with their new house
guest. Yet part of the fun with any new operating system release is
uncovering all the new features - and make no mistake, this big cat has
plenty of them.
Despite Apple's efforts to outline more than 250
new features in OS X Lion on their website, many users are still
discovering new items daily, which is keeping the folks who track such
features working overtime in their efforts to expose them.
However,
we realise that many of you don't have enough time to put on your
sleuthing cap and play Sherlock Holmes with us. That's why we've
assembled a massive list of all the cool little discoveries we've found.
So without further ado, let's get our big cats in a row (so to speak), dig in our claws and unearth 80 OS X Lion tips...
01. Birth date year optional
Many
of us know the month and day of our family and friends' birthdays, but
we might not know the year. Thankfully, Lion's Address Book couldn't
care less, allowing you to enter just the month and day, which will
carry over to iCal just fine - without displaying their age. Make sure
Birthday is selected in Address Book > Preferences > Template >
Add field.
02. FaceTime calling
OS
X Lion also adds a FaceTime link to the Address Book to make it easy to
keep up with friends and family. With a contact open, click on any
email address, choose FaceTime and enjoy your chat.
03. iPhoto faces
OS
X Lion makes it easier to attach images to your contacts in Address
Book by linking to iPhoto's Faces feature. Double-click on a contact's
photo and after a moment, click on the Faces icon at the bottom-left to
browse from your iPhoto library. Make your selection, zoom and crop and
you're good to go.
04. Lose the space
By
default, OS X Lion treats the Dashboard overlay as one of your
desktops, much to the chagrin of long-time users. This deprives it of
its quick-reference usability. Fortunately though, it's easy to undo,
simply by opening System Preferences > Mission Control and unchecking
the very first option, 'Show Dashboard as a space.'
05. Assign your desktops
All
apps in OS X Lion can now be assigned to specific desktops, all
desktops or none at all, right from the Dock. To do this, simply
Ctrl-click on the app in question, manoeuvre to Options in the pop-up
menu and select the appropriate choice from the 'Assign To' options.
06. Access recently opened files
The
OS X Lion Dock just got a little more useful with the addition of a
list of recently opened files for relevant applications. To access them,
simply Ctrl-click on any app in your Dock and up pops a list of
recently used files for that selection.
07. Volume encryption
FileVault
2 got a major overhaul with OS X Lion, and one of the biggest features
has to be the ability to encrypt an entire volume rather than just a
user's Home folder. Just turn it on, enter a recovery key and sit back
as a blanket of security is applied to your entire volume.
08. Lose the indicator lights
So
you love the Dock, but just aren't feeling it for those indicator
lights below each open application. No problem - OS X Lion now allows
you to turn them off by opening System Preferences > Dock and
unchecking 'Show indicator lights for open applications'.
09. Quick Look stacked files
Finally,
stacks are made more useful! From any folder stack in your Dock, simply
mouse over the one you'd like to Quick Look and hit the space bar. As
if by magic, you'll get a nice big preview of that file, same as you
would from a Finder window, in fact.
10. Encrypt external disks
In
addition to encrypting your entire system volume in OS X Lion (instead
of simply a user's Home folder in the prior version), users can now
choose to encrypt external USB or FireWire drives as well. The option
will come to your attention in the Disk Utility app at the time of disk
formatting.
11. Emoji emoticons added to special characters
This
tip actually works from any app that uses the Edit menu. To get your
Emoji on, simply go to Edit > Special Characters and browse to the
new Emoji section of the sidebar. Double-click or drag a selection to
insert it into the active text field.
12. File sorting
OS
X Lion introduces a new toolbar method for sorting files based on a
variety of options including name, kind, application, four date-related
options, size, label or none, which keeps things the way they were in
Snow Leopard. Now you can separate folders from documents and much more,
making it easier than ever to find what you're looking for.
13. Gesture navigation
If
you prefer to view your files as icons, OS X Lion now allows for
gesture-based navigation as it displays Finder items. Files in each
particular group are now displayed in rows of icons, allowing you to
easily swipe through them with a trackpad.
14. Keyboard shortcut to Downloads folder
Once
a file you've downloaded has vanished into Safari 5.1's tiny Downloads
window, how can you find it again? There are several ways, but one of
our favourites is using the Command+Option+L keyboard shortcut in the
Finder. This pops it open - even if you were just browsing another
Finder folder.
15. Merge folders
In
the past, copying a folder with the same name to a new location was
strictly a no-no. That's all changed in OS X Lion, and now you'll get
the option to merge folders or keep both folders when doing so. Oh, how
we love the little things in life…
16. Move instead of copy
We've
always been able to move files to different folders by dragging and
dropping with the Command key held down, but now keyboard junkies have
even more options. Simply use Command+C as always to copy one or more
files, then use Option+Command+V when pasting, which will actually move
the file from its original location to the new destination.
17. Navigate with gestures
With
all of the new gestures, it's no surprise that Apple removed the
previous method of navigating back and forth through Finder windows. But
it's still there - simply hold down the Option key while you swipe left
or right with three or four fingers (depending on how you have it
configured) to navigate Finder windows instead of spaces.
18. New folder with selection
If
you frequently move files into folders, you'll love OS X Lion's new
ability to select one or more files, then pull up a contextual menu with
a Ctrl-click. At the top of the menu you'll see 'New Folder with
Selection' - select it and watch as your files literally jump into a new
folder.
The follow up to Lion is called Mountain Lion. See what they did there?
Apple has today released details of its next-gen OS. Dubbed Mountain Lion, it's the follow-up to OS X 10.7 Lion and prior to that Snow Leopard and Leopard.
As such it's full name will be OS X 10.8 Mountain Lion.
Let's
make one thing clear - this is not a meghat's striking about Mountain
Lion is how much further towards iOS Apple is taking its desktop OS -
Mac purists will be rightly concerned that Apple seems to be moving its
operating systems together to a point where they will converge, but for
the rest of us a unified OS is a tantalising prospect.
"The Mac
is on a roll, growing faster than the PC for 23 straight quarters, and
with Mountain Lion things get even better," said Philip Schiller,
Apple's senior vice president of worldwide marketing in a statement.
"The
developer preview of Mountain Lion comes just seven months after the
incredibly successful release of Lion and sets a rapid pace of
development for the world's most advanced personal computer operating
system."
OS X 10.8 Mountain Lion: release date
Mountain
Lion has been released to developers today and should be available for
consumers this summer - expect a further announcement at Apple's
Worldwide Developer Conference (WWDC) in early June.
Apple says
theMac OS X 10.8 Mountain Lion release date is late Summer 2012. As with
Lion, Mountain Lion will be available as a download from the Mac App
Store.
OS X 10.8 Mountain Lion: iOS integration
The new OS
incorporates a number of features right from iOS - we had some in Lion
of course, but Mountain Lion includes reminders, notifications and
Twitter integration as well as Messages, Notes (separate, not within
Mail) and Game Center.
Reminders and Notes help you create and track your to-dos across all your Apple devices. These
all sync to iCloud, as does your gaming record in Game Center. More
importantly, the arrival of Game Center in OS X means you can play iOS
users in the same game. Apple has demoed cross-platform gaming with Reckless Racing - expect many other games to follow suit.
OS X 10.8 Mountain Lion: iOS terminology
One
of the most striking things about the new OS is how Apple is renaming
everything on its desktop OS to fall in line with iOS. So iCal is now
called Calendar, while Addresss Book has become contacts, for example.
OS X 10.8 Mountain Lion: iCloud integration
Apple
says Mountain Lion is the first OS X release built with iCloud in mind
for easy setup and integration with apps. Whatever that means.
Well
actually what it means is that Mountain Lion will use your Apple ID to
automatically set up Contacts, Mail, Calendar, Messages, FaceTime and
Find My Mac.
And iCloud will also sync Documents across your
devices - any changes are pushed across all your Apple kit so documents
are always up to date. Apple has also announced a new API to help
developers make document-based apps work with iCloud.
OS X 10.8 Mountain Lion: iMessage
There's
also a Messages app that takes the place of iChat, allowing you to
continue conversations started on Mac on any iOS device. iMessages will
work much as they do on iPad. Again, messaging is unlimited between
Macs and iOS devices.
This includes high-quality photos and
videos, while the Messages app will continue to support AIM, Jabber,
Yahoo! Messenger and Google Talk. The continued support for the later is
especially pleasing.
What's more, any Mac OS X Lion user can get hold of a beta of Messages from apple.com. The final version will be available with Mountain Lion.
OS X 10.8 Mountain Lion: Notifications
Mountain
Lion also nicks notifications from iOS. Again there's a Notification
Center that provides easy access to alerts from Mail, Calendar,
Messages, Reminders, system updates and third party apps.
And,
just like in iOS, you pull it across from the right of your desktop.
Developers will be able to bake in support for this in their own apps.
OS X 10.8 Mountain Lion: Safari
Safari now gets the ability to search right from the address bar, just as you can in Chrome and Firefox.
OS X 10.8 Mountain Lion: Share Sheets
A
new feature, called Share Sheets, is supposed to make it easy to share
links, photos and videos directly from Apple and third party apps.
Sounds like a clipboard to us. However, it enables you to share various
types of content with whoever you choose. The interesting thing here
is that Apple has partnered with Flickr for photos and Vimeo for video.
OS X 10.8 Mountain Lion: Twitter integration
And, of
course, there's Twitter. The service is integrated throughout Mountain
Lion so you can sign on once and tweet directly from all your apps
including Safari, Quick Look, Photo Booth, Preview and third party
apps.
OS X 10.8 Mountain Lion: AirPlay mirroring
Following
on from other attempts at computer-based wireless displays, such as
Intel's WiDi, Mountain Lion introduces AirPlay Mirroring. You'll be able
to mirror your computer screen on a TV wirelessly, though you'll need
an Apple TV to connect through. There's 720p HD support (although other
systems do support 1080p, Apple TV doesn't) and supposedly amazing
realtime response rates for gamers using the mirroring app.
OS X 10.8 Mountain Lion: Gatekeeper
Think
there's no need for security software on a Mac? Think again. Apple has
introduced a new security feature called Gatekeeper that allows for
personalised security settings, working as a kind of safety net for
less confident users by offering a setting that allows the Mac to accept
only software downloaded from the Mac App Store.
OS X 10.8 Mountain Lion for developers
Apple
says it has created hundreds of new APIs for OS X 10.8. As well as that
iCloud Documents API we talked about earlier, the Game Kit APIs tap
into the same services as Game Center on iOS, making it possible to
create multiplayer games that work across Mac, iPhone, iPad and iPod
touch.
There's a new graphics infrastructure underpins OpenGL and
OpenCL and implements GLKit from iOS 5, to make it easier to create
OpenGL apps.
What more is there? "Using Core Animation in Cocoa
apps is easier than ever, and new video APIs deliver modern 64-bit
replacements for low-level QuickTime APIs. Enhanced Multi-Touch APIs
give developers double-tap zoom support and access to the system-wide
lookup gesture. Kernel ASLR improves security through enhanced
mitigation against buffer overflow attacks," says Apple.
OS X 10.8 Mountain Lion for Chinese users
China
is now a massive market for Apple. And as such Mountain Lion introduces
new support for Chinese users, "including significant enhancements to
the Chinese input method and the option to select Baidu search in
Safari."
Apple has also announced easy account setup for some of China's biggest email service providers including QQ, 126 and 163.
Chinese
users can also upload video via Share Sheets directly to video
websites Youku and Tudou, and while we like Twitter, there's
system-wide support for Sina weibo.
Not quite the killer feature we thought it would be
Opera 10.10 (Unite) review
Opera 10.10 has something very clever up its sleeve with Unite
When Opera 10 was released early last year, it was supposed to
include Opera Unite, which turns your browser into a server. Unite
wasn't ready in time, and in our review a while ago we said: "We wanted to see Unite here… there's no killer app to tempt users away from rival browsers."
Opera
10.10 finally brings Unite to the party. So is it Opera's killer app?
We're not sure about killer, but it's certainly clever.
Unite is a
sandboxed server that can be used by Unite applications to share data:
photo albums or media streaming, for example.
Simply run the
application on your copy of Opera, leave your PC connected to the
internet and you – or anyone you give the URL and, if appropriate, the
password to – can access that content from any web browser.
It
works flawlessly, but we're not sure Unite makes sense for large-scale
sharing. It might take a while to upload stuff to Flickr, Vimeo or
DropSend, but once the upload's over, the bandwidth bill isn't a problem
if your content becomes popular.
Where Unite does make sense,
however, is personal sharing. Because you can use Unite to serve content
to PCs, Macs, Linux boxes and smartphones, it's a handy feature for
frequent travellers or anyone who needs to access their work from
multiple locations.
Slick and fast
Even
if Unite doesn't float your boat, there are plenty of other reasons to
give Opera a whirl. The unusual interface is rather lovely, Turbo speeds
up web browsing on slow Wi-Fi or 3G connections and you can sync
bookmarks from PC to PC.
You also get the usual Opera features, including integrated email, content blocking, RSS reading and mouse gestures.
It's
faster than Internet Explorer by some margin, it's more functional than
Chrome and it's smarter and slicker than Firefox. Nevertheless, Opera's
share of the browser market remains under three per cent, while
Internet Explorer 6 still gets around 11 per cent.
Opera 10.10 is
the best version of Opera yet, but we suspect that the browser is
largely preaching to the converted minority. It's a shame.
Ever since Internet Explorer beat Netscape and turned into the web
industry's least favourite boat anchor, Microsoft has been struggling to
turn the tide.
IE7 was little more than a statement that it
planned to become a contender again, and IE8 was a decent overhaul, but
one whose success came firmly from being a Microsoft release rather than
because of any intrinsic improvements over its rival Firefox.
With IE9, everything's changing. For starters, XP isn't supported – unless you're on at least Vista, you can't use it.
The
once heavy, intrusive browser has been stripped down, now focusing on
the web content you're looking at rather than trying to impress you with
gimmicky features, heavy interfaces or many of the other IE hallmarks
we've seen over the last five years.
In short, IE9 is now Google
Chrome. It looks like Chrome, it smells like Chrome and, while it
doesn't work as well as Chrome, it's still in beta.
Notable
visual issues right now are the blank gap where the title should be,
which niggles the eye every time it catches it, and the way the address
bar forces your tabs into a much smaller area, greatly reducing how many
you can comfortably use.
Subtle changes
Many
of the new features are ones we've seen before, such as being able to
rip tabs out of a window at will, or more subtle notifications when IE
wants to check that you're okay with a page or alert you to something.
There
are some new ones though, including the ability to add bookmarks to
your Taskbar and run them like applications, and Aero Peek support for
the tabs you have open in your browser – at the time of writing, Chrome
only displays the active browser window.
It feels like Microsoft
is putting its ego aside and realising that it's the web pages that
matter. This is how the whole industry is going at the moment, and it's
good to see it not trying to fight it. After all, when you're the
dominant player, you don't have to.
It's unlikely that IE9 will give you a real reason to switch back, but it should be an excellent update if you use it by choice.
Microsoft has admitted that it faces a major challenge in getting
people to give Hotmail another go, despite the great strides taken in
making the webmail service significantly better.
Speaking to
TechRadar, Microsoft Group Product Manager for Windows in the UK, Ian
Moulster believes that people's perception of hotmail is based on the
service as it was five years ago, and believes that the real trick is
persuading people to give the service another try.
"The perception issue in itself causes people to not want to switch or not to even look," said Moulster.
Moulster: "People think of Hotmail and think of the way it was five years ago with lots of spam, slow and clunky."
"They
are using Gmail or Yahoo mail and it seems to work – and they think of
Hotmail and think of the way it was five years ago with lots of spam,
slow and clunky.
Would I switch?
"They think it's going to be hard to switch anyway so they ask 'why would I switch?'.
"It's
an interesting problem to have. There are lots of cool things in
Hotmail that people would look at and say 'that's pretty cool and it
will make my life easier'."
Moulster believes that Microsoft as a
whole needs to be more vocal about the strides its online services like
Hotmail and IE9 have come, as well as talk about the impressive Skydrive
cloud storage that is becoming increasingly important to the company
and yet remains largely unknown to the general public.
"We just
don't shout enough about the stuff that we have got," Moulster added.
"We don't shout about many products at all – there's very few we make a
noise about.
"We're primarily a software company and we have great products and the focus is on making those products as good as possible.
"We
do need to tell people about the things we do and make sure people are
aware of how good these products have become as well and I put IE9 in
that bracket as well.
"I don't think people realise how much better they are now; just how good those products are."
The leaked build still says Office 15 (Mondo refers to the edition)
Office 15 will be here next year. And, what's more, it'll be getting the Windows 8 look.
There will also possibly be a Windows 8 authoring tool as well as HTML add-ins too.
So what are we expecting to see in Office 15?
What will Office 15 be called?
Microsoft's
PR team refers to "Wave 15" without giving any details (like "Wave 15
is currently under development, but we have nothing further to share at
this time"). Several Microsoft job adverts and LinkedIn profiles for
Microsoft employees use the name Office 15, and the Access team has
referred to Access 15 - but Office 15 is unlikely to be the final name
(Office 2010 had the Office 14 codename).
Although a discussion about SharePoint by what appears to be a Microsoft employee
refers to Office 2013, the name is almost certainly going to be Office
2012. As usual, we're expecting multiple Office 2012 versions from
starter to home and small business versions as well as a full Office
2012 enterprise edition, with different combinations of apps.
When is the Office 2012 release date?
A
job advert for Office Mobile testing in October 2010 referred to
"Office 15 and Windows Phone 8 planning phase just getting under way",
rumours in March suggested the code had already reached Milestone 2 and
what looks like a legitimate build leaked in May. The Office division
takes two to three years to put out a new version and we saw the beta of
Office 2010 in February 2010 followed by RTM in May.
Microsoft
names products by the year after the financial year they come out in (so
they don't look out of date immediately), but Microsoft's financial
year ends in July – so anything that releases to manufacturing after
July 2012 would have 2013 in the name. Office 2012 beta will probably
show up early in the year again, with final code by the middle of 2012
and the actual Office 2012 release date would be before late summer.
Office 2012 features
"Office 15 is shaping up to be one of the most feature packed and exciting releases," says a Microsoft job advert.
There's obviously noting official on the Office 2012 features at this
stage but there are some hints, like Office president Kurt delBene
saying at the Worldwide Partner Conference "We want to remain the
leaders in productivity on the desktop. We need to push forward in new
scenarios that we had not delivered before."
CLEAN LOOK:The OneNote 15 interface is sparser and easier to navigate on a tablet
There's
going to be more video (both editing and using for meetings), more
social network integration and maybe a whole new experience for
meetings tying together the invitation you send in Outlook, the
presentation you give in PowerPoint, the notes you take in OneNote and
the Lync client you use for the online meeting.
Office 2012 interface
The
Office 2012 interface is going to change from what we've seen in the
leaked builds so far, but we'd bet anything you like that it's not going
to lose the Office ribbon. OneNote 15 already has a new look in the
leaked build with a much cleaner interface that will work well on tablet
PCs, and a quick thumbnail navigation to get to recent pages that also
looks tablet friendly.
PowerPoint 15 doesn't have any new themes,
which reports from WPC mentioned, but it does preview themes straight
from Office.com; it also has a new random transition option. A new M1
tab on the ribbon (probably a reference to new features in the Milestone
1 build) has a Data Grid tool that opens a redesigned version of the
Chart picker with a new combo chart type. The same tab is in Word 15,
along with an Extensions dropdown; there's nothing on it but it's where
the new programming model we've been hearing about fits in.
CLOUD LINKS:No new transitions in the PowerPoint 15 leak but note how you can see themes directly from Office.com
Outlook
shows the most interface differences, with a cleaner look that has more
white space and resembles the Outlook Web App you get with Exchange and
Office 365 - but again it keeps the ribbon. Instead of the vertical
stack of buttons in the current interface there are Mail, Calendar and
Contacts buttons at the bottom to switch to those views - and a menu
with the familiar icons for Tasks, Folders and Shortcuts which lets you
add them at the bottom as well.
METRO LOOK:More white space like Outlook Web App in Office 365, but the notifications and bottom buttons are very Windows 8
This
has hints of the Metro style underlying the Windows Phone 7 and Windows
8 interfaces, especially with the notification icon for new messages
and tasks. The M1 command here is for sorting subfolders alphabetically
rather than keeping them in the hierarchy you created.
Office 2012 collaboration
The
co-authoring features in Word and the Word Web App show up in small
changes to the change tracking, making it easier to filter by who made
changes or when changes were made. That's part of what Word program
manager Jonathan Bailor was promising when Office 2010 came out. "
In
Office 15, we'd love to take collaboration and communication to the
next level. We've unlocked all of these new ways to work and a new set
of expectations from users, and we're like, "Put us back in the ring;
we're ready for round two." Until coauthoring a document is as easy and
ubiquitous as e-mail attachments, our job isn't done."
One hope is
that Office 15 might deal with some long-standing issues in Office,
thanks to an intern who worked on improving search features on
Office.com and built a tool so the Office developers could look at what people are searching for and "leverage the data in Office '15' planning".
Is there a new app in Office 2012?
Maybe
but it isn't Limestone; that's the same internal testing tool we saw in
Office 2010 builds. The leaked build includes a new program called
Moorea (there isn't a shortcut for it on the Start menu but you can run
it anyway).
WINDOWS 8 LOOK:The new Moorea app lets you place images, text and links to Word documents on a tiled layout that's very Metro
This
lets you create layouts with images, text and links to Word documents,
on a widescreen grid of tiles; it looks ideal for packaging up content
into a Windows 8 tablet layout and we think it might be a tablet
authoring tool – the files it saves are HTML…
Is Office 2012 based on HTML?
No.
There's Moorea, which looks like a nice way to build HTML interfaces
for content, and there's a new application model for developers creating
tools on top of Office using JavaScript and HTML (although Visual Basic
and C# are still there). A Microsoft job advert explains "Integration
of JavaScript/HTML5 will enable developers to create rich applications
that span clients and server, integrate with Office 365, enhance the
SharePoint experience, and unlock new scenarios that unleash the great
potential that lies in the combination of Office and the cloud." One
theory; developers might be able to create add-ins for Office that would
also work with the Office Web Apps.
Free for a limited time, the new Photoshop features a new Crop tool and overhauled Adobe Camera Raw, among others
Hot on the heels of Adobe Photoshop Touch, Adobe has unveiled the beta version of Photoshop CS6, and it's available for anyone to download and try for free, whether you're an existing Photoshop user or not.
While there are no unexpected must-have features, there are lots of tweaks and minor upgrades to the existing Photoshop CS5 and Photoshop Elements 10 tools.
When
starting up the Adobe Photoshop CS6 beta for the first time, for
example, you will notice that it has a new darker interface to help you
focus on the image you're editing.
But
there's more to the update than a superficial interface makeover. So
here we explore 10 of the most important things about the new software.
Adobe
has introduced the Mercury Graphic Engine to enable Photoshop CS6 to
make greater use of a computer's graphics processing unit (GPU).
Consequently, it makes some adjustments and edits render more quickly.
2. Photoshop CS6 Beta uses on image controls
Adobe
is moving to more intuitive 'on image' controls, so the strength of
some filters, for example, can be adjusted by moving a control displayed
on the image itself rather than on a dialog box on the side.
This enables you to keep your eyes on the picture, not jumping back and forth to dialog boxes or sliders.
3. Photoshop CS6 Beta has a black interface
By
default, the Photoshop 6 interface is dark, but if you prefer the old
style you can change it back via Preferences>Interface.
4. Photoshop CS6 Beta has a new Crop tool
The Crop tool has been overhauled, and is now similar to the one in Lightroom, so if you're a Lightroom user, you'll have no trouble adapting.
When
it's rotated to straighten the image, the image rotates instead of the
crop rectangle, and you can use guides such as the rule of thirds.
Helpfully, it quickly switches into the straightening mode, enabling you
to you drag a line along an element such as the horizon that needs to
be level. The guides can be changed by hitting the O key.
There
are also shortcuts to a range of customisable aspect ratio options, and
there's a handy command that switches the crop rectangle between
landscape and portrait orientations. Another useful new setting is
Delete Cropped Pixels. Untick it to crop the canvas but leave pixels on
the layer, in case you change your mind.
However, if you really
don't like the new style, tick 'Use Classic Mode' in the Options Bar's
fly-out menu to revert to the old Crop tool you know and love.
5. Photoshop CS6 Beta has a new Filters menu
Adobe
has reviewed the filters provided in CS5 and reorganised the menus for
CS6. It's also dropped a few of the filters, including the Pixel Bender
options.
A
new Oil Paint filter is an astonishing way to transform pictures and
offers a lot of control over the way a seemingly random pattern of
brushstrokes is added to an image.
6. Photoshop CS6 Beta has a new Layers Filter
This
is useful with images that have numerous layers, since it enables you
to filter the layers in the Layers' panel by type, characteristics or by
searching by layer name. It's even possible to see just those layers
with a certain colour.
The filter also enables you to quickly toggle between a subset of layers and the entire stack.
7. Photoshop CS6 Beta reveals a Tilt Shift filter
Photoshop
CS6's new Tilt Shift filter (found in Filter>Blur>Tilt Shift)
enables you to replicate the popular miniaturisation/tilt-shift effects
by adding blur from a plane.
This
filter uses 'on image' controls so you can drag and adjust the effect
on the image, rather than through a dialog box. This is also one of the
GPU-accelerated effects.
8. Photoshop CS6 Beta brings Character and Paragraph Styles
Just like in fellow Adobe Creative Suite program InDesign,
Photoshop CS6's new Character Style and Paragraph Style Panels enable
you to save your favourite font, size, colour, and other type-related
settings and edit them via the fly-out menus.
9. Photoshop CS6 Beta enables local white balance in Adobe Camera Raw
Photoshop
CS6 enables local white balance adjustment in Adobe Camera Raw using
the Adjustment brush and/or the Graduated Filter tool. Another new local
adjustment is Moire Reduction, and the other sliders have been updated
to match the basic adjustments.
Other changes have been made to Adobe Camera Raw too, including its adjustment sliders and save versions.
10. Photoshop CS6 Beta has a Content-Aware Move tool
Adobe's
new Content-Aware Move tool is found in the same Tools Panel button as
Spot Healing and Patch. It extends the Content-Aware Fill technology to
moving a selection, blending it into its new location, and
simultaneously filling in the hole it left.
It needs to be used with care, but when it works well, it's a great time saver.
As you'd expect, IE9 integrates well with Windows 7. The interface divides opinion but we really like it
Competition among browsers is more fierce than ever.
Google's
knocking out new versions of Chrome at an alarming rate, Mozilla's been
pulling nightshifts to improve Firefox, and Microsoft's rejuvenated IE
team is doing great things with its browser.
There are great browsers from Opera and Apple too, not to mention mobile browsers for smartphones and tablets.
So which browser should you be using?
Let's find out which ones offer the best blend of power, expandability and all-round awesomeness.
The best browser for speed
We
tested the latest official releases of the big browsers: IE9, Safari
5.1, Firefox 9, Chrome 16 and Opera 11.6 to see how they performed on
the desktop. All of the big browsers deliver speedy browsing, but there
are still differences when it comes to things such as JavaScript
performance, which affects the speed at which web apps and complex
websites work.
In the Sunspider JavaScript benchmarks Firefox
left its rivals in the dust, storming through the tests in a hugely
impressive 189.4ms. Safari was next with 219.6ms, followed by IE9
(247.9ms), Opera (254.3ms) and Chrome (291.0ms). We saw similar results
in Windows Vista, with Firefox narrowly pipping its rivals to take first
place.
These figures are based on brand new installations without
any plugins, extensions or similar: once you start loading your browser
up with goodies, performance is likely to take a nose-dive.
WOW:Firefox is the speed king on Windows and on OS X, but there isn't much in it: all the browsers are swift
The best browser for add-ons
You
can get add-ons for all the main browsers, but Firefox has the edge
here: its huge number of add-ons and Greasemonkey scripts mean that its
reputation as the Swiss Army Knife of web browsers is well deserved.
It's far and away the most expandable web browser, and it's got the best
browser sync features too. Bear in mind, though, that all of the main
browsers are expandable, and while some - such as Safari - don't have
enormous libraries of add-ons, you can still get the essential ones such
as ad blockers, Twitter utilities and Gmail notifiers.
Opera
deserves a special mention here because it's more than just a browser.
It has integrated email, newsgroups and IRC chat, the Opera Unite file
server, Opera Turbo to improve performance on crappy mobile connections,
and Sidebar-style widgets for games, web applications and utilities.
The best browser for Windows 7
Safari's
the first to fall here: it just looks odd on Windows, and doesn't offer
anything over its rivals. IE9 and Opera are both very nice to use on
Windows 7 and make good use of taskbar pinning and jump lists, but
Firefox has the edge in both speed and expandability and it's our pick
here.
UNEXPECTED?:Opera's a joy to use and worth considering if you like the idea of widgets, integrated email and file sharing
The best browser for Windows Vista
IE9
flies on Vista - it hammered through Sunspider in 193.7ms - but Firefox
is faster still, scoring 192.2ms in the same benchmarks. Safari ran
through the benchmarks in 224.4ms, Chrome 246.6ms, and Opera in 251.2ms.
Firefox isn't just the speediest browser on Vista, but the most
expandable too.
The best browser for Windows XP
Internet
Explorer takes an early bath here, because Microsoft doesn't make IE9
for its ageing OS. That leaves Safari 5.1, Firefox 9, Chrome 16 and
Opera 11.6; of the four, Chrome demands the least RAM and hard disk
space, making it the best bet for older XP systems. That means Chrome's
the best browser for netbooks too: its more modest hardware requirements
are a boon on relatively low-spec machines.
The best browser for OS X
Firefox
was massively in the lead on OS X Lion, rocketing through Sunspider in
153.8ms compared to Safari's 209.2ms, Opera's 214.7ms and Chrome's
225.3. However, it's worth noting that while Safari's figures look good
on paper, they don't reflect the way it chugged through the benchmarks
as if it were wading through treacle.
Firefox's speed is countered
by what we think is a faintly horrible interface. If that isn't your
top priority then Firefox is the best browser for Mac users; if it
annoys you, then Opera or Chrome is a better bet. While Safari is a
perfectly decent browser, its rivals performed better in our tests.
The best browser for privacy
All
of the browsers we tested had excellent privacy protection including
private browsing and warnings of suspicious web pages, but IE9 is
marginally ahead of the pack here: its tracking protection enables you
to subscribe to lists that tell specific kinds of websites not to track
you, which is potentially more useful than a global "do not track"
option.
The best browser for HTML5
All of
the main browsers support the important bits of HTML5, but when it
comes to full standards support Chrome and Firefox are in the lead by a
significant margin. According to the excellent Caniuse.com, Firefox and
Chrome score 89% for HTML5 standards support, with Safari at 78%, Opera
74% and IE9 52%. If you add CSS support into the equation the scores are
87% for Firefox and Chrome, 83% for Safari, 75% for Opera and 59% for
IE.
LAGGING BEHIND:All the browsers support key HTML5 features, but IE9 lags behind when it comes to full standards support
The best browser for Android
The
stock Android browser is pretty good, but we think Opera Mobile has the
edge for smartphones: it's got a lovely interface, goes like the
clappers - we've previously described it
as "comically fast" on decent kit - and synchronises well with its
desktop cousin. On tablets, the standard browser is still our preferred
option: while Dolphin for Pad and Firefox are looking pretty nifty,
they're both still in beta.
CACHE KING: Opera Mobile for Android is particularly good on mobile phones. It's "comically fast" on decent kit
The best browser for iPad
The
lack of tabs in Apple's Safari drove us daft on the original iPad, but
now it's got tabbed browsing and iCloud syncing we think it's the best
browser on the platform, especially on the iPad 2: in our experience
it's faster and more reliable than iCab Mobile, considerably nicer to
look at than Atomic Browser, and less likely to dump you back to the
home screen for no good reason than non-Apple browsers.
it's
just a matter of time: eventually, your computer will get close to
filling up. If you want to free some disk space on your hard drive, it
is very easy to do so.
If your hard drive has been on the edge of overflowing before, you might have
spent some time (or even money!) trying programs which claim to
free disk space on your bloated hard drive.
Oftentimes such programs
won't let you clean your hard drive after they have analyzed it, unless
you purchase their product -- it's a ridiculous money scam that
countless people surely fall for.
You do not have to spend money
to simply free disk space on your hard drive! Hidden amongst the mess
that is the internet, are some free working products and alternatives.
CCleaner
Possibly one of the best software inventions ever is CCleaner,
a program created by Piriform Ltd. CCleaner can free gigabytes from
your disk drive very quickly, without messing up the rest of your PC.
CCleaner
not only removes unused files from your hard drive, but is also
optimizes your system, can clean all traces of your online activities,
and even includes a registry cleaner all for free.
The best part is that is is extremely fast! It's stunning how much junk it cleans in such short periods of time.
Uninstall Programs
While
a hard disk cleaner will free up some substantial space, if you have
large programs, such as video games, installed on your PC, they will be
left untouched. It can be very beneficial to uninstall large, unwanted
programs manually.
To do so is not as daunting as it may sound.
There are many ways to go about this task, and the method is generally
quite similar no matter what operating system your PC is running (for
example, Windows XP, Vista, Windows 7, etc.)
Click the "Start" button in the bottom left corner of the screen
Amazon Price: Too low to display List Price: $229.99
External Hard Drives
If
you happen to have a drive filled with valuable contents that you don't
want to delete, an external hard drive might be a better alternative.
As opposed to hard drive expansions which can be a hassle, an external
hard drive can be linked to your PC very easily. They are also generally
quite affordable. Don't pay more than $0.50 per gigabyte if possible!
External
hard drives have the additional benefit of being portable, so you can
move the drive between several computers and free space on all of their
hard drives!
If you have some spare cash, external hard drives are well worth the purchase.
Online Storage
If
you're someone blessed with a speedy and unrestricted internet service,
then online storage might be the perfect answer to your disk space
problems.
A major benefit to online file storage is that you can
access your files from any computer (or device) from anywhere with an
internet connection!
There are many services which allow you to safely store files online.
Box.net allows free users to store up to 50Gb of data online, with affordable plans available for expansion, and Adrive also allows free users 50Gb of storage, with scalable plans as well.
Conclusion
So
there you have it, the most effective ways to free disk space on your
hard drive. Whether used individually or in combination, you will have
heaps of free space on your hard drive for a long time still!
If
you found this article useful, please leave a comment, rate this
article, "like" or tweet it, or submit it to StumbleUpon or other social
media.
A
common issue that people run into when using VMware is that once they
have created there virtual machine and installed there OS and everything
else they eventually run out of room and decide to increase the Virtual
machines hard disk / partition.
For this example I am running VMware server on Windows Vista , WIth
one virtual machine running Linux Ubuntu 8.04 Hardy and will go through
the steps to increase my harddrive size from 15GB to 25GB
Increasing Hard Disk Size on your Virtual Machine ( VMware )
Step 1.
Firs thing to do is locate the location of vmware.exe on your PC
typically it will be in C:\Program Files\VMware\VMware Server or VMware
Workstation
Once you have located your vmware.exe file open up command prompt on
Windows. [Start -> Run -> type "cmd" in the window then press
ENTER
Now navigate into the vmware.exe directory , in this case simply C:\Program Files\VMware\VMware Server
From here type vmware-vdiskmanager -x 25GB image.vmdk
- 25GB in this case we would like to make the NEW size 25GB , this method will not remove any exisiting files
- image.vmdk , Name of your Virtual Machine disk my example
was Ubuntu.vmdk, if for some reason it doesn't work type the entire path
of the vmdk file for example
Now
that you have used the VMware diskmanager to increase size of the
Virtual Disk Space , this will create a new parition that 10GB in this
case ( original 15GB + 10GB increase). This increased size will not
automatically show up when we reboot our Virtual Machine. We need to
carry out a few extra steps to make use of this newly created space ,
this involves extending the partition or merging two partitions
together.
Step 2.
Before trying to extend your harddrive to include the newly created
partition, you will need to open vmdk file in a second virtual machine.
The reason for this is that you cannot extend a partition on a drive
that you are actually using system files on, It has to be set as the
secondary drive.
So go through the steps of making a new virtual machine and give it
4-5GB or so it doesn't need to be huge. You wont actually need to load
any Operating system on it if you use the LiveCD. Before you run your
second virtual machine you will need to add the harddrive you wish to
increase onto that system , see screenshot
Select your 2nd/Other Virtual Machine, then select Edit virtual
machine settings, Click Add, Select Harddrive and use exisiting virtual
then load your original harddisk , in my case Ubuntu.vmdk
Choose to start Ubuntu without installing it, Run it off the CD (LiveCD)
Gparted
Now
that you have created your secondary virtual machine, Boot it up and in
order to extend our virtual hard disk we will use a inbuilt linux tool
called gparted , there are also many other partitioning programs out
there including fdisk and many others.
Now we want to load up our ubuntu LiveCD instead of having to install
an Operating System, To get your virtual machine to boot up from your
LiveCD do the following.
- Use Daemon Tools or any other mounting program and mount your Ubuntu.iso image.
- Start your virtual machine and soon as it starts press ESC to enter the boot menu and from here select CD-ROM
- This will start your secondary virtual machine with the Ubuntu LiveCD
Running Gparted ( Partitioning Program )
To
run gparted simply enter the terminal window and type "gparted" , and
this will open the gparted gui window. ( Remember to issue this command
with root privledges )
Once gparted has started you will see a window similar to below, We
see two parition that we want to join together below circled in red, To
extend the exisitng partition to the unallocated partition use the
resize button to increase the size of the exisiting partition to
increase the size.
( Ensure the harddrive is unmounted, and swapoff )
Not my original screenshot for this case but you get the drift:)
Resizing Partition , simply drag the handle across to pick a size or type in desired size
Finishing Up
Now
once you have resized your partition to include the unallocated
partition size click apply. This may take sometime for it to resize the
partition size.
Once this is complete shutdown the virtual machine and remove the
secondary harddrive you added in the previous section. Boot your
original virtual machine and you should have successfully extended your
hard disk space.
Gparted LiveCD
There is also a gparted LiveCD which can be run if you have trouble
deleting and creating partitions. Simply mount the gparted LiveCD and
follow the prompts.
If
you have made your way through this howto and still unable to get it to
work you could try the Vmware Converter which can do all this tasks a
lot easier, ( yeaa should've told you a lot earlier) its a free download
and can perform partition extensions easily.
After you have loaded the secondary harddrive on the secondary
virtual machine (windows in this case) to fix the partitions. Run the
command prompt and enter "diskpart.exe" or if that doesn't work locate
its location and run it through cmd using the directory locations.
Steps - type
- show volume
select volume 2 ( in this case , double check to make sure you have the right one)
USB 2.0 Enclosure for IDE Drives - Western Digital, Seagate, LaCie, Maxtor, Iomega - Introduction
Thanks
to the continuing advancement of technology, the world has witnessed
the birth of new gadgets and gizmos that make life and communication a
little easier for everyone. But with the increase in indispensable
gizmos comes the responsibility of learning the jargon and other terms
pertaining to them. It’s not really a requisite to learn the little
nuances.
Consider it more of an advantage if you can
understand what these seemingly complicated and out-of-this-world terms
mean because you are spending good money when you purchase your
equipment in stores. Some are a little bit self-explanatory like the
external hard disk. Though if the term hard disk confuses you, then read
on to learn more about external hard disks and how you can build an
external hard drive from scratch.
Simply put, a hard disk
drive is a device that can store your digital data. It is encased
within a metal case and has one or more rigid platters that rotate on a
motorized spindle. On top of the platters are read/write heads that
magnetically encode your data. Capacity of a hard disk drive varies
depending on the number of heads, tracks and sectors. An external hard
disk is a particular type of hard disk drive that you can connect to
your computer via USB cable among other means.
A
brief history lesson on the external hard disk is also needed in order
to understand this device further. The first incarnations of the
external hard disk were originally bulky in size. They were literally
external hard disks because they couldn’t be stored inside the unit due
to their large size. Pretty soon, compact hard disks that could be
easily stored into the computer’s bays will be available to the market.
Apple Macintosh was a proponent of this early innovation. When USB and
Firewire interfaces became a staple in the design of PCs, the external
hard drive gained further popularity in the market.
Over
the last ten years, USB flash drives have dramatically altered the way
we store and transport important information. Starting with the first 8
MB commercial drives from IBM in 2000, it has been an arduous journey
all the way to the mammoth 128 GB keys available today from many leading
companies.
There has been a lot of flash drives advertised
for sale on eBay, seen in the Amazon Marketplace, and in Google ads of
many Chinese sites. In fact, during 2008 several well-known companies
released 64 GB USB flash drives and they continued to be the largest
available till middle of 2009. But lately many frontline manufacturers
have added 128GB drives to their products. Let us make a honest attempt
to see which makes are the most reliable and wise to buy.
The
Corsair Flash Voyager family of USB drives is indeed sturdy, stylish
and compact. More than all things else, the Corsair Flash USB drives are
reliable for transporting MP3s, digital images, presentations and a lot
more. Flash Voyager USB drives are simple Plug and Play with most
operating systems and are also backward compatible with USB 1.1. The
Sequential Read: 32.6 MB/s and Sequential Write: 28.8 MB/s are
formidable and the speed is comparable to many portable harddrives and
is more than 2.5 times faster when compared with other high-capacity USB
flash drives in the market.
The Corsair USB Flash Drives,
with capacities from 4GB to a large 128GB, offer a hassle-free way to
carry your data with you, wherever you go. Corsair USB drives are
designed to provide foolproof protection for your data, with features
like solid-state electronics, water-resistant or water-proof housings,
and even 256-bit encryption and access control. All Corsair Flash USB
solutions are compatible with the latest Microsoft Windows 7 Operating
System and carry a ten year warranty.
Kingston
have brought out their their Data Traveler USB drives, the 200 series
which includes 128GB USB Flash drive. The drive is password-protected
and the other features are read/write speeds of up to 20MB/sec and
10MB/sec. The password protection is by means of Password Traveler
software, which enables user to create and access a password-protected,
secure area of the drive called a "Privacy Zone.” The Data Traveler
works with Windows ReadyBoost. Like other Kingston USB flash drives, it
is plug and play.
The Kingston DataTraveler 200, in a sleek,
durable body, features a capless design to protect the USB connector
when not in use and is enhanced for Windows ReadyBoost. It is available
in 32GB, 64GB and 128GB capacities and carries five-year warranty. The
biggest advantage is the DataTraveler 200 is backed by Kingston brand
image plus a five-year warranty and 24/7 tech support. There are no
negative user reviews except for the pricing. But because a large
numbers of fake 128GB USB flash drives are today available, both from
China and on eBay, it is critical to understand and buy the authentic
Kingston USB flash drives.
If
you've found yourself here, chances are you need to know how to
install software on a netbook. You may have purchased one of these
new, petite notebook computers and are faced with the fact that it
does not have a built-in optical drive such as a CD-ROM or DVD-ROM
drives. Before you consider installing software on a netbook, make
sure that it is something that can be usable and worthwhile on it.
Chances are you will not very much enjoy playing World of Warcraft on
your netbook PC. So, how do you go about installing programs on a
netbook?
There
are a few ways to go about getting your software onto your new
netbook computer. The first, and absolute easiest way is to download
it from the internet. If it is available for download online, then
all you have to do is point your web browser at the download link and
away you go. Once your netbook has finished downloading the
software, then you simply open the installer or unzip the file and
then open the installer.
Install Netbook Software Using an External Drive
Another
way is to purchase an external optical drive that will plug in to
your netbook, usually either with a USB or a firewire cable. USB is,
by far, the most common for this type of peripheral. These drives
can usually be had for not too much money, and a bonus is you can use
your netbook to play CD's or, in the case of a DVD-ROM your netbook
could double as a portable DVD player to take on those camping trips
where you're really going to be roughing it.
Netbook Software Install With a USB Drive
One
of the most popular methods of installing software on a netbook
requires having a second computer with an optical drive and a USB
flash drive. If you do not have a USB flash drive, and need to
purchase one, make sure it is at least 4 gigabytes (GB). This is
slightly less than what a full DVD-ROM holds, on average, but is 5
times what a CD holds, so it should be large enough for most
installations. A flash drive of 8 gigs or more should be able to
take care of any installation task.
Hardrive
data recovery in Macs, Windows or, Linux computer operating systems is
at some point, inevitable since, data loss can occur at any given time
while using a computer. Thus the only way to forstall this is to be
properly prepared by having on hand, essential tools and software.
This hub hopes to
introduce
you to 3 hard disk drive data recovery software (because I don't wan't
to bore you to death) and/or tools that I personally picked. They are,
free and like said,personally tested.
To ultimately, arm you
with suitable data recovery services that, are free to use and also as
good as any expensive or cheap data recovery services/software out
there.
Also in this hub will be, some educational videos
discussing reasons for hard drive crashes and how best to recover data
from them.
This hub will provide you with links to download this
software and links to some other useful hard drive data recovery
information.
Plus a cool ipod data recovery software that I just
discoovered (when I lost some of my music)... well just read on and
we'll get to it further down the hub.
But before I
proceed, let me quickly state that when none of these tools can be of
any help, then I would advice that you get a good professional hard
drive recovery service which, you can find listed in your local
directory services and online.
As a statement of fact, the best
defense against data loss is real-time backup of data. That said, we
must understand that sometimes data loss can occur when you least expect
it. Whether the long minutes of this quarter's meetings refused to show
up when you opened an email attachment on your computer or your game
loving son, accidentally deleting all your business account files for
the previous year, having ready, hard drive data recovery tools is
important to getting your data back before it's gone for good.
3 Basic Types Of Hard Drive Crashes And How To Recover Data
So what happens when data loss occurs before a needed data back-up?
Computer
or laptop hard drive recovery software tools are designed to recover
lost files including video, documents and archives from hard disks.
These tools are needed even when real-time data back-up is performed, it
has the downside of needing constant updates. This is where the data
recovery tools can also help to recover accidental data loss that occurs
before updating backed up data.
Need I say why you require these hard drive data recovery tools?
To
be blunt and sincere, you need these tools to try and recover any type
of data that you have lost (accidentally or not).Now there are different
types of hardrive data recovery software and tools out there, they also
run under various plataforms (windows, Mac, Linux, etc.). Find below 9
of the best free ones available. Some are as good as the ones that you
have to pay for, but do not take this hub as being biased towards free
stuff only. After all,your data is important, and whatever
you do or spend to recover it is a reflection of how important that lost
(or rather, almost lost) data is to you.
This
is a user-friendly Windows OS software tool. Made by Piriform, this
software comes from a stable of well known and highly praised software
(e.g Ccleaner). Running Recuva, you can redeem missing files by using
either the user friendly file recovery wizard or the
application's manual mode for professional user's who know what they are
doing. The file recovery wizard is user friendly because you can recover data
when you're not sure not quite sure where the data went or how to
recover it back. Through the wizard, you can narrow down your search
type to pictures, video, documents, music files, or any kind of specific
files and you can set the search location to everywhere or specific
areas on your computer, like removable media only (usb's, SD cards,
removable hard druves, etc.), in my documents folder, the recycle bin,
or a particular location.
Working in manual mode, you can
search directly where you know the lost file should be. Recuva uses an
easy to understand, green/yellow/red lighting system as indicators to
show the possibility of success, the recovery of your files will be, and
when it has been retrieved, it can provide previews of the image files
available for recovery. Recuva also has a tool (like some other hard
drive recovery software) to securely wipe files you decide you don't
need and that you need to clear up space on your hard drive to help your
hard disk recovery process, Recuva can be downloaded here:
TestDisk (For Windows/Mac/Linux/Sun OS) TestDisk
is a one of the prime examples that open-source software and tools are
worth their 'salt'. This powerful tool for hard disk data recovery is
not just a basic file recovery that undeletes accidentally deleted files
from NTFS, FAT (W£indows) and ext2, ext3, &ext4 (Linux) file
systems, but it comes with an army of additional functionality that cuts
across different operational systems. Wether the OS of your hard drive
is, Windows, MAC or, Linux, TestDisk you can recover your entire boot
sector from a backup, can rebuild your boot sector, repair your MFT,
fix FAT tables, locate the ext2/ext3 backup, copy deleted files from
partitions to any available recovery media, and locate lost partitions
in many different formats to aid the location of lost data. The
downside though is, It's a command line tool, that means no GUI (not too
friendly for noobies or novices to dos commands). But it has loads of
documentation in the wiki
(like most open source stuff) that should get you knowing the ropes
without much trouble. This software packs some serious sh__, so don't
mess with it unless you lnow what you are doing. You can also download
it with PhotoRec to recover your digital pictures and file recovery. I'm
not going into that here, but you can read more by going to Testdisk's
site
PS: For
Mac users who think that you canm only experience hard disk data loss
but can't have mac security issues, take a look here and get yourself
protected: MAC SECURITY SOFTWARE FOR OS X AND LEOPARD.
Time is a precious commodity, especially if you're a system
administrator. No other job pulls people in so many directions at once.
Users interrupt you constantly with requests, preventing you from
getting anything done. Your managers want you to get long-term projects
done but flood you with requests for quick-fixes that prevent you from
ever getting to those long-term projects. But the pressure is on you to
produce and it only increases with time. What do you do?
The answer is time management.
A nice theory i've found is the one that is behind the "Get things Done".
Getting Things Done
has been developed by David Allen, and the best definition of what
constitutes the GTD is given by himself. I limit myself to briefly
define it as a methodology to manage the assets that a person has to
perform, which has the aim to maximize productivity and reduce stress.
One of the cornerstones of the GTD
is that to be the most productive and creative, you must have a clear
mind, so you must move all the things we have to remember out of your
mind, to put them in a system (paper or software, at our option) for you
to be fast and easy to use.
The method is to collect all things (emails, telephone calls, fees,
books, faxes, etc.) in an "input" (inbox), picking them up and wondering
what we have to make with them:
1. if do NOT require an action now, you are facing three options:
1. trash can
2. stores it for future reference
3. action is premature, we leave the action incubate inside a special list (Sometimes / Maybe)
2. if it requires an action, we must distinguish whether:
1. is composed of more than one action, then creates a special project
2. consists of a single action:
1. takes less than 2 minutes to run it: DO IT!
2. Require more than 2 minutes:
1. delegated to someone else and put it in the list of feedback (Waiting for)
2. "Move it" temporarily on the list of things to
do next (Next steps) or add to the agenda if it is absolutely necessary
to run at a given time.
No action should return to the inbox, only in this way we can be sure
that everything is processed and once we decide what to do with every
thing. Having already decided what to do and be ready when the action
will be take in hand the thing, relieves a lot of stress, you do not
need to take once again a decision on what to do. In this way everything
is reduced in a systematic way to manage a series of lists (todo list)
and an agenda that helps us to remember, depending on context and
timing, which are actions to be undertaken.
Getting things gnome
Getting Things GNOME
To remember their commitments using some programs or sites that help
you manage a list of things to do with notes and even warnings. Getting Things GNOME! is a new to-do manager that allows you to manage your business.
It is written in PyGTK and it works well in Gnome to be a software so
young. You can organize everything according to labels and easily write
extensions with the choice of using Python.
The application is available for any variety of Linux with Gnome
installed, but Ubuntu users can simply download a .deb file and install
it easily. Once you've installed the application you can use the quick
add box to start typing in tasks, and then drag and drop to rearrange
them into a hierarchy. You'll have to open the to-do item to edit the
tags, but if you want to create a task under a tag, ju
... Read more »
I have tried
a few of the large "user friendly" Linux distros. Spent a few days or
weeks of my free time trying to make everything work, but couldn't. For me the
lack of drivers were the biggest problem also (connecting either my broadcom
wifi card or the mobile internet card to use the internet).
Most of the
people have other (better) things to do in life than mess around with their
computer all the time just to have a all round working operating system. While
I'm not debating that Linux as an OS is better than Windows, Windows is just
easier to use and with Plug-and-Play Microsoft really beats all its
competitors. In fact, that is exactly why Microsoft beat all its competitors in
the early 90s.
Below I
will list some reasons why Linux, as a primary operating system on computers
(of course you can partition your disk and install both, just to play around
with Linux), does not come close to Windows:
No, or Limited Drivers
For
example, there is no, or very limited wireless card drivers which means there
is no internet connection on your computer. Nowadays Internet is pretty much a
must have to have a really productive work experience. Of course, you can (and
should) work offline, but you need to check your emails, send your work to
other colleagues or the boss. Also for Linux, to make sure that everything does
work, you constantly need internet connection (for new updates and drivers).
Windows is not as Internet connection dependent.
Updating
With Linux
you can update ALL of your programs with a single click. In Windows, only the
operating system upgrades, not everything. Me personally, I don’t want the
operating system to know what programs are installed. In this respect Privacy
is better in windows.
Linux
advocates say that to have your updates take affect, you don’t need to reboot
your operating system. In Windows you don’t need to either. They just install
when you start windows the next time.
Softwares and Applications you can Download is Limited
Those of
you who have even looked at other operating system applications beside Windows
(this also applies to Max OS-es, although to a lesser extent) the available
programs, applications, softwares, drivers, plugins and who knows what else.
3D Desktop: Linux Compiz Fusion vs. Windows
The reason
why this isn’t an advantage is because for most people Windows computers are
just workstations, they don’t care much how it looks as long as they can get
their job done. Me personally, the way those windows came up just really
annoyed me (I know, I can turn it off, but that too requires some time and
effort, I can spend better).
Installing Software is More Difficult
You have to
type in commands, always type in your username and password. In Windows you
just press two of three icons with the automatic pop-up installation wizard.
Additional Programs Installed During Installation Process
When you
install Linux many additional programs are installed also, many of which you
will probably never use, like and instant messenger. During Windows installation
only those apps are installed that everyone uses, so no wasting of your hard
drive space. And they are not as easy in Linux to delete as in Windows. Same
goes for the package manager in Linux, although they are pretty much just
installer files, the average user doesn’t need most of it.
Limited Plug-And-Play
Hardware
drivers are not recognized and downloaded automatically in Linux distros. This
probably doesn’t need much explanation; you just plugin your new camera,
printer or whatever, and it just works with Windows
Wine
There is a
program called Wine for Linux, which runs Windows programs under Linux, however
many programs don’t work too well with Wine. Also when you have to use and
other program to run a program or application in your operating system is just
doesn’t feel rights (somewhat lame, should I say?).
Open Source
This would
be and advantage for Linux if most Windows users cared to mess around with the
coding of the operating system, but as most Windows owners are users, not
developers, this isn’t really an advantage of Linux.
No Official Online Place to Turn to When You Have a Technical Problem
I know there are commercial companies and
websites for Linux too, but the feeling is just not the same when you turn to a
company that has made ALL the components of its operating system from the first
to the last code letter. Also forums for support aren’t the ideal; when you
need to have a technical problem to be fixed right away, forum help process of
I get back.
No Standardization
Many packages
(Linux name for programs and applications) just don’t install in other distros,
or you need other packages (dependencies) to install, which might still need
another package.
Graphical User Interphase (GUI)
Its user
interface (GUI) is a lot different than that of Windows (The order of apps and
programs, and the subfolder system is different in a many ways).
Better Gaming Experience
Many say
that Linux is more powerful for playing RAM resource demanding games. Most
people do not play games on windows, maybe only simple games like solitaire or
minesweeper when they are bored. You don’t need Linux for that
Safer
With all
the anti-virus, -malware, -spyware, -Trojan Horse, and -keylogger programs out
there, these are not much of an issue. In my years of experience with Windows
these programs were pretty effective in finding and deleting them. Also with
all the system optimizing programs, Windows can be run smoothly.
More Stable
Many people
say that Linux is a lot more stable, and it doesn’t crash. I have used Windows
for as long as I can remember, and it never crashed on me. It even froze only a
few times, but when you save your work with CTRL+S often you don’t really loose
your work, in fact, when I am working in MS Word, I usually save my work after each
paragraph or so (again, it just takes two keys to press simultaneously to do
so, and no popup windows will disturb you about the location of saving).
Boot-up Speed
Windows
loads within one or two minutes too. Meanwhile it loads, I always do other things,
and by the time I finish those, Windows is up and running. Who should care if
an operating system loads within 1 minute or 2 minutes, this is an argument
only for those who want to bash windows in everyway possible
Regular Clean Installs
Every year
or so you should backup (save it at an external driver, pendrive, DVDs, etc)
your files, and documents, and clean install your OS just get rid of all the
custom settings, apps, softwares, etc that you have not used in a long time,
and don’t need anymore. With everything out of box in Windows, Installing and
setting everything up again is a snap.
Warranty
As there is
a central company behind the operating system, and you payed for it, they
provide a guarantee, that if the operating system in not working properly, they
will fix it, or replace it. In Microsoft’s case that is 30 days. Also many
r
... Read more »
This
tutorial is intended for people who have some to a lot of knowledge of
computers, partitions and OS's. If you plan on formating your computer
you might consider my other hub:
The total time to do this all in 1 go should be around 3+/- hours. I wont post links on where to get the DVD's. (Google).
//Ay Guys I just installed the latest Ubuntu 10.04 and it
works great with dualboot for those wanting to experiement or a too
nervous of going the whole way..yum :)
What You Will Need.......To Get Started
Click edit above to add content to this empty capsule.
A copy of iATKOS, iPC, Kalyway DVD (Snow Leopard not supported yet)
Windows 7 RTM DVD
Ubuntu 9.10 (latest) DVD
A decent working computer/laptop
A second internet source (incase anything goes wrong)
Printed version of this guide (unless viewing off another machine)
Suggested Laptops are Dell Inspirons, Acer and HP.
.::Disclaimer::.
Click edit above to add content to this empty capsule.
I do not take any responsibility for any problems you recieve from
following this tutorial. By following the tutorial you are agreeing to
enhance your laptop/computer machine under your own responsibility and
desire.
Lets Begin :^)
Step1: Install Windows 7
Installing Windows 7 is easy and should take between 15mins - 40mins (machine dependent).
First you'll need to boot up with a Windows 7 DVD you presumably have
burned already. I Prefer erasing a hard drive and "clean installing"
Windows on there. Upgrade if you want doesn't matter. Once installation
is complete, reboot and your machine should go straight into Windows.
Set up Windows to your likings and install drivers if needed.
If you want Windows 7, Ubuntu and Mac OSX (Triple Boot) go to step 2.
If you want Windows 7 and Mac OSX (Dual Boot) go to step 3.
Step 2: Install Ubuntu (not necessary)
There are 2 main ways to install Ubuntu. I'll be doing the way I find easiest and user friendly.
Log
into your Windows and insert the Ubuntu Disk. If the installer opens
automatically great. If not browse the disk and look for Wubi. Run Wubi
and the installer should appear. As a installation option select
"Install inside of Windows". This is the easiest way to install Ubuntu
for even the most novice of computer user. Select a drive (Use the same
as Windows), select a minimum of 7 gigs of space for Ubuntu. Enter your
username and password for your new account. Installation should take
around 30 minutes or less.
Reboot your machine and Ubuntu should
appear under Windows 7 highlight it with the arrow keys and press Enter
button. Ubuntu will start up now. Install any nessesary programs,
drivers and explore your new Ubuntu :^) . Shutdown you machine.
Congratulations thus far you should have Windows 7 and Ubuntu Successfully installed and working. Grad a drink and food now.
Proceed to step 3 to install Mac OSX
Step 3: Install Mac OSX
Boot
up into Windows 7. In the start menu search "computer management" (Here
is were we partition a drive for Mac). In the left panel select Disk
Management and partition 15GB or more for Mac OSX. The Partition should
be formated as Fat32. Insert the Mac OSX disk and reboot.
Boot
into the Mac OSX disk. When prompted to install in 'x' seconds type "-v"
without quotation marks. A bunch of writing should appear and stay on
the screen for a about 5 mins or less.
When prompted go to Disk
Utility at the top panel and select to erase the partition you plan on
installing Mac OSX on. Format the partition as Mac OS Journal. Close the
window and select install. Let it install, this should take around 20
minutes. Afterwards Mac OSX with boot up, you may notice you don't have
sound yet and your resolution is the greatest.
Step 3: Install Mac OSX - - continied - -
Now its up to you to install the drivers your new Hackintosh machine
will require. For Dell Inspiron Users I'll be putting together a package
for you to download to get the drivers. But till then do a little
googling.
Almost done, we're heading to the final steps. When you
reboot and select Windows you'll notice that your unable to. Reboot your
computer but insert the Windows 7 (or even Vista) and select "repair"
when its done loading. Select "Startup repair", this should take about a
minute or so. Reboot and you'll notice Mac OSX is missing. Boot into
Windows 7 and download a program called "EasyBCD". Open the program and
select to add entry (We're going to add the Mac OSX entry. From the drop
down box select Mac. Under Drive select "boot". Now reboot and there
you go.
FINISH
Last thing you need to do is update your programs and software on your OS's. You've officially completed the Tutorial.
Don't be shy to check out my other pages and comment and take a short
look at the poll below, thanx..... don't forget to comment if it works
wel
Every computer user
on the planet is different. We have different tastes and want different
things for our computers. When it comes to choosing an operating
system, there are many rivals. By far, majority choose Microsoft
Windows. Another handful will pick Linux and some may choose Mac OS. If you are a Windows user and would like to use Linux instead, read further.
First of all, ask yourself why would you like to move to Linux? Is it because you feel Linux is better than Windows or are you simply being anti-Windows? Many people do not consider this question as something serious. "Oh an operating system
is an operating system." Wrong. Windows suits most users needs. Those
who either like to be different or just get sick of security patches
move to other operating systems. Once you have assessed why you'd like
to change, the next step in migrating is deciding which Linux
distribution you'd like to use.
There is are many (over 40) different distributions of Linux. Not sure which one to choose? Many users use Ubuntu which, like all other Linux distro's, is free. I do suggest you do some research into the different Linux's available and make an informed decision.
Cost also plays a huge part. While Linux can be installed on many computers
with no restrictions and for free, Windows must be purchased for each
individual computer and licensed. Hence, the more computers you have,
the higher the cost. Linux = free.
Next on the list is
support. For both Windows and Linux, there is professional support
available but for a fee. But if you have an internet connection, most
problems are easily solved on a forum or someone's blog. Linux is
community based and everyone can lend a helping hand.
Another
point for those wanting to move to Linux is that while Linux users can
use a program called WINE to run Windows programs on Linux, this is not
guaranteed and the program may not work. A useful suggestion is to look
up the company that created WINE-HQ and search the site for whichever
program it is you'd like to use. This way one can be sure that the
program will work. It may not be perfect, but remember it was designed
for Windows.
The above mentioned items are merely things to
think about before migrating to Linux. Once you have decided on a Linux
distro, first try to browse the operating system before you install it
to be sure this is what you want.
Windows and Linux can run
side by side as long as the system requirements are met. The
installation can be done by a professional or by yourself as long as you
know what you are doing.
I use Windows for gaming purposes
but Ubuntu for everything else. As an Ubuntu user for almost a year, I
would recommend it to anyone looking at a Linux distro. The last comment
I have to make must be expressed in capital letters:
DO NOT EXPECT WINDOWS WHEN YOU HAVE LINUX. THAT IS WHY IS IS CALLED LINUX , NOT WINDOWS.
With the release of Windows 8 consumer preview, my thoughts turn to how quick and unpredictable Operating Systems
(OS) have been. I remember the fluke that was Windows Vista, which
prompted PC manufacturers to package their systems with an OS other than
Windows, giving Linux's Ubuntu a try. I recall Windows 7 being the
savior and fix for Vista, and how before Windows 7 most people reverted
back to XP.
I digress. Today the general public is more aware of their options
for an OS, and with that awareness consumers are able to choose an OS
that fits their needs, thus changing the market dynamics of OS's. Here
is an overview of the world's top PC operating systems.
Definition of an Operating System
To kick this off, let's start with a definition of what an operating system is and does.
An operating system, or OS as it is commonly called, is the main
software that manages the hardware and programs of a computer. It
provides the user with an interface to interact with the hardware and
programs or applications installed on your computer.
That is the simple explanation. If you would like more of an explanation, check out this google search OS definition.
Windows 7 Snap
Want
to compare two windows side by side but hate re-sizing windows to do
it? Yeah, we all do. That's why Window 7 gives us snap, to easily do
side by side windows. Ahhh, painless.
Windows 7 Jump Lists
The
jump lists are a new feature that allow you to right click taskbar pins
to generate a list of frequently used items or items that you pin. An
example is right clicking your web browser to get a list of the last
tabs you closed, most frequented web pages, and pinned websites. A great
resource for quickly locating your items.
Windows 7 Peek
Windows
7 gives you the ability to 'peek' at your desktop when you have
multiple windows open. It does it by turning all other open tasks
transparent, giving you a glimpse at the desktop. This is especially
nice if you utilize widgets.
Windows 7 Aero desktop
Though
not available for Windows 7 starter, and with limited functions for
Home Basic, the Aero desktop enhances the look and feel of Windows by
providing some 2.0 updates, giving it a slick and shiny feel.
Windows 7
Windows alone makes up 80% of OS usage, according to WS3's OS Statistics. (Please note that these statistics are gathered from PC's that have accessed the internet.)
Until August of 2011, Windows 7 was behind or tied with Windows XP in
terms of use percentage. As of January of 2012, Windows 7 now accounts
for 47.1%
Even within this operating system we see several variants, with
varying degrees of features available. It would take considerable time
to explain in detail all the differences, so instead I give you a list
of editions and a link to Microsoft
to better understand the differences. Note that some of these editions
may not be available in your country. Currently the following editions
are available for Windows 7:
Starter
Home Basic
Home Premium
Professional
Enterprise
Ultimate
Since I won't be going into detail about these variations, I
will point out a few of the features that make Windows 7 a unique and
worthy experience, found to the right.
The requirements for running Windows 7 are (taken from Microsoft's website):
1 gigahertz (GHz) or faster 32-bit (x86) or 64-bit (x64) processor
1 gigabyte (GB) RAM (32-bit) or 2 GB RAM (64-bit)
16 GB available hard disk space (32-bit) or 20 GB (64-bit)
DirectX 9 graphics device with WDDM 1.0 or higher driver
There
are some older programs that have difficulty running on Windows 7
machines, but work flawlessly on XP. Yes, there are editions of Windows 7
that provide compatibility for Windows XP, yet nothing can top XP
itself for being able to run programs. Why else would Windows 7 need an
XP mode? There have been occasions where I have been unable to run
programs due to compatibility issues.
Windows XP is Familiar and Safe
XP
was a good product to begin with. Not great, but good. Especially as a
redeemer from Windows ME. Being a good product at start and then having
over ten years to update, patch, and service the OS and you have a
pretty stable and reliable product, which is why the Vancouver winter Olympics committee chose Windows XP over Windows 7.
Windows XP Performance on Older Machines
This
one is bound to cause some controversy since it still has not been put
to rest. However, it is worth noting that some people swear that XP
outperforms Windows 7, especially when it comes to gaming. There has
been one occasion for myself where I had to run a game in XP for
stability and performance.
The big thing to take away here is that it really depends on your
system. Benchmark performances indicate newer machines run Windows 7
better, whereas those with antiquated equipment will have better success
with Windos XP.
Windows XP
Coming in at 31.4%
of OS usage is the ever faithful and stalwart, Windows XP. When Windows
Vista flopped, it was Windows XP that stepped in and saved the day.
Consumers missed the ease and abilities of XP that they either did not
upgrade, or if they did they were quick to replace it with XP. It wasn't
just individuals doing this either. Corporations, small businesses, and
schools were all reverting back.
Let's take a look to the right at why XP is still beloved though it was released back in 2001.
Now don't get me wrong. I love Windows XP, because it has been such a
large part of my life being the OS I have most widely used. But Windows
7 goes above and beyond and really answers some of the needs of users,
maki
... Read more »
A free easy to use operating system (OS) for netbooks.
I
don't use my netbook that often, only when I am travelling away from
home. Windodows XP was OK but I became tired of spending lots of time
doing all the windows updates and updating the virus program, the
firewall and all the other programs I use just to keep it running
properly and securely. I had tried linux before but found setting it up
and getting all the hardware running was too difficult. Then I found jolicoud,
I put it alongside windows xp to start with but soon decided it had
everything I need and I no longer required windows. It is very easy to
use, adding programs or apps is easy and updating everything is quick
and simple. It is based on a linux OS but they have worked hard to make
sure everything works on netbooks. The only problem I had with my
Compaq Mini 700 was getting the microphone to work but that was simple
to fix.
All the free applications I need from the cloud.
Jolicloud
uses lots of free alternative versions of programs that most of us will
of used. The gimp is a great photo editing program, quite similar to
photoshop. Open office is similar to microsoft office. They also have
most of the programs I use all the time with windows, like firefox,
thunderbird, skype and spotify. Putting these on to the computer was so
easy, I registered with them, logged in to "My Jolicloud" found the
apps in the directory and clicked "install". This is an interesting use
of the cloud, I can see other operating systems working like this in
the future.
Changing an OS is a big step, the new layout takes a
bit of getting used to. Everything has been optimized for a netbook but
I am getting used to it and haven't had any real problems adapting.
So
far, I couldn't be more pleased with jolicloud. If you want to try it
out, you can use it alongside your current OS. Just go to their site, download the software, put it on a USB stick and follow their instructions.
Linux Mint is back to being #1 for many reasons. After using Ubuntu
11.10 and Linux Mint 12 for awhile, I have come to realize that Ubuntu
lacks the out-of the-box support that comes with Linux mint. Also Linux
Mint is more configurable.
--------------------------------
Old ranking (rev.2)
1. Ubuntu 11.10
2. Pinguy OS
3. Linux Mint 12
4. Zorin OS
5. joli OS
----
----
Old Ranking:(rev.1)
1. Linux Mint
2. Ubuntu
3. Zorin OS
4. Pinguy OS
5. joli OS
There
are plenty of Linux Distros out there but there's only very few that is
truly for beginners. So I have picked 5 distros that suit the category.
You might be curious about the factors that I considered when picking
the Top 5. Well, out of the box support is very important in picking
beginner distros. Other factors include: User friendly UI, easy
installation and great online support. The Distros below are well-known
for excelling in those areas.
Linux
Mint is known as the second most popular linux distribution simply
because of its user friendliness. It comes with loads of software
carefully picked by the team, media codecs and drivers. The distro works
so well out of the box you will not be spending any time trouble
shooting. The Distro always focuses on what is best for its users and
provides what the mainstream linux users demand. For example: Linux Mint
11 was released with the classic Gnome 2.32 interface because Gnome 3
and Unity posed stability issues. Linux mint is based on Canonical's
Ubuntu. Even though Mint is a polished Distro its default wall paper and
artwork collection is not very impressive.
EDIT: Linux Mint 12 was released in November 2011.
Pinguy
OS is an Ubuntu based distribution that comes with A LOT of software
preinstalled. It is great for users who want to explore the extensive
software that Linux has to offer. It is also very convenient because it
includes almost all the software that a user may require. Pinguy OS is a
fairly new distro but it is gaining popularity quickly. Pinguy OS
includes a Dock by default and the overall look of the desktop leans
toward OS X.
Ubuntu
is the #1 and the most popular distro out there. Even though Linux Mint
appeals more to new users Ubuntu has a rigorous release cycle and tends
to have more features implemented in each release. Ubuntu does not come
with a load of software and codecs pre installed like Linux Mint. So
new users may have trouble playing certain media formats and may require
a few command line installations but due to the excellent community
support they can be sorted out within minutes. Unlike Mint (speaking of
Linux Mint 10 and earlier) Ubuntu comes with excellent wall papers and
artwork.
Zorin
OS is optimized for users who are transitioning From windows. It looks
quite similar to Windows 7 and comes with "zorin look changer" that can
make your desktop look similar to older Windows versions and Mac OS X.
Zorin OS also offers four premium versions (Ultimate, Business,
Multimedia, Gaming) which are available upon donating. There is also a
free version that does not come with as much software preinstalled.
Joli
OS is a one of a kind distro and it is a very interesting one at that.
Its interface is built from HTML5 and installing apps is a piece of
cake. Joli OS is a cloud based OS that encourages the use of Cloud
applications. You can browse your application launcher from any computer
using the web browser so you can access your cloud apps even if you
don't have the machine that has Joli OS installed. Its interface is very
interesting and appeals to a lot of new users.
Fixing the "BOOTMGR is missing" error isn't too hard; here's how.
The day before yesterday I was testing out a program with several
system utilities built in. One of its components left my computer in a
bit of a mess – no icons anywhere and other assorted woes. I had set a
system restore point before I ran the program, so I thought I’d do a
system restore. System restore gave me a message that it couldn’t
restore my files. I decided to restore a disc image I had made a short
while back. When I booted up the computer I got a message:
BOOTMGR is missing
Press Ctrl+Alt+Del to restart
I stared at it the white letters on the black background for a few
minutes, while the cursor blinked back at me. After some searching (on
another computer) I had some solutions.
Barring any hardware errors, here’s how to fix that error:
Insert your Windows Vista or Windows 7 disk into your DVD player and restart your computer.
The next screen you see should have the Language, Time and Currency and Keyboard boxes.
In the lower left side there are two options: "What to know before installing Windows” and "Repair your computer.”
Click on "Repair your computer”
Windows will then try to find the installation directory for Vista or Windows 7, depending on what you have.
Next up is a screen with a box called Recovery Options. Click the first option, Startup Repair.
You’ll see a Startup Repair box with the message "Startup Repair is checking your system for problems…”
When it’s done, it will prompt you to reboot. If there is more than one problem it may reboot again to continue repairing.
At this point, you can remove the DVD, reboot and everything should be working.
Windows 7 is out. Ubuntu 9.10 is coming next week. Do you know what this means? It's time for a dual boot
tutorial. We have learned how to install Windows 7. We have learned how to
install Ubuntu.
Today, we will learn how to install Windows 7 AND Ubuntu, side by side on the same hard disk, in what is known
as a dual boot configuration. In the Ubuntu installation guide, I have promised you we would do this, so here
we are.
What are we going to do?
We are going to do what a typical Windows user would do:
We will install Ubuntu on a computer that already has Windows 7 installed. We will have to accommodate space
for our Ubuntu installation. To this end, we will use the GParted partitioning tool to resize (shrink) the
Windows installation and create new partitions for Ubuntu.
After Ubuntu is installed, we will have to deal with an error - a typical case of
unbootable Windows, a common problem that can occur when the Windows installation is changed. We will learn how
to deal with this problem simply and efficiently using the built-in tools, fixing the Windows boot issue. In
the end, we will have the two operating systems installed side by side in a dual boot configuration, both
working happily.
This tutorial is critical for any Windows user considering running Linux alongside his/her installation. Not
only will it teach the user how to interpret the hard disk layout and change it safely and smartly, it will
also expose the user to a seemingly catastrophic boot failure, which we will solve. This exercise in
dual-booting is as real as it can get.
Follow me.
Preliminary reading
To be able to fully enjoy this tutorial and follow all its minute details, you must invest some time in reading
older material, on which this guide is based. Lots of technical lingo in this tutorial references to detailed,
step-by-step instructions presented in the dedicated Windows 7 and Ubuntu installation guides, as well as
additional tutorials.
Please do not skip this section. While you can use this guide without any external help, you will greatly
benefit from studying the other articles. They will teach you the vital, fundamental basics in operating system
installations, disk management and boot loading procedure.
This is the classic case. A Windows user, who has already installed Windows on his/her machine would like to
try Linux. The user has heard of Ubuntu, which comes as no surprise, since
it is the most popular Linux distribution available. The user downloads the Ubuntu live CD image, burns it to
CD - and the fun begins.
Things to consider before trying Linux
Windows users need to consider carefully the pros and cons of testing a new operating system on their hardware.
Please go through the following list and see if any of the issues mentioned might be of concern for you.
There might be hardware issues
Linux distributions have good hardware support in general, but there's no such thing as perfect. You may be the
unlucky person whose hardware is incompatible with this or that edition of this or that Linux distribution.
This can cause problems in getting the operating system to boot or you might have to deal with missing drivers
after the installation.
The same holds true for Windows, but Windows usually comes preinstalled and you get a load of drivers when you
buy a new computer. Keep this in mind before venturing into uncharted territories.
Windows and Linux are different
Windows users have a notion of how things work based on their former experience with computers, mostly
revolving around one or more Windows releases. The Linux operating system is different. Mastering it takes time
and patience. Do not expect to become experts overnight or be able to solve all your problems early on. At all
times, you must remember that the two operating systems are different, they behave and act differently.
Data loss
Whenever you're about to change the existing installation, there's a risk of data loss, regardless of which
operating system you're about to install. It is important to make sure you have your critical data backed up to
external media. You should also verify that your backups are intact and that they can be restored.
Therefore, to install Windows and Linux together, you need to be confident your data is safely backed up and
you need to understand that there might be hardware issues with your installation. Likewise, the methodology to
solving the problems will differ from you're used to in Windows. As long as you keep these things in mind, your
dual-boot experience will be a pleasant one.
Boot into Ubuntu live CD session
Very fortunately, Ubuntu (as many other Linux distros) comes as a bootable live CD. This means you can boot
Ubuntu and test the hardware compatibility, without making any changes to your existing installations on the
hard disk. This is an excellent feature that lets you play with the operating system, get the first impression,
check different applications, and make sure all your hardware is properly detected.
This is what we will do. Boot into live CD, make sure everything works, then proceed with the installation.
Following the instructions in the Ubuntu installation guide should have you logged into the Ubuntu live session
in the matter of minutes:
Make sure your wired and Wireless network adapters are functioning, make sure your Bluetooth, Web camera, sound
card, and possibly the graphics card all work as expected. This is the first step to ensuring smooth and
painless installation and post-install experience. If you need guidance how to test all these, please refer to
any one of my Linux distro reviews, including Ubuntu 8.10 and Ubuntu 9.04 in particular. Once you're sure everything is ready, you can begin the
installation.
Truth to be told, you should NOT start the installation immediately, but we will do this anyway. I want to show
you how an average user might act and follow his/her train of thought.
Please note, it is okay to start the installation, but there is an ever better and smarter way to approach the
task. We will soon learn why and how. For now, let's double-click on the Install button.
This will begin the Ubuntu installation.
Prepare Disk Space (Partitioning)
The most important step of the installation is Step 4: Prepare Disk Space. In
technical terms, this is called partitioning.
Let us first examine the current situation:
Windows 7 is installed
Ubuntu wisely informs you that This computer has Windows Vista (loader) on it.
Good. This means that Ubuntu recognizes the existing installation.
Do not be confused about the Windows Vista terminology. Windows Vista and Windows 7 use the same bootloader,
hence the "erroneous" notation. This will definitely change in the coming version of Ubuntu.
Take a look at the existing layout. There's a small, 100MB Windows system partition present and another 13.6GB
partition in use, plus some free space. If you recall the Windows 7 installation, these are exactly the
partitions we created, both primary!
We now know that we should not touch or alert the small Windows system partition, but we might be able to
resize (shrink) the big NTFS partition in order to accommodate more space for Ubuntu. So far so good.
Let's see what else the installer offers us:
The default installation choice is to install Windows and Ubuntu side by side. Good. This is what we want.
Ubuntu even suggests its own recommended layout.
Windows 7 provides several options for conserving power when you are
not using your PC. These options include Sleep, Hibernate, and Hybrid
Sleep and are very useful if you are using a laptop. Here’s the
difference between them.
Note: this article is meant primarily for beginners.
Obviously ubergeeky readers will already know the difference between
power modes.
Sleep Mode
Sleep mode is a power-saving state that is similar to pausing a DVD
movie. All actions on the computer are stopped and any open documents
and applications are put in memory. You can quickly resume normal,
full-power operation within a few seconds. Sleep mode is basically the
same thing as "Standby” mode.
The Sleep mode is useful if you want to stop working for a short
period of time. The computer doesn’t use much power in Sleep mode.
Hibernate
The Hibernate mode saves your open documents and running applications
to your hard disk and shuts down the computer, which means once your
computer is in Hibernate mode, it uses zero power. Once the computer is
powered back on, it will resume everything where you left off.
Use this mode if you won’t be using the laptop for an extended period of time, and you don’t want to close your documents.
Hybrid Sleep
The Hybrid Sleep mode is a combination of the Sleep and Hibernate
modes meant for desktop computers. It puts any open documents and
applications both in memory and on your hard disk, and then puts your
computer into a low-power state, allowing you to quickly wake the
computer and resume your work. The Hybrid Sleep mode is enabled by
default in Windows on desktop computers and disabled on laptops. When
enabled, it automatically puts your computer into Hybrid Sleep mode when
you put it into Sleep mode.
Hybrid Sleep mode is useful for desktop computers in case of a power
outage. When power resumes, Windows can restore your work from the hard
disk, if the memory is not accessible.
Where are the options?
The Sleep and Hibernate options are accessed using the arrow button next to the Shut down button on the Start menu.
If you don’t see the Sleep option or the Hibernate option, it may be for one of the following reasons:
Your video card may not support the Sleep mode. Refer to the documentation for your video card. You can also update the driver.
If you don’t have administrative access on the computer, you may have to refer to the administrator to change the option.
The power-saving modes in Windows are turned on and off in your
computer’s BIOS (basic input/output system). To turn on these modes,
restart your computer and then enter the BIOS setup program. The key for
accessing BIOS differs for each computer manufacturer. Instructions for
accessing BIOS generally displays on the screen as the computer boots.
For more information, see your computer’s documentation or check the
website for your computer’s manufacturer.
If you don’t see the Hibernate option, the Hybrid Sleep option is
mostly likely enabled. We will explain how to enable and disable the
Hybrid Sleep mode later in this article.
How Do I Wake Up the Computer?
Most computers can be woken up by pressing the power button. However,
every computer is different. You might need to press a key on the
keyboard, click a mouse button, or lift the laptop’s lid. Refer to your
computer’s documentation or the manufacturer’s website for information
about waking it from a power-saving state.
How to Enable and Disable the Hybrid Sleep Option
To enable or disable the Hybrid Sleep Option, click Control Panel on the Start menu.
Click Power Options in the Control Panel window.
NOTE: If Power Options is not available, select Large icons or Small
icons from the View by drop-down list in the upper, right corner of the
Control Panel window. In the Category view, you can also click System
and Security and then click the Power Options heading.
On the Select a power plan screen, click the Change plan settings link next to the currently selected power plan.
NOTE: You can change the Hybrid Sleep option for either one or both of the power plans. The steps are the same for both.
On the Change settings for the plan screen, click the Change advanced power settings link.
On the Power Options dialog box, click the Change settings that are currently unavailable link.
Click the plus sign next to Sleep to expand the options, if they are
not already expanded. Click the plus sign next to Allow hybrid sleep.
Select Off from one or both of the drop-down lists under the Allow
hybrid sleep heading.
NOTE: You can also double-click on a heading to expand it.
By default, Windows requires a password to access the computer when
you wake it up from a power-saving state. You can use the Power Options
dialog box to turn this off. The first heading in the list box is the
name of the power plan chosen in the drop-down list above the list box.
Click the plus sign to expand the heading and select Off from one or
both of the drop-down lists under the heading.
Click OK to save your changes and then click the X button in the upper, right corner of the Control Panel window to close it.
How to Prevent Your Computer from Automatically Sleeping or Hibernating
However, if you are using a battery-powered laptop, be careful when
turning off the sleep or hibernate mode. If the battery dies when you’re
in the middle of working on the computer, you can lose data.
You can also change the amount of time before your computer goes into sleep or hibernate mode. Here’s how to do this.
Access Power Options in the Control Panel, and click the Change plan
settings link next to the currently selected power plan on the Select a
power plan screen, as we described earlier in this article.
On the Change settings for the plan screen, click the Change advanced power settings link.
NOTE: This article doesn’t work anymore. Please refer to this updated article instead forusing the windows key as start in ubuntu.
Ubuntu has a dropdown menu at the top of the screen to launch
applications, which is very similar to the way Windows has the start
menu at the bottom of the screen. If you are a windows user new to
Ubuntu, you may prefer to have the windows key launch the applications
menu. Thankfully this is an easy thing to do in Ubuntu.
Go to the System \ Preferences \ Keyboard Shortcuts menu item:
Scroll down till you see the "Show the panel menu” item. Click in
the Shortcut column, and when it changes to "New accelerator…”, hit the
Windows Key. Click the close button. You’re done!
Now when you hit the windows key, the application menu will pop up.
If you hit the right arrow key, you can go to the Places or System menu
as well.
Ubuntu has pretty good theming system, visual effects, and eye-candy
stuff, but you may love the elegance of Windows 7 Aero class,
transparency, or the Start Menu. Today we’ll show you how to transform
Ubuntu to look like Windows 7.
Of course, it won’t be an exact match, but it’s close enough that at
first glance a lot of people would think it’s Windows 7. Keep reading to
see how to do this.
Installing the Win7 Theme
Let’s start by entering some commands—just open up a terminal window and enter this:
This will download a script file that will be used later to tell your
computer what files to download to complete the Win7 theme packages
install. Once finished, a window will tell you that the installation
will start now so just press OK.
Another window will pop up asking if you want to continue, answer yes
for that window too. Now the terminal will begin downloading and
installing the theme. It may take some time depending on your Internet
speed. After that, a window like this will appear:
Press OK, then back in the terminal enter:
setup-win7-theme
This command will setup Win7 theme and your computer will start
transforming into windows style immediately. Wait for a few seconds and
you will see a window asking you to logout so logout and log in again
and this is what you will see:
Now your Ubuntu looks almost exactly like Windows. Congratulations!
Now you have WinBuntu! You can even right-click the start button and
choose "properties” to customize the start menu.
If you want, you can install Internet Explorer-like themes for
Firefox. You can also use Windows 7 wallpaper for you desktop to give it
a complete feel of Windows 7. The download links are down at the end of
the article.
Uninstalling the Win7 Theme
During the setup of Win7 theme script, a backup of the previous Gnome
settings got saved in your home folder, so if you ever get bored of
this theme, you can uninstall it and rollback to previous Gnome state.
The only downside though, is that there is no automatic uninstallation.
It’s not hard to do the uninstallation. Open your home folder there
should be a file named "win7-uninstall.tar.gz”, open it with your
archive manager and you’ll find your home folder, double-click it and
you’ll see your username, double-click it too. There should be a
".gconf” file, extract that file to your home folder.
Logout and log back in, that’s it. Your theme is back to normal gnome as if nothing has happened. Cool, isn’t it?
Forcefully uninstalling
In some cases when you try uninstalling the theme it won’t uninstall
completely, leaving some Windows 7 icons or desktop wallpaper. In cases
like this, you’ll have to remove the theme by deleting it’s files
manually but don’t worry, it is easier than you think. Just open up a
terminal window and type the following command followed by the enter
key.
rm -rf .gnome .gnome2 .gconf .gconfd .metacity
NOTE: This will restore your gnome appearance setting back to the default like when you first installed Ubuntu.


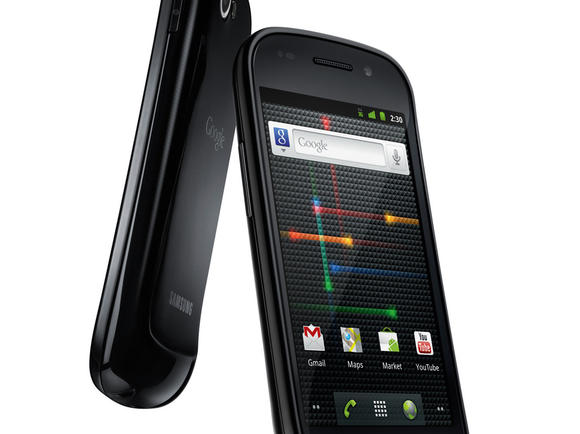 Google Nexus S - all the tips


 Ever since Internet Explorer beat Netscape and turned into the web
industry's least favourite boat anchor, Microsoft has been struggling to
turn the tide.
Ever since Internet Explorer beat Netscape and turned into the web
industry's least favourite boat anchor, Microsoft has been struggling to
turn the tide. 


 's changing. For starters, XP isn't supported – unless you're on at least Vista, you can't use it.


")
")


